An Iowa classic, a tasty tender fried pork tenderloin sandwich. Indiana, Missouri, and even Ohio have laid claim to this traditional comfort food. Maybe I will just say midwest to include everybody.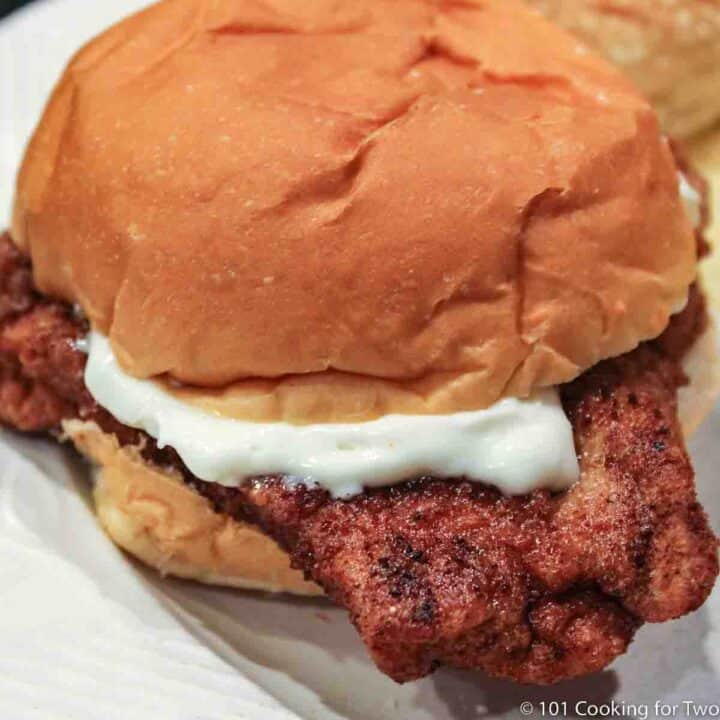
Jump to:
![]()
Pork Tenderloin Sandwiches Discussion and My Rating
The pork tenderloin sandwich is made with a breaded and fried pork cutlet similar to the Wiener Schnitzel. Oddly enough, it is generally made with mechanically tenderized pork loin, not tenderloin. It was the perfect recipe for the opening day of the Iowa State Fair, which is when I first published this recipe.
For you non-Iowans, this is a small town classic. Almost every small town in Iowa has a restaurant that will claim to have the best, most award-winning or the biggest tenderloin sandwich.
You don’t need to say pork, it is understood, it is just called ” a tenderloin sandwich.” The pork producers have a yearly contest to pick the best restaurant version. There are web sites dedicated to this much-celebrated delicacy.
The Des Moines Register has a yearly roundup of the best tenderloin sandwiches in the state. It is a much-coveted award that will be talked about for decades. It has been, it is, and always will be a much loved Iowa tradition.
I hear that Indiana has the same fanatical love for the tenderloin sandwich, and it is embedded in their Hooser hearts. In the interest of midwest comradeship, they may use my recipe. And may your supply of Iowa raised pork and Iowa made John Deeres last forever. I will give on the cover bridge thing.
My Rating

Maybe it is a 4 without the memories, but it’s a 5 to me and everybody in the midwest.
🐖The Meat
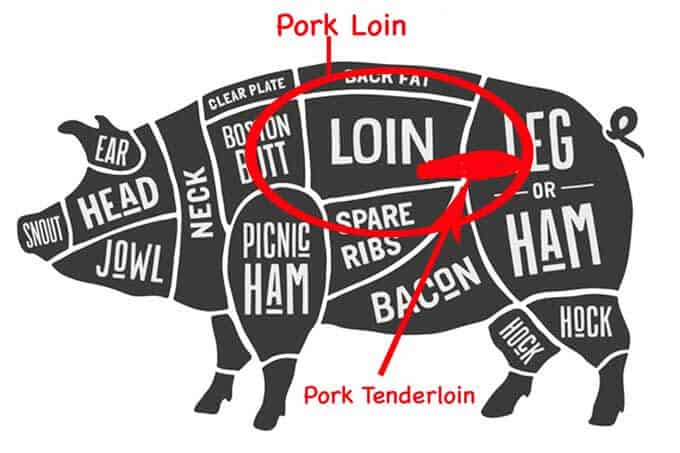
You would think it is pork tenderloin, but you would be wrong. It is almost always pork loin (think boneless pork chop here).
Most of these are made with pork loin that is mechanically tenderized. In most grocery stores in Iowa (I’m thinking of you Hy-Vee) and some other states, the tenderized pork loin is common specifically for this sandwich. Many times sold already breaded.
But, I suggest using pork tenderloin, which is more “tender,” tastier and my preferred meat here. Since the meat is smaller in diameter, I butterfly slices and flatten them.
🥣The Coating
The wash: I suggest, and most other recipes use egg or egg with milk. Several used milk or buttermilk alone. I went with egg with some milk added. An egg wash will stick better.
The breading: I suggest a flour base with some breadcrumbs to add more crunch. Also, I’m adding some spice that seems to be lacking in most tenderloin sandwiches. Even with that, it is a bit bland.
There are other recipes that were flour without even any salt or pepper. There are some with onion powder, onion salt, garlic powder, garlic salt, oregano, paprika, and a few other spices I don’t remember. There were cracker crumbs, bread crumbs, Italian bread crumbs, panko bread crumbs, and cornmeal.
Getting the coating to stick better:
-Start with very dry meat. Dry with a paper towel before starting to coat.
-Use egg as the wash.
-Let it the coating sit for 5 minutes before cooking.
-Don’t play with your food. Wait for the edge color change before flipping.
-When you do a flip, use a fork and stick it on edge. Try only to flip once.
♨️Cooking
This is a stovetop frying recipe, so we are shallow frying using oil in a large frying pan. You can use those countertop deep-fryers if you have one.
So start with a large frying pan, I’m using a 12-inch cast-iron pan. But other pans can be used.
The oil should be a neutral oil, like corn or canola. The oil temperature needs to be monitored and kept between 350° and 375°. Start at the high end of the range since the temperature will drop when the tenderloins are added.
✔️Final Tips
From all the above you should conclude…. do what you want. Everyone will swear by their method, and I’m sure they are all fine. Mine is simply tasty and melts in your mouth good with not much work.
If the oil gets colder than 325°, the coating will absorb more oil. But too hot oil will burn. I recommend 350° to 375° as your goal, but 325° to 375° is OK.
You can store after cooking for a few days and reheat in the oven at 400° for about 10-15 minutes. You can freeze after cooking.
One commenters froze after coating, but before cooking, I have not done this, so I can’t endorse it.
A final point– this is frying and makes a bit of a mess at times. See the oven-fried recipe below.
Oven Fried Pork Tenderloin Sandwiches
Oven Fried Chicken with Gravy
30-Minute Chicken Fried Steak with Gravy
Fried Pork Chops with Gravy![]()
![]()
🖼️Photo Instructions
Start with about a quarter-inch of oil in a large pan. I used a 12 cast-iron chicken fryer, but any large, heavy frypan would work. Preheat oven and a tray to 200° to use to keep batches warm while you do additional pieces. Put the oil over medium heat and heat to 350°-375°, but not more. You need to check the temperature frequently, and a good instant-read thermometer is great here.
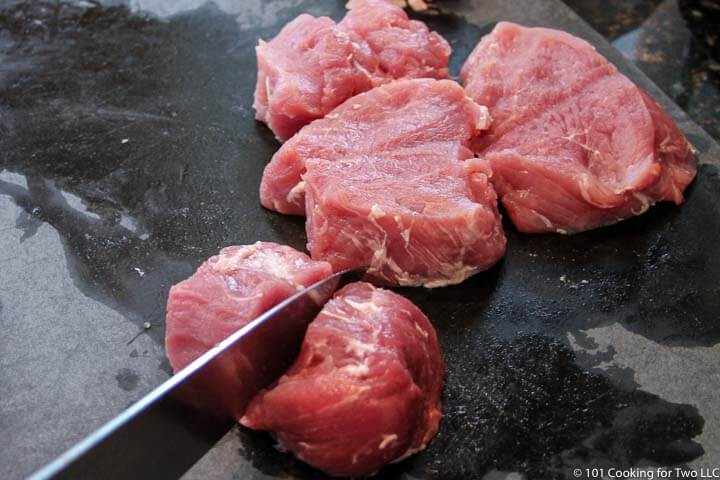
Trim pork tenderloin of any fat and silverskin. Now cut into four equal size pieces. You are going for approximately equal weight. Next, “butterfly” the pieces. Do this by cutting 3/4 of the way, though, and fold it back to double the size.
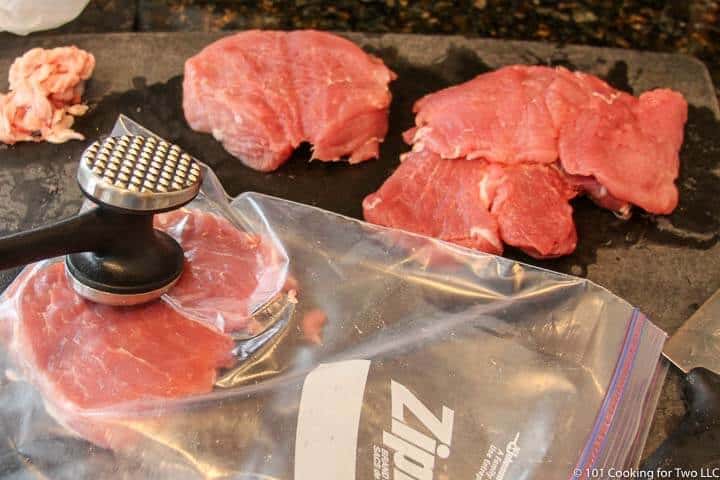
Next cover with plastic wrap or put in a ziplock bag and pound to 1/4 inch thick.
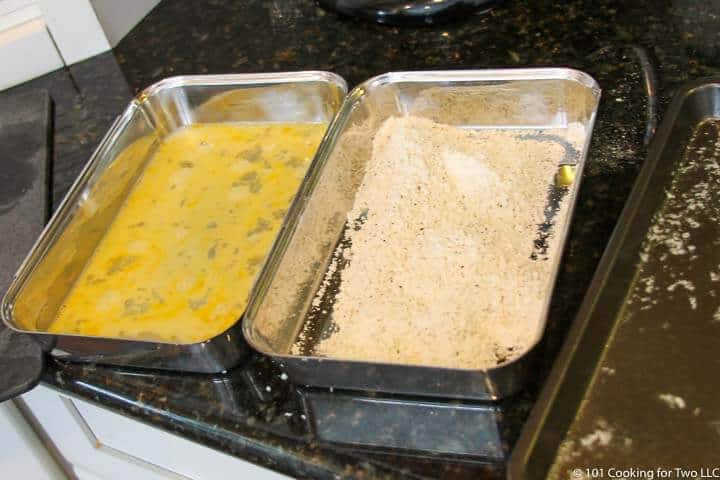
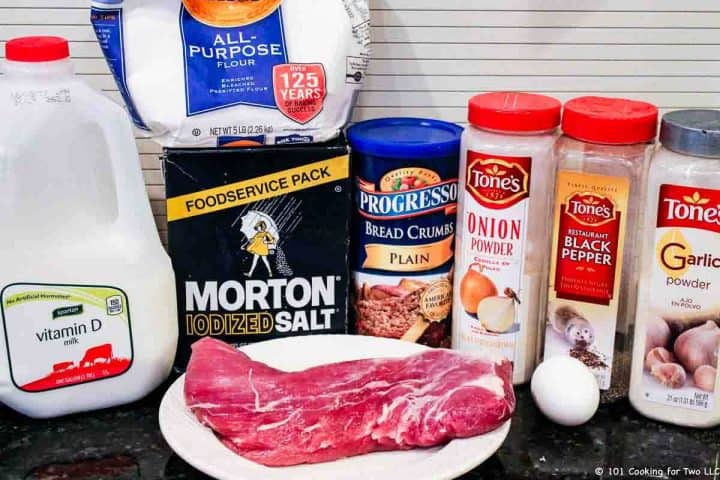
Set up two pans. In the first, combine one egg and 1/2 cup milk. Whip well. In the second pan, 1 cup flour, 1/2 cup bread crumbs, 1 teaspoon salt, and 1/2 teaspoon each of pepper, garlic powder, and onion powder.
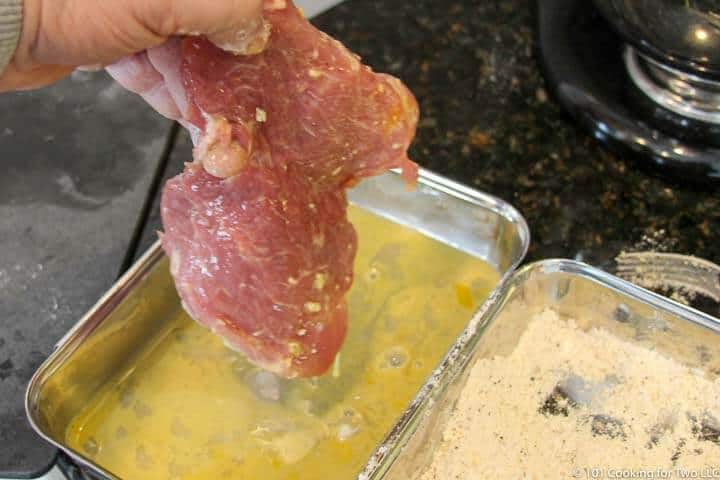
Dry the meat well with paper towels. Start coating the meat with the egg wash. Shake to remove excess. Coat well in the flour mixture and shake off excess. Try to let them rest for about 5 minutes before starting to cook.

Do not “crowd the pan.” Place in the 375° oil. Fry for 3-4 minutes per side. About a minute into each side, shake the pan a little to move the meat a little, this will keep it from sticking and help it be crispy. See the color change at the edge in the picture. The meat is saying, “turn me now.”
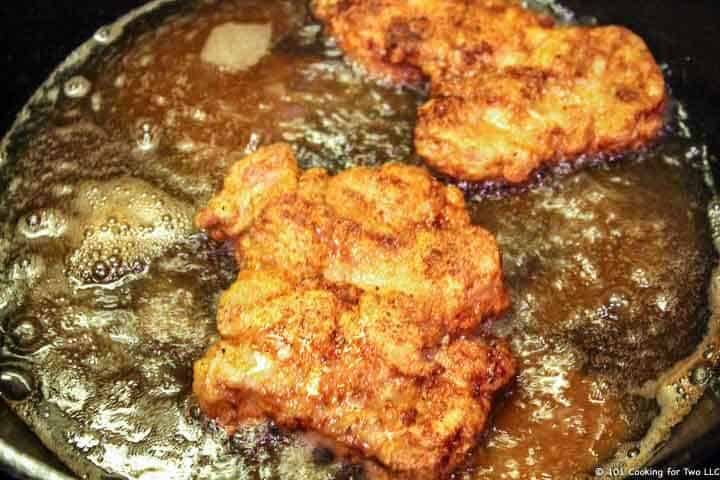
Cook until golden brown and internal temp of 145° plus. You will need to adjust heat to keep the oil in the 350° to 375° range. You will not be able to keep it perfect, but be aware you need to turn up the heat. Between batches, you should turn the heat down to keep it from overheating.
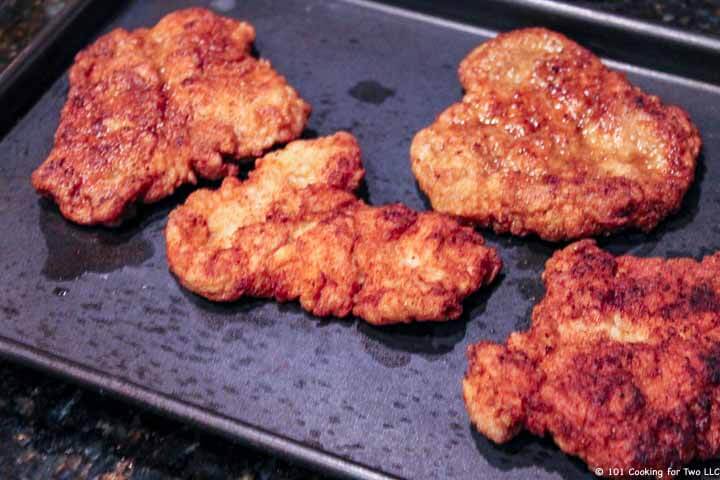
Transfer the completed tenderloin to the heated oven and pan to keep warm for serving. Continue to cook your batches of tenderloins.
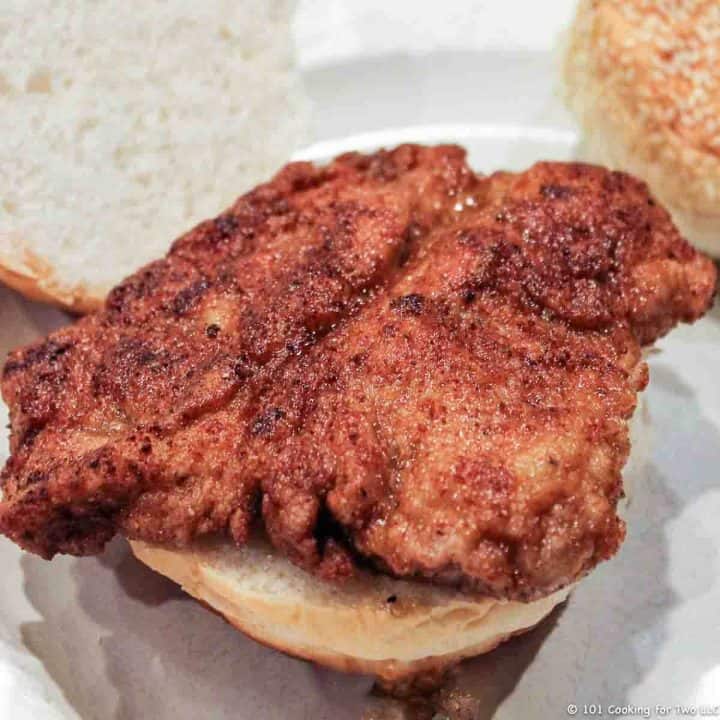
I like mine on a bun with mayo. Many will add a pickle, also.![]()
![]()
Do you want more recipes from 101 Cooking for Two? Sign up for the newsletter and get all posts delivered straight to your inbox!
![]()
📖 Recipe
Iowa Breaded Pork Tenderloin Sandwiches
An Iowa classic, a tasty tender fried pork tenderloin sandwiches. Indiana, Missouri, and even Ohio have laid claim to this traditional comfort food. Maybe I will just say midwest to include everybody.
Prep Time10 mins
Cook Time16 mins
Total Time26 mins
Servings/Adjust Amount: 4 servings
4
Ingredients
- 1 pork tenderloin – trimmed
- 3/4 cup oil – corn or canola
- 1 egg
- 1/2 cup milk
- 1 cup AP flour
- 1/2 cup bread crumbs
- 1 teaspoon salt
- 1/2 teaspoon pepper
- 1/2 teaspoon onion powder
- 1/2 teaspoon garlic powder
Instructions
-
Start with about a quarter-inch of oil in a large pan. I used a 12 cast iron chicken fryer, but any large, heavy frypan would work. Preheat oven and a tray to 200° to use to keep batches warm while you do additional pieces. Put the oil over medium heat and heat to 350°-375°, but not more. You need to check the temperature frequently and a good instant-read thermometer is great here.
-
Trim pork tenderloin of any fat and silverskin. Now cut into four equal size pieces. You are going for approximately equal weight. Next, “butterfly” the pieces. Do this by cutting 3/4 of the way, though, and fold it back to double the size.
-
Next cover with plastic wrap or put in a zip-lock bag and pound to 1/4 inch thick.
-
Set up two pans. In the first, combine one egg and 1/2 cup milk. Whip well. In the second pan, 1 cup flour, 1/2 cup bread crumbs, 1 teaspoon salt, and 1/2 teaspoon each of pepper, garlic powder, and onion powder.
-
Dry the meat well with paper towels. Start coating the meat with the egg wash. Shake to remove excess. Coat well in the flour mixture and shake off excess. Try to let them rest for about 5 minutes before starting to cook.Do not “crowd the pan.” Place in the 375° oil. Fry for 3-4 minutes per side. About a minute into each side, shake the pan a little to move the meat a little, this will keep it from sticking and help it be crispy. See the color change at the edge in the picture. The meat is saying, “turn me now.”Cook until golden brown and internal temp of 145° plus. You will need to adjust heat to keep the oil in the 350° to 375° range. You will not be able to keep it perfect, but be aware you need to turn up the heat. Between batches, you should turn the heat down to keep it from overheating.Transfer the completed tenderloin to the heated oven and pan to keep warm for serving. Continue to cook your batches of tenderloins.I like mine on a bun with mayo. Many will add a pickle, also.
-
Do not “crowd the pan.” Place in the 375° oil. Fry for 3-4 minutes per side. About a minute into each side, shake the pan a little to move the meat a little, this will keep it from sticking and help it be crispy. See the color change at the edge in the picture. The meat is saying, “turn me now.”
-
Cook until golden brown and internal temp of 145° plus. You will need to adjust heat to keep the oil in the 350° to 375° range. You will not be able to keep it perfect, but be aware you need to turn up the heat. Between batches, you should turn the heat down to keep it from overheating.
-
Transfer the completed tenderloin to the heated oven and pan to keep warm for serving. Continue to cook your batches of tenderloins.
-
I like mine on a bun with mayo. Many will add a pickle, also.
Recipe Notes
Pro Tips:
- This recipe will work with tenderized pork loin also.
- Use the coating you want. Vary the spices and components
- Temperature of your oil is very important. I suggest corn or canola oil.
- To help the coating stick better:
-Start with very dry meat. Dry with a paper towel before starting to coat.
-Use egg as the wash.
-Let it the coating sit for 5 minutes before cooking.
-Don’t play with your food. Wait for the edge color change before flipping.
-When you do a flip, use a fork and stick it on edge. Try only to flip once. - Good refrigerated after cooking for 2-3 days or frozen for about 3 months. Reheat after thawing in a 400° oven for 10-15 minutes.
Check Out Other Great Recipes

![]()
Nutrition
Calories: 540 kcal | Carbohydrates: 36 g | Protein: 44 g | Fat: 23 g | Saturated Fat: 5 g | Polyunsaturated Fat: 3 g | Monounsaturated Fat: 14 g | Cholesterol: 164 mg | Sodium: 736 mg | Potassium: 748 mg | Fiber: 2 g | Sugar: 3 g | Vitamin A: 150 IU | Vitamin C: 2.5 mg | Calcium: 90 mg | Iron: 4.3 mg
Nutrition is generally for one serving. Number of servings is stated above and is my estimate of normal serving size for this recipe.
All nutritional information are estimates and may vary from your actual results. This is home cooking, and there are many variables. To taste ingredients such as salt will be my estimate of the average used.
Originally published August 9, 2012. Updated with greatly expanded options and explanations. Photos have been refreshed and a few from other cookings added to help with the explanation. Finally, a table of contents and puppy picture.