Preheat the oven to 350 degrees F. and cut the tip of the garlic off to leave the cloves exposed.
Drizzle with the 1 Tsp. olive oil and wrap it up in foil.
Place it in the oven to bake for about an hour to roast.
While the garlic is roasting, whisk together the ingredients for the seasoning; 2 Tsp. salt, 2 Tsp. red pepper, 1 Tsp. marjoram, 1 Tsp. basil, 1 Tsp. oregano, 1 Tsp. thyme, and 1 Tsp. pepper.
Cut the chicken tenders in half (or don’t!) and and place in a large ziplock back to season with about 2 Tbsp. of the seasoning; place in the fridge to marinate for at least 30 minutes and up to overnight.
Once the garlic is done roasting, allow it to cool slightly before removing the roasted garlic cloves from the bulb (It should squeeze right out.)
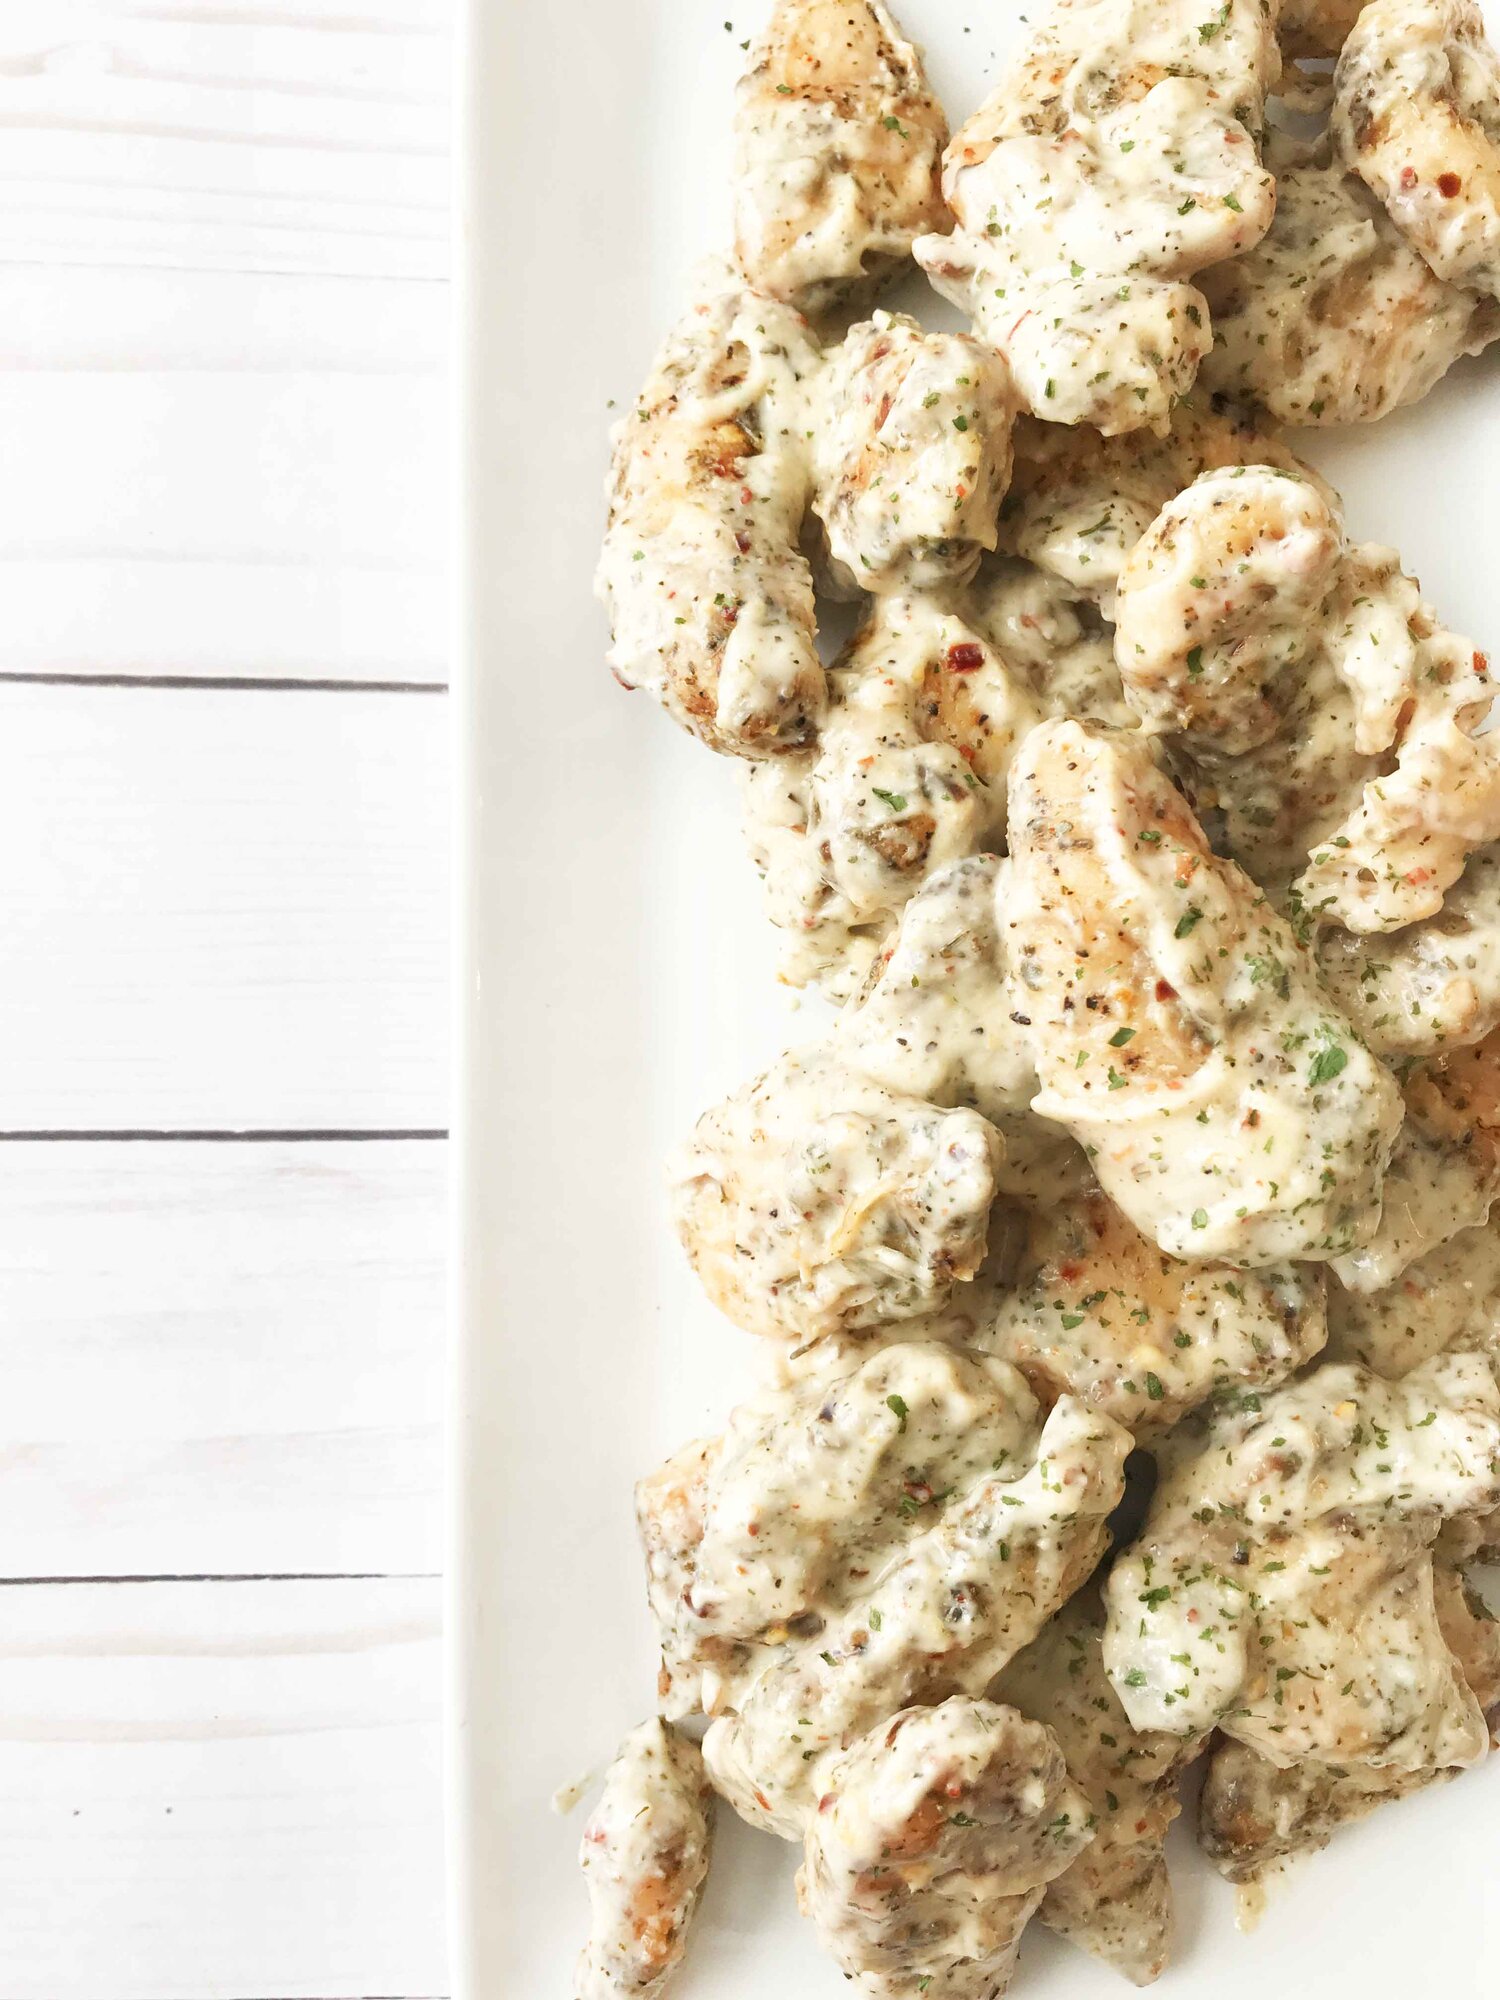
Place the roasted garlic, 1/4 C. greek yogurt, 1/4 C. mayo, 2 Tbsp, parmesan cheese, 1 Tbsp. corn syrup, 1 Tbsp. apple cider vinegar, the remaining 1 Tbsp. of seasoning, and 1 Tsp. lemon juice together in the cup for an immersion blender or regular blender. Puree down until smooth and creamy; cover and place in the fridge to keep cool.
Once the chicken has marinated, preheat the oven to 400 degrees F. and line a baking sheet with foil or a silicone baking mat for easy clean up. Place a wire rack or two over the baking sheet and set aside.
Remove the chicken from the fridge and toss to coat lightly with cornstarch. Dust off any loose remaining cornstarch and place on the prepared wire rack on the baking sheet.
Give a light spritz of non-stick baking spray and place in the oven to bake for 20 minutes.
Remove from the oven, flip the pieces of chicken over, give them another spritz of non-stick spray, and bake for another 20 minutes.
Once done and cooked through to temperature, remove from the oven and toss to coat with the parmesan garlic sauce.
Sticky Chicken is baked in a deliciously different homemade honey soy sauce barbecue sticky sauce. We like to serve it over yellow rice and spoon extra sauce on top for the rice to soak in. You’ve got to taste this sauce! It’s like no other.
If I had to pick the one supper my family enjoys most these days, it’s Sticky Chicken. In fact, when we have our special family supper on Friday nights, 50% of the time, Sticky Chicken is on the menu just because I like how excited everyone gets when they know it’s coming. I’ve even made a promise to our bonus daughter (Katy’s best friend) that I will never have Sticky Chicken without inviting her over – and so far she has never missed an opportunity to be here for this. I make sure to cook extra to send home to her family, too. Seriously, this is THAT special of a meal at my house.
The original recipe requires bone-in, skin-on chicken. The skin was key for all that wonderful sticky sauce to have something to stick to. I’ve since modified the recipe to make it work with boneless skinless chicken breasts because: A. They are everyones favorite. and B. They are easier (and often cheaper) to find these days. I always have some in my freezer.
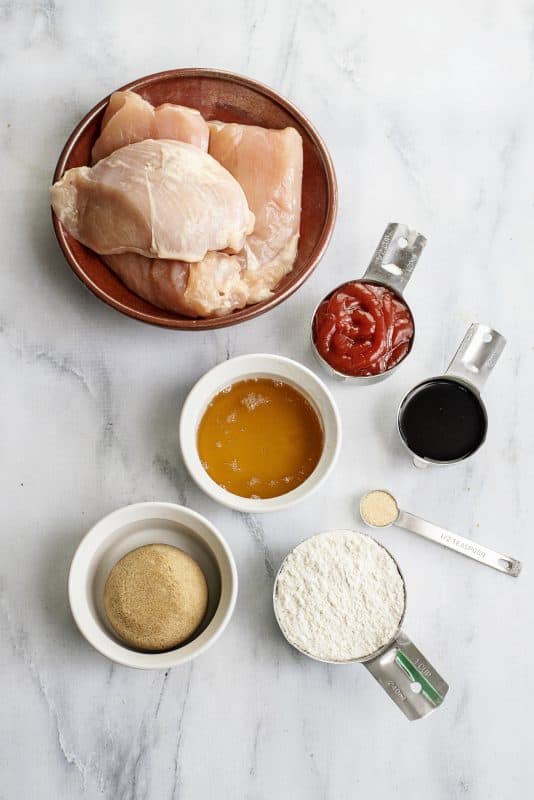
You’ll need: Boneless Skinless Chicken Breasts, Honey, Brown Sugar, Ketchup, Soy Sauce, Garlic Powder, and All Purpose Flour*.
*Self rising will do just fine if that is what you have.
To make the sauce, simply place all of the ingredients in a 2 cup measuring cup and stir well. Place this in the microwave or a small sauce pot. If using the microwave: Heat for one minute and stir. Repeat in thirty second intervals, stirring after each, until smooth and well blended. If using a sauce pot: Heat over medium heat, stirring often, until it becomes hot enough to blend together well, with no lumps.
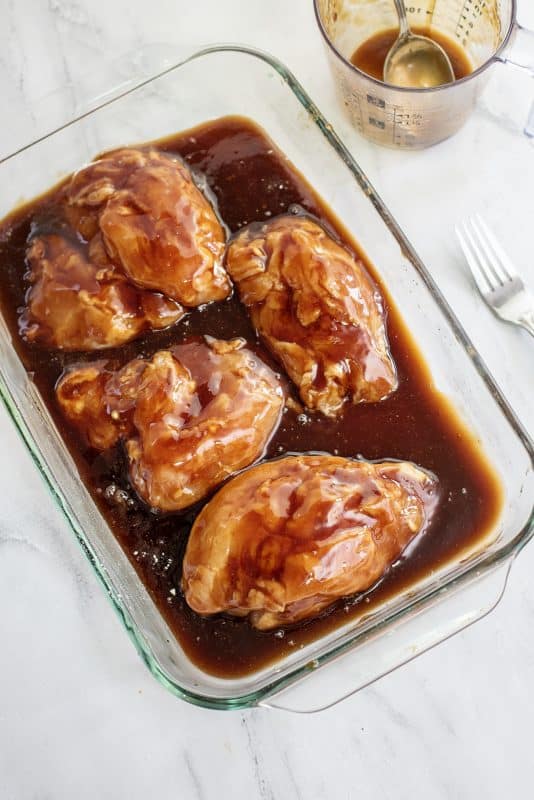
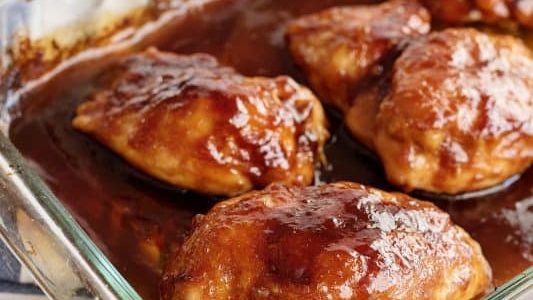
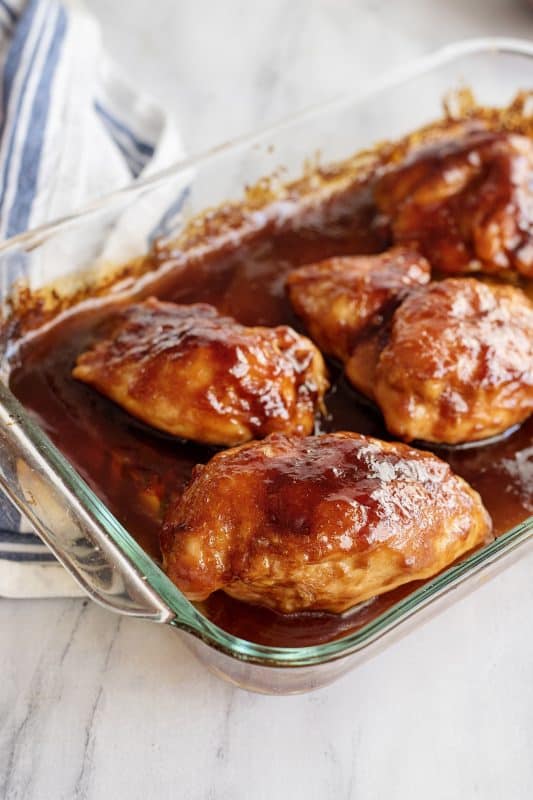
Pour just a bit of this wonderful sauce in the bottom of a 9×13 baking dish. Spread to coat the bottom of the dish.
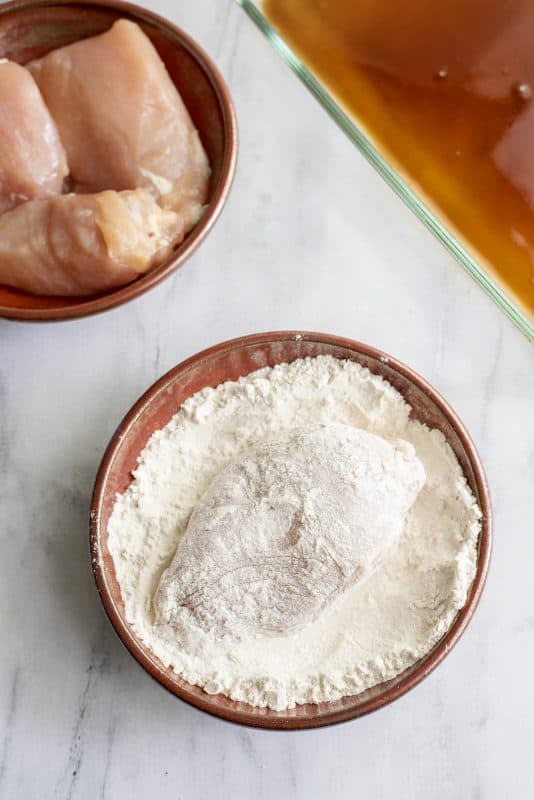
Place flour in a shallow bowl and just press each side of each chicken breast into that so that it is lightly coated.
Place these in your baking dish.
Spoon remaining sauce over the top. Place in 350 degree oven, uncovered. After 30 minutes, remove from oven and carefully flip chicken pieces over. Spoon sauce from baking dish over them again and return to oven for another 15-30 minutes, or until chicken is fully cooked. Baste it once more during this time.
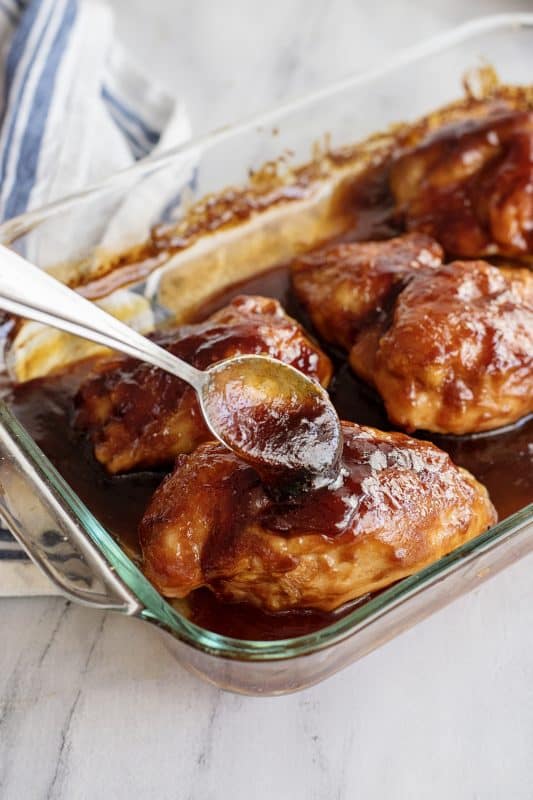
Remove from oven and baste again (without returning to oven). Allow to sit for five minutes and baste once more before serving.
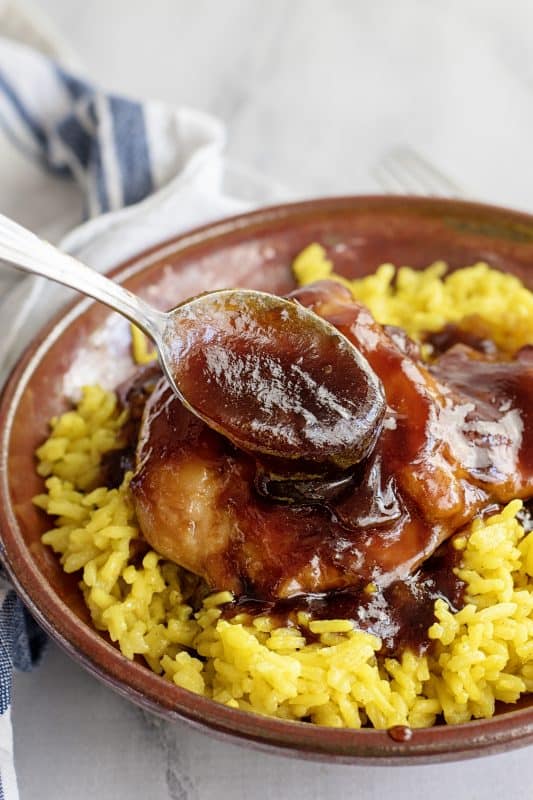
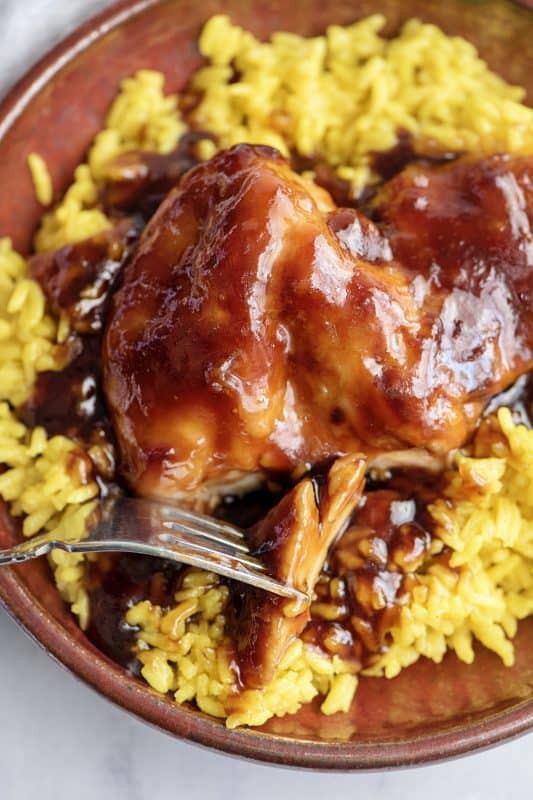
Excellent served with yellow rice or mashed potatoes so you can spoon some of that delicious sauce over them!
I hope your family and friends love this as much as mine does.
Ingredients
4boneless skinless chicken breasts
1/2cuphoney
1/2 cupketchup
1/2 cupbrown sugar
1/4cupsoy sauce
1/4teaspoongarlic powder
Instructions
In medium bowl or large measuring cup (I use a 4 cup measuring cup) stir together ketchup, soy sauce, honey, brown sugar, and garlic powder until well combined. If using the microwave: Heat for one minute and stir. Repeat in thirty second intervals, stirring after each, until smooth and well blended. If using a sauce pot: Heat over medium heat, stirring often, until it becomes hot enough to blend together well, with no lumps.
Place enough sauce in the bottom of a 9×13 baking dish to be able to spread it around and cover the bottom.
Place 1 cup flour in a shallow bowl. Dip each chicken breast into flour on both sides and place in the baking dish top side down. Spoon remaining sauce over, making sure to coat the chicken.
Place in 350 degree oven, uncovered. After 30 minutes, remove from oven and carefully flip chicken pieces over. Spoon sauce from baking dish over them again and return to oven for another 15-30 minutes, or until chicken is fully cooked, basting once more while cooking.
Remove from oven and baste again. Allow to sit for five minutes and baste once more before serving. Excellent served with yellow rice or mashed potatoes so you can spoon some of that delicious sauce over them!
Click here to see my original bone-in sticky chicken recipe Check out my Facebook page here and Instagram here.
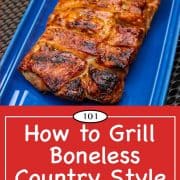
Learn how to grill boneless country-style pork ribs with these easy to follow step by step photo instruction. Great taste with minimal work.
Jump to:
Introduction and My Rating
Boneless country-style ribs are one of my favorite “cooking for two” meals. It is about the right size with two large serving or 3-4 more reasonable size servings.
They are also cheap, cook rapidly, and freeze well. And finally, they are lean and healthy with great taste.
It is leaner than lots of pork (healthier). And they can be prepared in many ways (grill, stovetop, and oven). You just need to know-how.
My rating:
Low 5 or high 4. Great taste, and the drying was minimal.
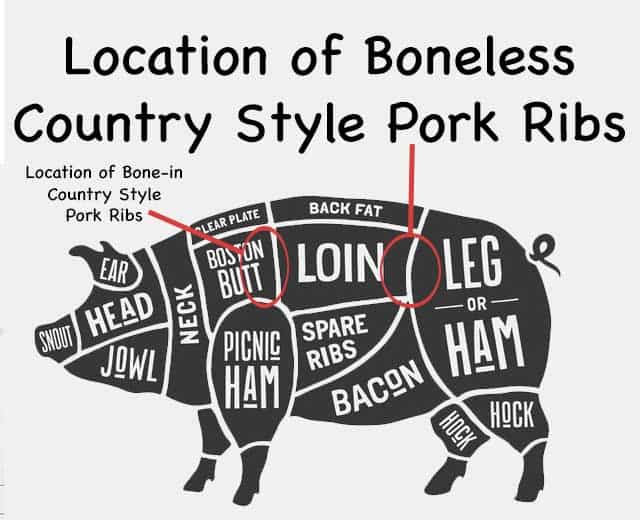
🐖What are Boneless Country Style Pork Ribs?
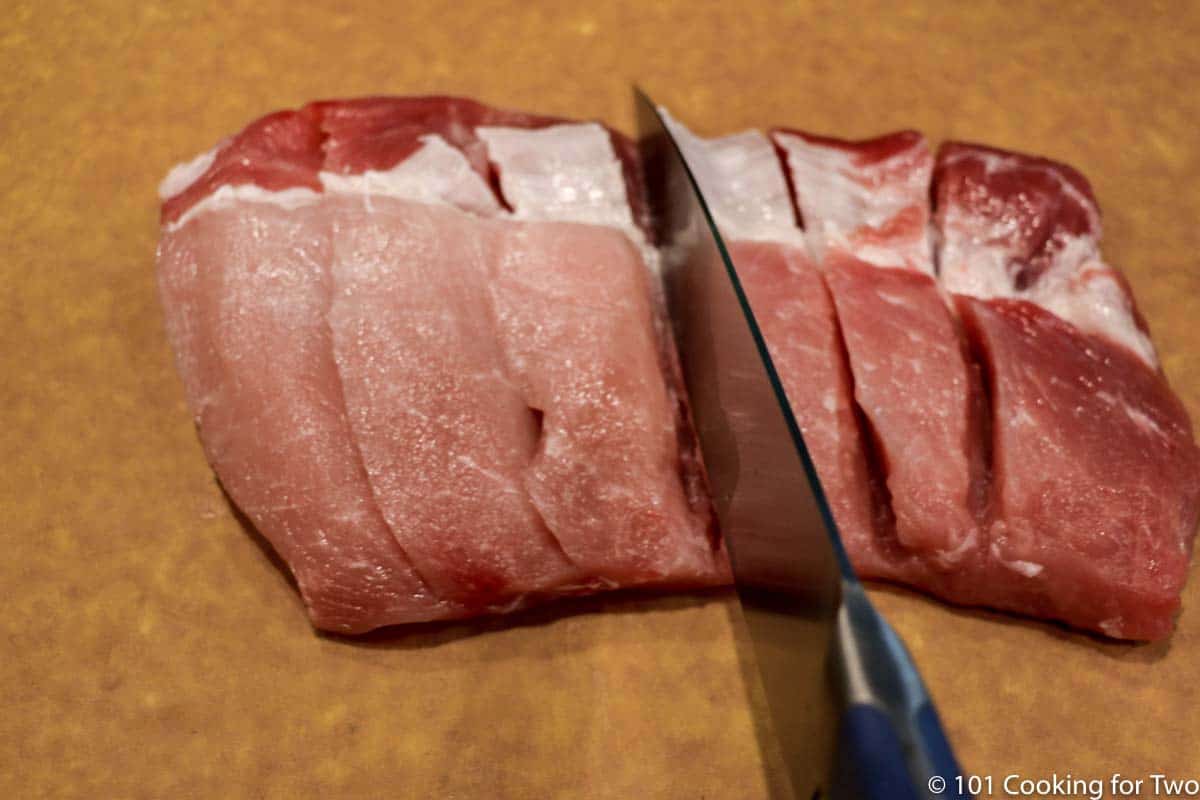
Boneless country-style pork ribs are not real ribs. They are the tail end of a whole pork loin cut in half and scored to make “ribs.” So more a pork chop than real ribs.
Usually, that scoring is not very deep, so I like to deepen the cut to a little over half the thickness of the meat. I consider this to be more surface area for seasoning.
Unfortunately, there are also “bone-in country-style pork ribs,” which may get confused with the boneless variety. The boneless are the tail end of a pork loin and are lean while the bone-in variety is more like a slice of pork shoulder.
The bone-in ribs need to be cooked more like a pork shoulder (AKA pork butt), meaning low and slow while the boneless ribs are lean and are usually cooked more rapidly.
If you have the bone-in country-style ribs, check out Slow Grilled Bone-In Country Style Pork Ribs.
🧂To Brine or Not
These “ribs,” because they are lean, can tend to dry if overcooked. But if not overcooked, they can stay moist like a nice pork chop.
A brining would fix some of the moisture issues and add taste depending on the brine. But this would add hours and take it out of the weeknight recipe class.
A suggested brine would be 2 tablespoon table salt 1 tablespoon sugar and 2 cups of water for 1-4 hours. Other spices like allspice, garlic, pepper, etc. can be added.
I will be continuing to do these ribs by this method and brine if it fits my schedule.
♨️The Grill
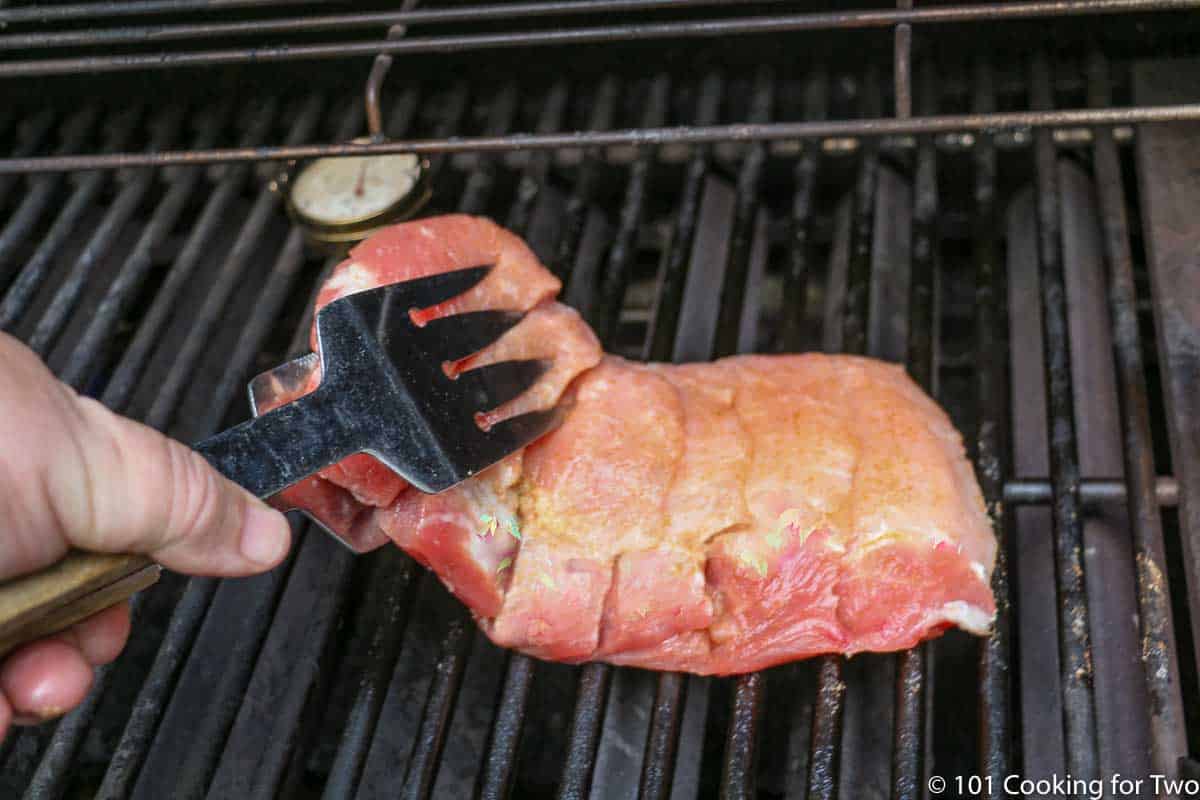
These are a lean cut, unlike normal ribs, so low and slow is not recommended. I suggest a nice medium grill temperature of about 450° surface temperature. You can use a higher temperature, but they will dry out more.
To learn about controlling the surface temperature of your grill, please see A Beginners Guide to Grill Temperature on a Gas Grill.
🌡️⏰Temperature and Time
For many years, due to the fear of trichinosis, which was a parasite found in undercooked pork, pork was cooked to 170 by common wisdom. However, with modern farming methods, that has not been a risk in the USA for decades.
The FDA went to a recommendation of 160° for a number of years. Then in 2012, went to the current recommendation of 145° with a 3-minute rest.
Taste and moisture wise, 145° is correct. There will be a little pink left in the pork at 145°, and if you are like my wife, who wants no pink, you will be more comfortable at 150° or even 155°. Please do not go over 155° for this cut, or it will begin to dry.
Also, the 145° recommendation is not for ground pork, which is 160°. And cuts like pork butt and ribs like baby back ribs, although safe at 145°, would not be considered done cooking.
The grilling time is about 20 minutes, depending on the grill, the thickness of the meat, and the final internal temperature you want. As always, cook to a final internal temperature and never by time alone.
🥣Rub and Sauce
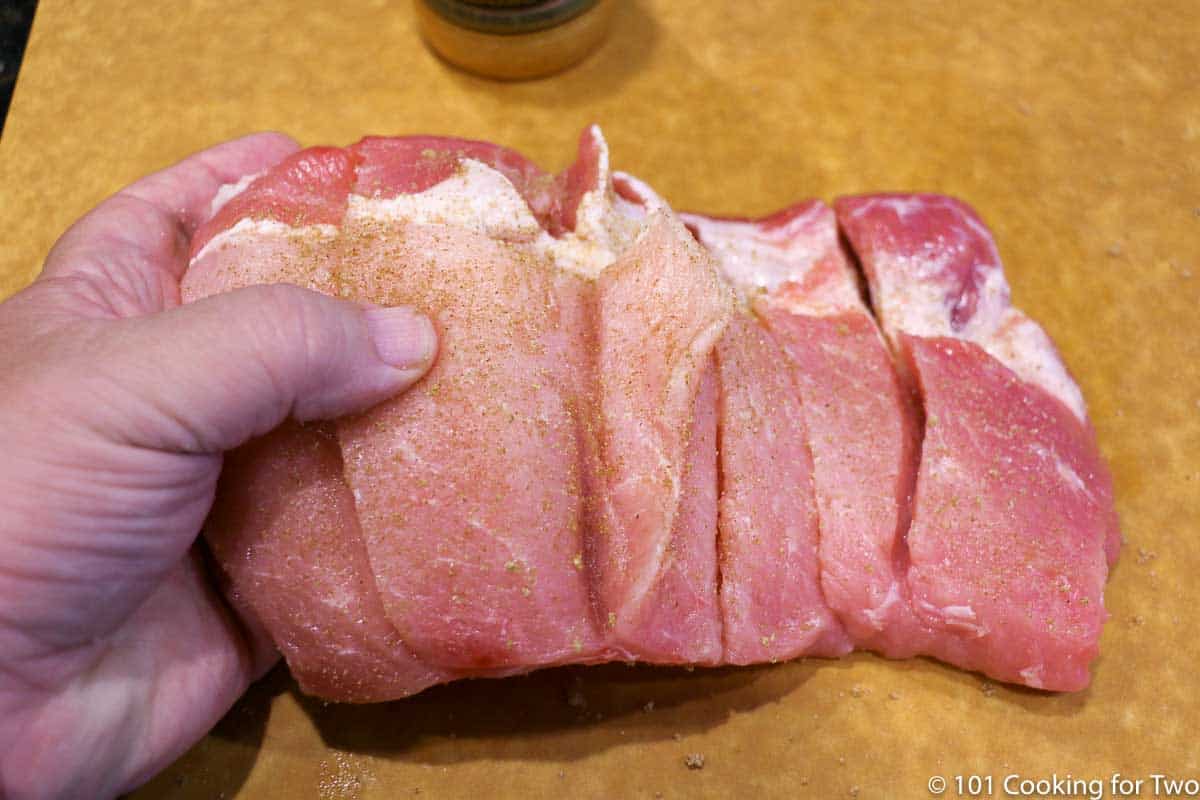
First, you don’t have to use a rub. Since they are so like pork chops, if you have a favorite pork chop recipe, you can adapt it here. But I like to do the “rib” thing.
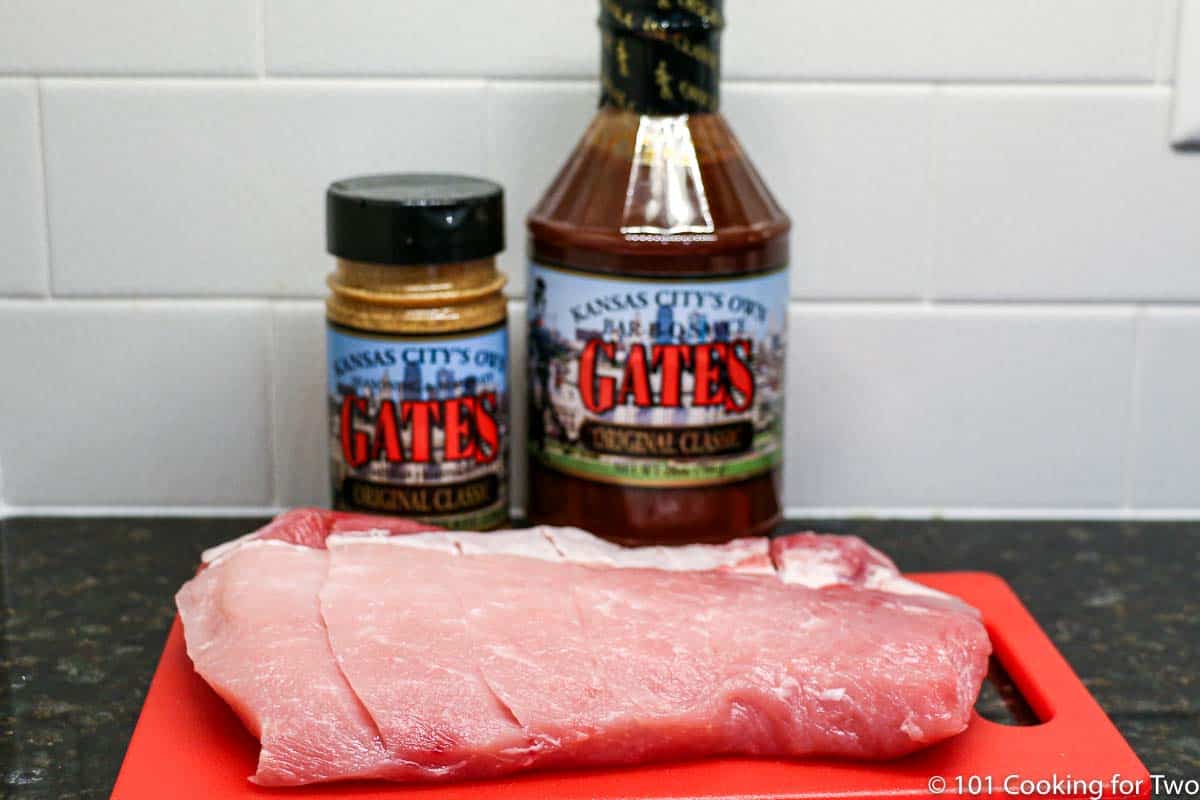
I tend to use a premade rub with this recipe since it is all about lazy. So you will see rub from Gate’s of Kansas City in the pictures along with their sauce.
But here is a great homemade rub that I keep around during grilling season. This makes enough for 2 slabs. Cut in half to have less leftover if you want, but I save it for next time.
8 tablespoons (1/2 cup) brown sugar 3 tablespoons kosher salt 1 tablespoon chili powder 1 teaspoon black pepper 1 teaspoon onion powder 1 teaspoon garlic powder
What Sauce to Use?
Again, I tend to use premade out of laziness. I love my Gate’s BBQ Sauce from Kansas City, which I buy by the case.Bull’s-Eye Original Barbecue Sauce is recommended by CI.
But if you want the best sauce ever, try my Memphis BBQ Sauce.
📖Boneless Country Style Pork Rib Recipes
Grilled Boneless Country Style Pork Ribs with Simple Rub
Grilled Memphis Boneless Country Style Pork Ribs
30 Minute BBQ Boneless Pork Ribs
🔪Instructions
Optional: Brine first if you have time. 2 cups water, 1 tablespoon table salt, and 1 tablespoon brown sugar for 1-4 hours in the refrigerator. Rinse well and use a rub without salt.
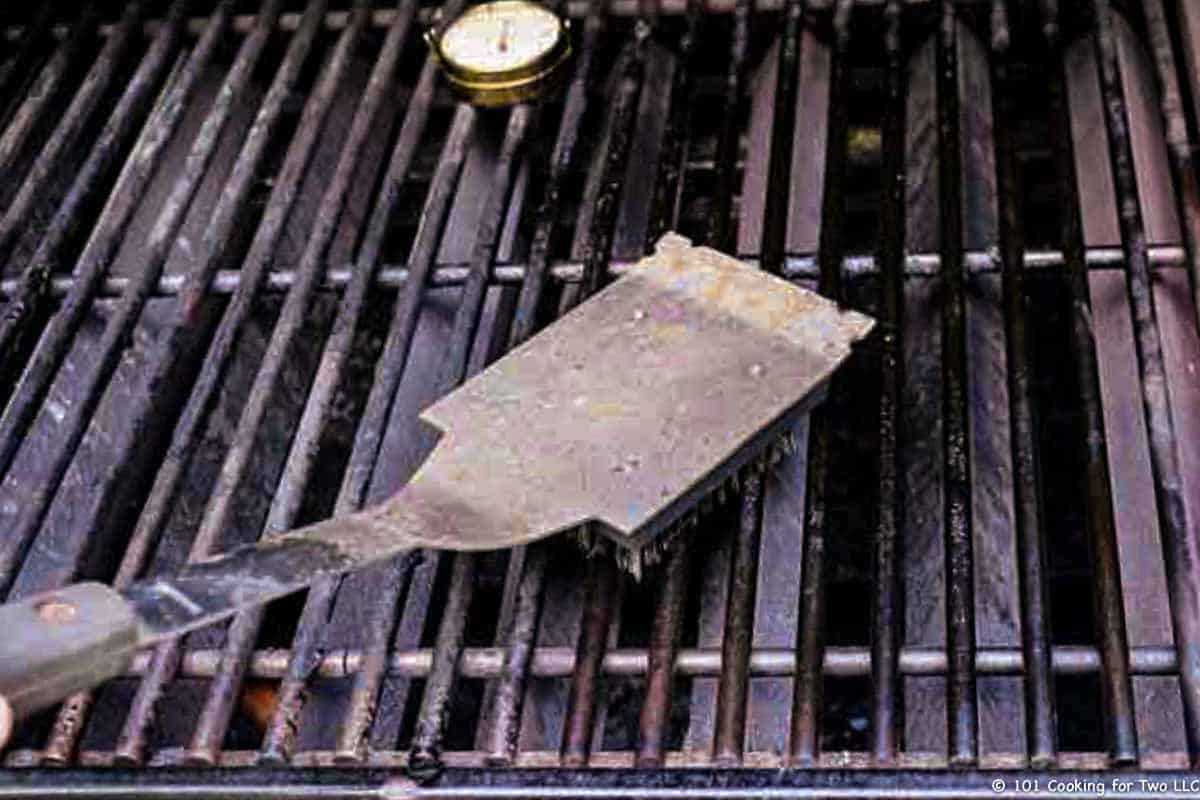
Clean and oil grill grates, then preheat grill to a grill surface temperature of 450°-500°.
Trim ribs of any excess fat. Deepen the cuts that are already in the ribs to about 75% through.
Coat both sides of ribs with a rub of your choice. Be sure to get in the cuts. Rub in and let rest for 10 minutes while preheating the grill.
Place over direct heat and close lid. Flip about every 5 minutes and grill until an internal temperature of about 145°-150°. About 20 minutes, depending on the grill and the thickness of the meat.
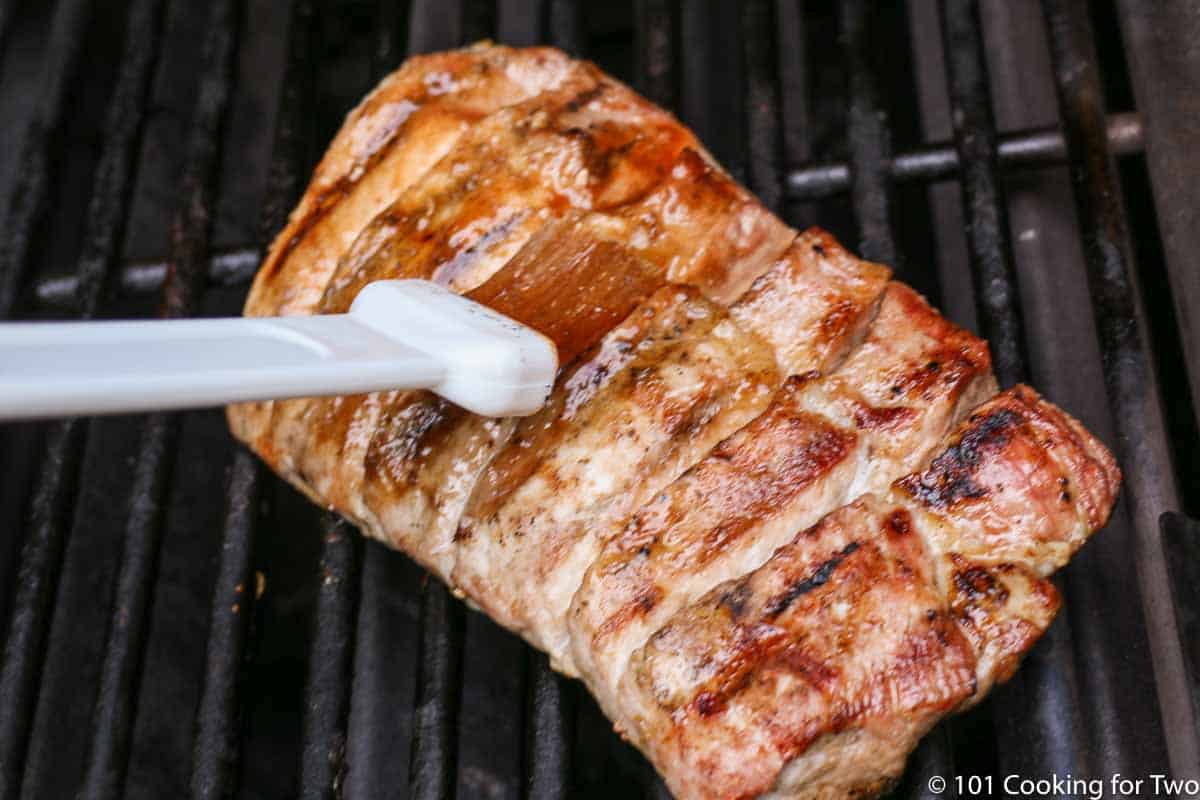
The last few minutes, coat with sauce on both sides and grill until brown. Let stand for 5 minutes before cutting.
Do you want more recipes from 101 Cooking for Two? Sign up for the newsletter and get all posts delivered straight to your inbox!
📖 Recipe
How to Grill Boneless Country Style Pork Ribs
Learn how to grill boneless country style pork ribs with these easy to follow step by step photo instruction. Great taste with minimal work.
Prep Time10mins
Cook Time20mins
Total Time30mins
Author: Dan Mikesell AKA DrDan
Servings/Adjust Amount: 4servings
Ingredients
1slab boneless country style pork ribs
rub of your choice
Barbecue sauce of your choice
Optional brine
2cupswater
1tablespoontable salt
1tablespoonbrown sugar
US Customary – Convert to Metric
Instructions
Optional: Brine first if you have time. 2 cups water, 1 tablespoon table salt, and 1 tablespoon brown sugar for 1-4 hours in the refrigerator. Rinse well and use a rub without salt.
Clean and oil grill grates then preheat grill to a grill surface temperature of 450°-500°.
Trim ribs of any excess fat. Deepen the cuts that are already in the ribs to about 75% through.
Coat both sides of ribs with a rub of your choice. Be sure to get in the cuts. Rub in and let rest for 10 minutes while preheating grill.
Place over direct heat and close lid. Flip about every 5 minutes and grill until aninternal temperature of about 145°-150°. About 20 minutes depending on grill and the thickness of the meat. Always cook to the final internal temperature and never by time alone.
The last few minutes, coat with sauce on both sides and grill until brown. Let stand for 5 minutes before cutting.
Recipe Notes
Pro Tips:
I remove most/all of the fat pad.
Extend the “rib cuts” to 75%
Brine if you have time. If you brine, use a rub without salt.
Rub and sauce of your choice.
Grill over a medium grill with a surface temperature of 450°.
Do not overcook. 145°-150° is nice.
If you don’t have a rib, try this version of 8311. This makes about twice what you need so cut in half or keep the extra for later. Also, if you brine, leave the salt out of the rub. 1/2 cup brown sugar 3 tablespoon kosher salt 1 tablespoon chili powder 1 teaspoon black pepper 1 teaspoon onion powder 1 teaspoon garlic powder
Course Main Course
Cuisine American
HAVE A QUESTION? – Look in the full post.Make it Perfect First Time and Every Time. Don’t miss out, check the full post above. Almost every recipe includes easy step by step photo instructions so you can visualize yourself cooking this recipe along with helpful tips and options.
ADJUST THE RECIPE SIZE:
You may adjust the number of servings in this recipe card under servings. This does the math for the ingredients for you. BUT it does NOT adjust the text of the instructions. So you need to do that yourself.
Nutrition is generally for one serving. Number of servings is stated above and is my estimate of normal serving size for this recipe.
All nutritional information are estimates and may vary from your actual results. This is home cooking, and there are many variables. To taste ingredients such as salt will be my estimate of the average used.
Editor’s Note: Originally Published March 26, 2010. This has been a constant popular post on this blog even though it hasn’t been updated for over eight years. The post has been completely rewritten, all photos re-shot, expanded options, and a table of contents to help navigation.
The cookie settings on this website are set to "allow cookies" to give you the best browsing experience possible. If you continue to use this website without changing your cookie settings or you click "Accept" below then you are consenting to this.
Read more about data collection for ads personalisation our in our Cookies Policy page


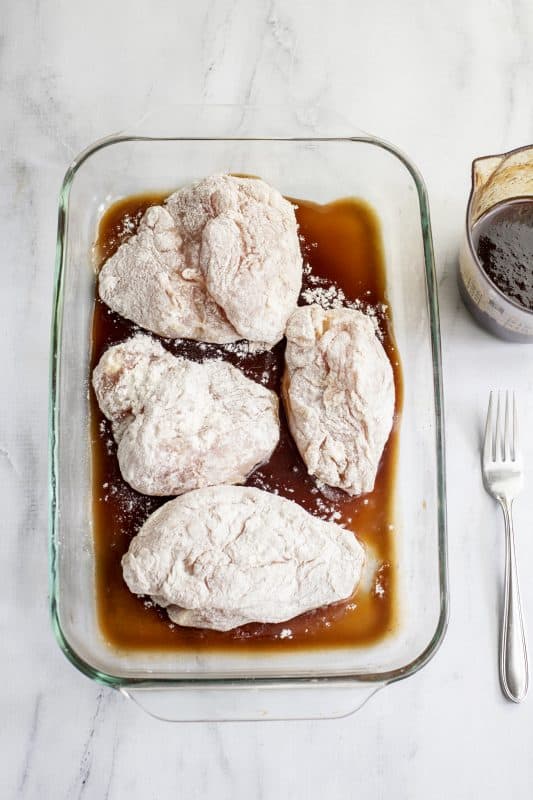 Place these in your baking dish.