Tag: EASY

EASY BANANA BREAD – Butter with a Side of Bread by Gordon Ramsay

EASY BANANA BREAD - Butter with a Side of Bread


Easy Banana Bread is the simplest homemade banana bread recipe ever! Made with ripe bananas, a cake mix & 2 other simple ingredients.

Be sure to check out our updated collection of BEST BANANA RECIPES EVER!

Easy Banana Bread is the simplest homemade banana bread recipe ever! Made with ripe bananas, a cake mix & 2 other simple ingredients.

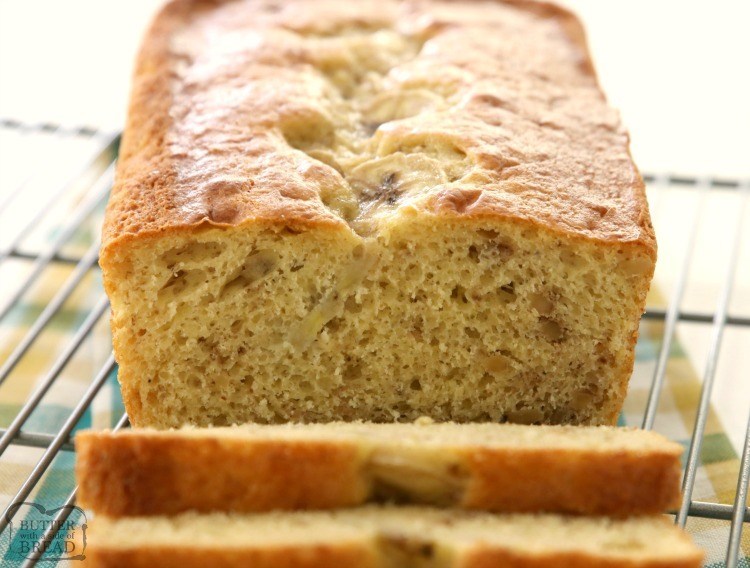
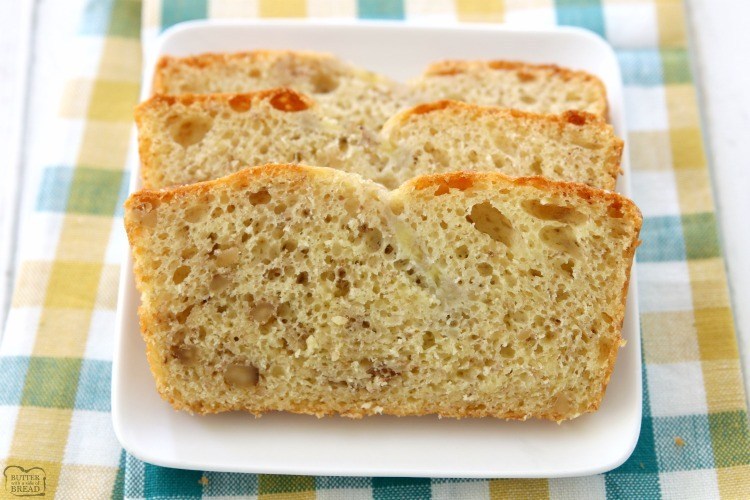
Easy Banana Bread is the simplest recipe with the best results. If you need a tasty homemade snack in less than 30 minutes, look no further! With 4 simple ingredients it couldn’t be easier to make this light, moist banana bread.

easy banana bread recipe ingredientsHow to make Easy Banana Bread

Here’s how you make Banana Bread: First, preheat the oven to 350º F.

Then, lightly spray an 8″ loaf pan with cooking spray. I like to use the non-stick spray made specifically for baked goods. It contains flour in addition to the oil, so breads and cakes don’t stick to the pan. Set the pan aside.

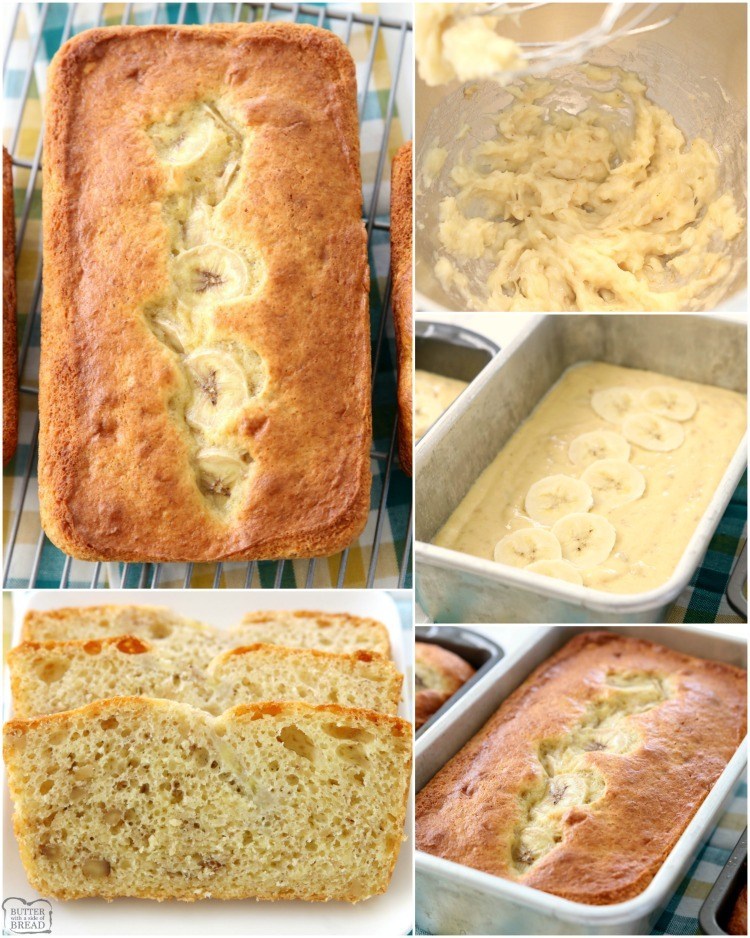
In a mixer, stir all the ingredients for the bread, starting with the ripe bananas, then the oil and eggs, then the cake mix. You won’t mix long- it takes only about 1 minute to get the batter ready!

Easy Banana Bread is the simplest homemade banana bread recipe ever! Made with ripe bananas, a cake mix & 2 other simple ingredients.

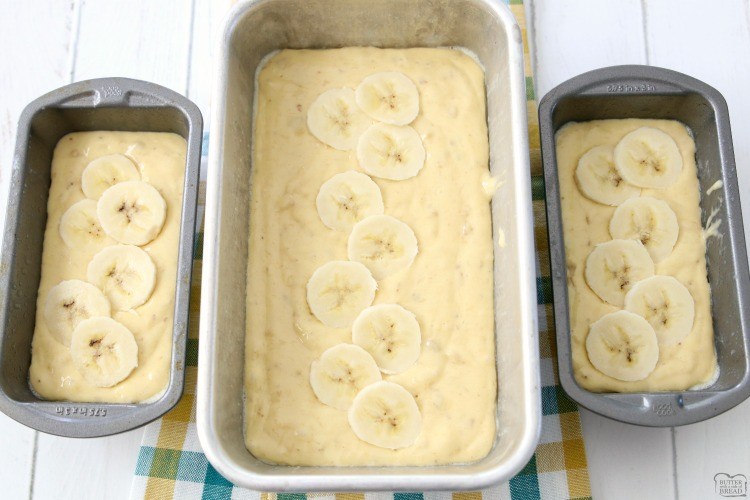
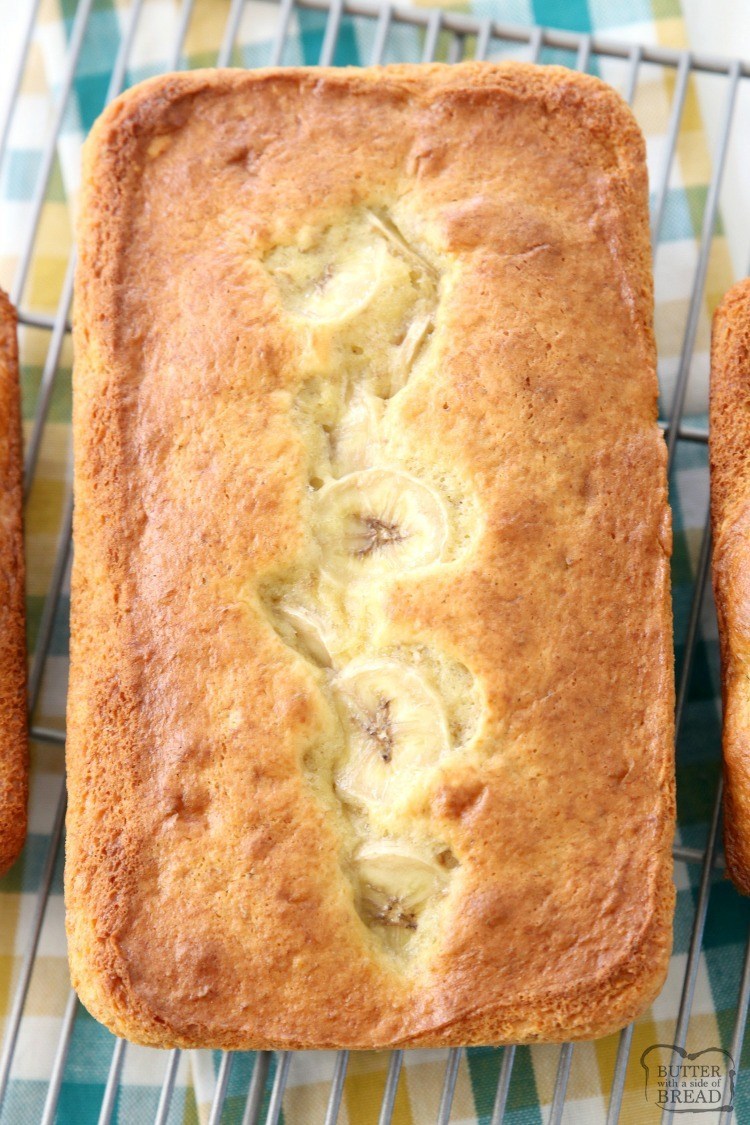
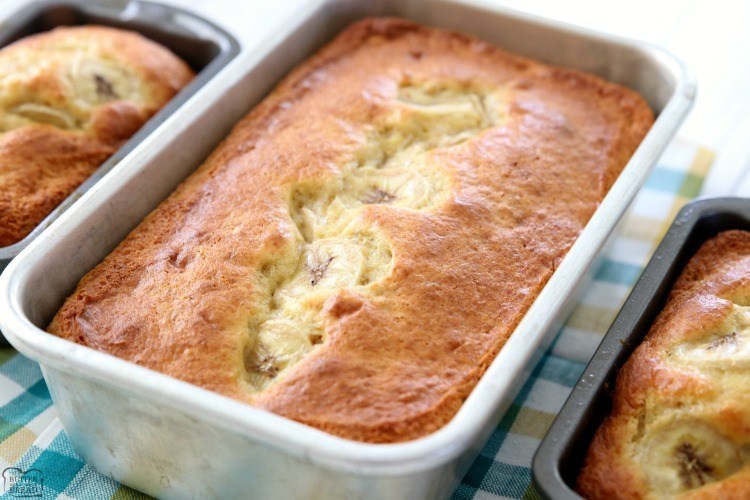
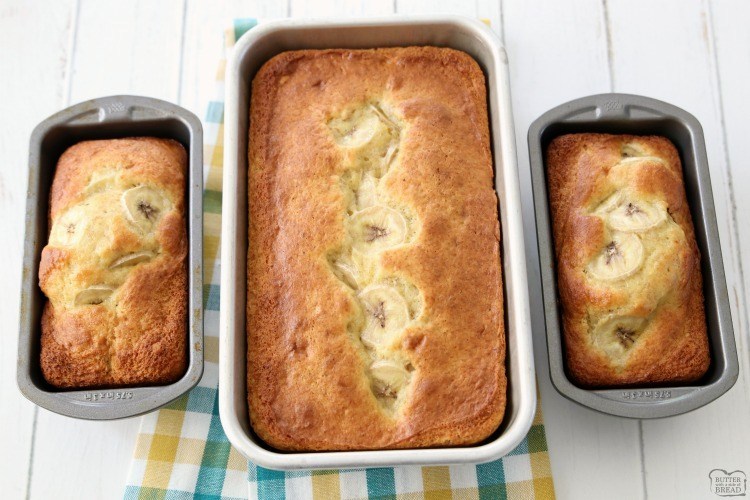
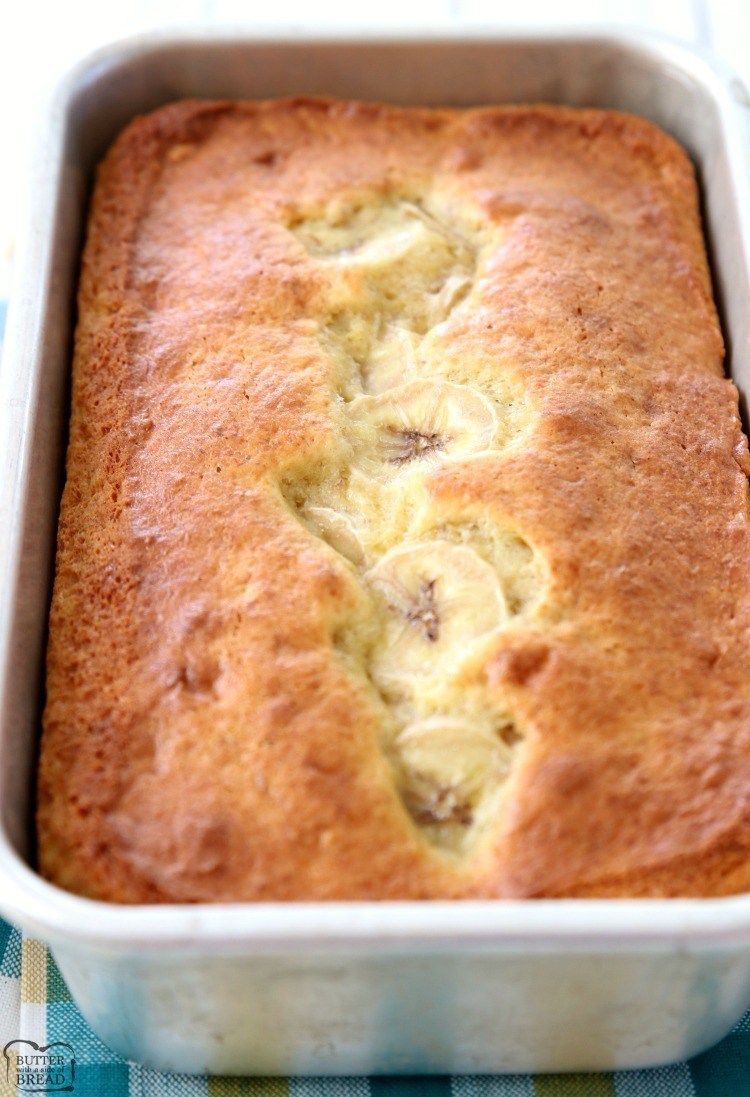
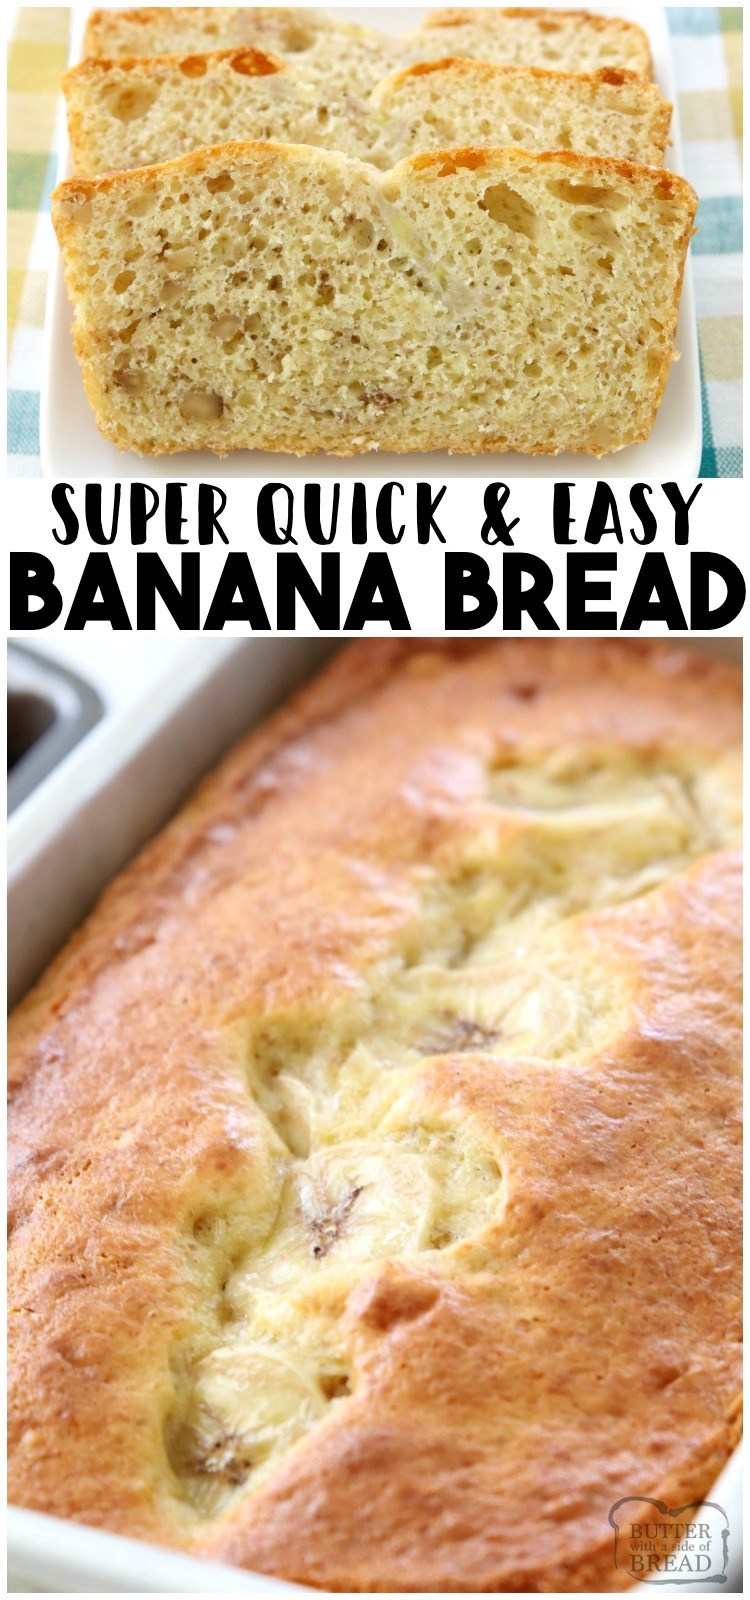
Pour batter into your prepared pan. You can add fresh banana slices and a dust of cinnamon sugar. It looks gorgeous and adds even more banana flavor.

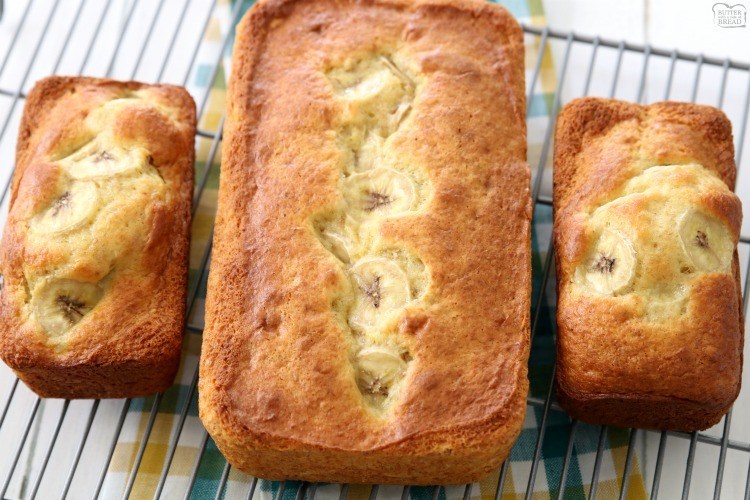
Bake for 50 minutes, until bread is golden and internal temperature registers 200º F. This is one of my favorite tricks for baking quick bread! If you test the internal temperature, you can be assured that the inside of your bread is sufficiently baked, which means it won’t collapse as it cools!

Remove bread from oven and let cool in the pan before you take it out.

Easy Banana Nut Bread

How can I ripen bananas quickly?

Ripe bananas are used in banana bread because they have a stronger, more pronounced flavor. There are several ways to help bananas ripen faster so that you can make banana bread. Here are my preferred methods:

  1. Ripen bananas in the oven. Heat the oven to 350º F and line a baking sheet with parchment paper. Place bananas peel and all on the parchment and bake for 30-40 minutes, until peels are black & shiny. Let cool 1 hour and proceed with banana bread recipe.
  2. Ripen bananas in a paper bag. If you have more time, place bananas in a paper bag with an apple. Fold and secure closed. I usually leave bananas like this for a full day, then proceed with the Yogurt Banana Bread recipe.

Easy Banana Bread is the simplest homemade banana bread recipe ever! Made with ripe bananas, a cake mix & 2 other simple ingredients.How to keep your banana nut bread from sinking in the middle

This happens all the time when making banana bread. Often it’s because I’ve over mixed the batter. Quick bread (referring to a bread recipe that doesn’t use yeast) does not like to be stirred too much, so try to just barely mix all the ingredients together. Another culprit could be overfilling the pan. The bread pan should be only half full each time. As always, make sure your leavening ingredients- baking soda and baking powder- aren’t too old. Baking soda should only be on your shelf for 6-9 months before purchasing new. I purchase it in bulk (I bake a lot!) and refrigerate it to help it last longer.

Easy Banana Bread is the simplest homemade banana bread recipe ever! Made with ripe bananas, a cake mix & 2 other simple ingredients.Can Homemade Banana Bread be made into muffins?

Easy banana bread can absolutely be made into muffins! Simply use my recipe above, then spoon 3 tablespoons of batter into each greased or lined muffin cup. Bake for 18-20 minutes.

There are several benefits of making banana bread into muffins. First, they cook faster! Muffins will only take 20 minutes to bake! You don’t need to slice them, they’re easily portable, and they’re easy to freeze! I like to bake a batch of banana muffins and then freeze them in a layer in a large ziplock freezer bag. I pull them out one or two at a time for breakfast. You can let them thaw on the countertop, or you can microwave them or toast them to heat them up. Yum!

Easy Banana Bread is the simplest homemade banana bread recipe ever! Made with ripe bananas, a cake mix & 2 other simple ingredients.
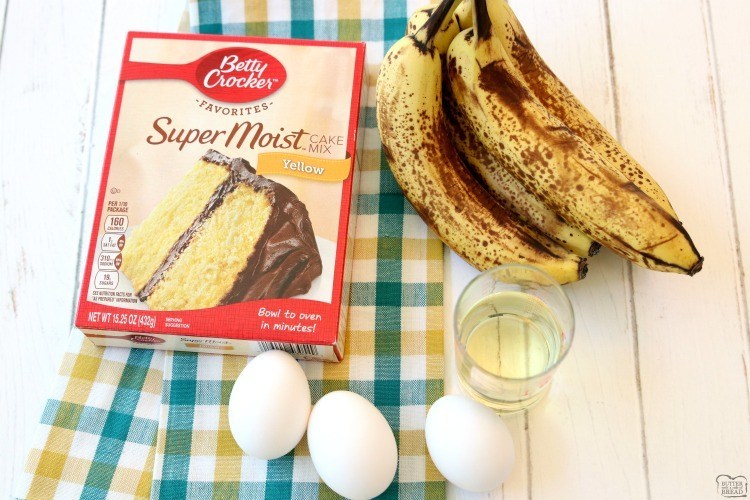
Homemade Banana Bread Ingredients

Here’s what you need to make our Cake Mix Banana Bread:

  • 1 box yellow cake mix
  • 3 eggs
  • 1/3 cup oil
  • 4 ripe bananas (plus additional banana slices for top, if desired)
  • 1/2 cup nuts (optional)

How to make bananna bread

Directions for making Easy Banana Bread recipe:

  1. Preheat oven to 350º F. Spray pan and set aside.
  2. Peel ripe bananas into a mixer. Mix for 20 seconds, until mostly smooth.
  3. Add oil and eggs. Mix.
  4. Add cake mix. Mix for 1 minute.
  5. Pour batter into prepared pan, until the pan is 1/2 full.
  6. Bake for 50 minutes, until bread is golden and internal temperature registers 200º F.
  7. Let cool for 15 minutes, then remove bread from pan to cool completely.

cake mix banana bread recipe


Easy Banana Bread is the simplest homemade banana bread recipe ever! Made with ripe bananas, a cake mix & 2 other simple ingredients.

Easy Banana Bread Recipe

Easy Banana Bread is the simplest homemade banana bread recipe ever! Made with ripe bananas, a cake mix & 2 other simple ingredients.

Print Pin Rate

Course: bread, Breakfast

Cuisine: American

Keyword: cake mix banana bread, easy banana bread

Prep Time: 5 minutes

Cook Time: 50 minutes

Total Time: 55 minutes

Servings: 18

Calories: 176kcal

Ingredients

Ingredients

  • 1 box yellow cake mix 15.25 oz
  • 3 eggs
  • 1/3 cup canola oil or coconut
  • 4 ripe bananas plus additional banana slices for top, if desired
  • 1/2 cup walnuts or pecans chopped, optional

Instructions

Instructions

  • Preheat oven to 350º F. Spray bread pan with non-stick cooking spray and set aside.

  • Peel ripe bananas into a mixer. Mix for 20 seconds, until mostly smooth.

  • Mix in oil and eggs. Mix an additional 10 seconds. 

  • Add cake mix. Mix for 1 minute. Pour batter into prepared pan, until the pan is 1/2 full.

  • Bake for 50 minutes, until bread is lightly browned and internal temperature registers 200º F. Let cool for 15 minutes, then remove bread from pan to cool completely.

Notes

Recipe yields 2 standard loaves, or equivalent. I made 1 standard loaf + 2 mini loaves. 

Nutrition

Calories: 176kcal | Carbohydrates: 29g | Protein: 2g | Fat: 5g | Saturated Fat: 1g | Cholesterol: 27mg | Sodium: 219mg | Potassium: 117mg | Fiber: 1g | Sugar: 15g | Vitamin A: 1.1% | Vitamin C: 2.8% | Calcium: 6.6% | Iron: 4.4%

homemade banana bread recipe

Which bread pan is the best?

I bake a lot of bread and the pans I prefer are either aluminized steel or ceramic. Both types of pans will bake bread more evenly and release the bread more easily after baking. I’ve used glass pans in the past and it seems like my bread sinks too often when using them, so I stopped. I also don’t like using dark or nonstick pans because the bread cooks unevenly. It darkens on the outside before the bread is cooked on the inside, so it’s easier to burn.

Can Easy Banana Bread be frozen?

I love freezing loaves of banana bread! How you prepare banana bread for freezing really depends on how long you intent to keep it frozen. If you just want to freeze it for a week or two, I’d wrap it in plastic wrap or foil and place the loaf in a large freezer ziplock bag. Most often, when I bake banana bread to freeze it, I’ll bake mini loaves so that they fit in the ziplock bag easier. If you want to freeze it for 2-6 months, I’d wrap it more securely, making sure it’s airtight and wrapping it in a double layer of foil or plastic wrap, then place it in a ziplock bag.

Easy Banana Bread is the simplest homemade banana bread recipe ever! Made with ripe bananas, a cake mix & 2 other simple ingredients. #banana #bread #quickbread #baking #recipe from BUTTER WITH A SIDE OF BREAD


This Easy Banana Bread is so easy and so tasty, it’s hard to believe it only has 4 ingredients. Made with cake mix this cake mix banana bread is a definite favorite.

Easy Chicken Fajitas | 101 Cooking For Two by Gordon Ramsay


It’s easy to great restaurant quality chicken fajitas with the best-tasting chicken. Just follow the simple step by step photo instructions. Only a little work and almost no skill and you have a new house favorite.
Close up image of a chicken fajita on a white plate


Editor’s Note: Originally Published May 3, 2012. Republished with expanded explanation and discussion along with updated photos.

Only a little work and almost no skill and you have a new house favorite. Happy almost Cinco de Mayo.

Here is the “other” restaurant favorite: Beef Steak Fajita, I knew that chicken wouldn’t be far behind.

I always go back and forth chicken or beef… beef or chicken… What to do? Your choice. But both are easy and if you care, much cheaper at home. Another candidate for house favorite recipe.

Start with chicken, clean it and cut up. Now marinade for a few hours, cook in a heavy cast iron skillet then do some veggies, and you are good to go.

My Rating
My rating system. Great 5 out of 5


I always love great Mexican, and this is it.

Pro Tips: Recipe Notes for Easy Chicken Fajitas

I wanted something that would fit ingredients that I almost always have on hand. I’ll do an “inspired by” to an Allrecipe.com recipe. There are many great finds there. I kicked the spice up some and added expanded explanation.

What Chicken to Use?

Fresh chicken is preferred here. Use skinless boneless breasts or thighs. I don’t recommend precooked shredded chicken like a rotisserie chicken.

I cut the chicken into strips and then broke them up during cooking. This gives a little of that shredded texture while still having chunks. Cut them into small cubes if you want, but I think that looks like dog food.

The Secret to the Great Taste

The key to why this recipe is so good is the marinade.  Most home recipes are some dry spice mix from the store. It is just not acceptable after you try this.

Blue ribbon divider used for visual effect

image of spices and lime juice

Start by mixing a marinade in a 1-gallon zip lock. 2 tablespoon lime juice, 4 tablespoon water, 1 tablespoon olive oil, 1 teaspoon kosher salt, 1/4 teaspoon liquid smoke, 1/2 teaspoon cayenne pepper, 1/ 4 teaspoon pepper, 1 teaspoon soy sauce, 1-2 cloves of garlic crushed.

image of sliced chicken on a white board

Clean and trim about 1 1/2 pound of skinless boneless chicken breasts. This is about 2 medium-large ones. Don’t worry if you’re a little over or under that amount. Cut the chicken into strips about 1/2 inch thick.

adding chicken to a plastic bag of marinadee

Add to the marinade and refrigerate for at least 2 hours. Overnight is fine also.

image of chopped onion and pepper on a black board

When ready to cook. Put 1 teaspoon oil in a large cast iron pan and heat over medium-high heat. While heating, slice up a large onion and one or two peppers. I like a medium red and green pepper. If your pepper is large, you only need one. Mix 1 tablespoon water, 1 teaspoon lime juice and 1 teaspoon soy sauce in a small bowl.

When the oil is hot, add the veggies and after a few minutes add the water, soy sauce, and lime mixture. When onions are nicely browned (about 8-9 minutes), Remove from pan and set aside and cover.

image of cooking strips of chicken in black cast iron pan

Add a little oil to the pan. When hot, add the drained chicken and brown. Near the end of cooking, break apart the chicken with a wooden spoon. This will make much smaller pieces and prove the meat is cooked. About 8-9 minutes. Please check a few of the large piece with an instant-read thermometer to be sure you are to 165 degrees.

image of cooked chicken and pepper in a black skillet

When the chicken is done, move the meat to one side and add the veggies back to the pan. Cook and stir for a minute or two until veggies are reheated.

image of chicken fajita on white plate-2

Serve with heated tortillas, sour cream, guacamole and anything else you like. An easy way to heat tortillas is to sprinkle a dish towel with some water put tortillas inside and heat in a microwave on high for one minute.

Blue ribbon

Do you want more recipes from 101 Cooking for Two? Sign up for the newsletter and get all posts delivered straight to your inbox!
Subscribe to 101 Cooking for Two

Easy Chicken Fajitas

It’s easy to great restaurant quality chicken fajitas with the best-tasting chicken. Just follow the simple step by step photo instructions. Only a little work and almost no skill and you have a new house favorite.

Prep Time10 mins

Cook Time20 mins

Total Time30 mins

Course : Main Course

Cuisine : Mexican

Keyword : Chicken Fajitas, Fajitas

Servings/Adjust Amount: 4 servings

4

Ingredients

  • 2 skinless boneless chicken breasts cut into thin slices or cubes

Marinade

  • 2 tablespoons lime juice
  • 4 tablespoons water
  • 1 tablespoon olive oil
  • 1 teaspoon kosher salt
  • 1/4 teaspoon liquid smoke
  • 1/2 teaspoon cayenne pepper
  • 1/4 teaspoon pepper
  • 1 teaspoon soy sauce
  • 1-2 cloves garliccrushed

Veggies

  • 1 teaspoon oil
  • 1 pepperlarge or 2 medium – green or red
  • 1 onionlarge
  • 1 tablespoon water
  • 1 teaspoon soy sauce
  • 1 teaspoon lime juice

Serving

  • 4-6 flour tortillas
  • sour cream
  • cheese
  • salsa
  • Guacamole

Instructions

  • Start by mixing a marinade in a 1-gallon zip lock. 2 tablespoon lime juice, 4 tablespoon water, 1 tablespoon olive oil, 1 teaspoon kosher salt, 1/4 teaspoon liquid smoke, 1/2 teaspoon cayenne pepper, 1/ 4 teaspoon pepper, 1 teaspoon soy sauce, 1-2 cloves of garlic crushed.

  • Clean and trim about 1 1/2 pound of skinless boneless chicken breasts. This is about 2 medium-large ones. Don’t worry if you’re a little over or under that amount. Cut the chicken into strips about 1/2 inch thick.

  • Add the chicken to the marinade and refrigerate for at least 2 hours. Overnight is fine also.

  • When ready to cook. Put 1 teaspoon oil in a large cast iron pan and heat over medium-high heat. While heating, slice up a large onion and one or two peppers. I like a medium red and green pepper. If your pepper is large, you only need one.

  • Mix 1 tablespoon water, 1 teaspoon lime juice and 1 teaspoon soy sauce in a small bowl. When the oil is hot, add the veggies and after a few minutes add the water, soy sauce, and lime mixture.

  • When onions the (about 8-9 minutes), Remove from pan and set aside and cover.

  • Add a little oil to the pan. When hot, add the drained chicken and brown. Near the end of cooking, break apart the chicken with a wooden spoon. This will make much smaller pieces and prove the meat is cooked — about 8-9 minutes. Please check a few of the large piece with an instant-read thermometer to be sure you are to 165 degrees.

  • When the chicken is done, move the meat to one side and add the veggies back to the pan. Cook and stir for a minute or two until veggies are reheated.

  • Serve with heated tortillas, sour cream, guacamole and anything else you like. An easy way to heat tortillas is to sprinkle a dish towel with some water put tortillas inside and heat in a microwave on high for one minute.

Recipe Notes

Pro Tips

  1. You can use chicken breast or thighs.
  2. I prefer to use two smaller peppers so I can have a mixture of color, but the day of the pictures, I only had a huge green pepper.
  3. Raw chicken only here. This is not a recipe for precooked chicken.
  4. The lime juice is important.
  5. There has a touch of heat. Cut down the cayenne if you want.
  6. I didn’t cover how to assemble your fajita. I think you know what you like if you are reading this. I did add a tip for the tortillas.

    Nutritional information is for chicken and veggies only.

Nutrition Facts

Easy Chicken Fajitas

Amount Per Serving

Calories 172 Calories from Fat 54

% Daily Value*

Total Fat 6g 9%

Saturated Fat 1g 5%

Polyunsaturated Fat 1g

Monounsaturated Fat 4g

Cholesterol 70mg 23%

Sodium 666mg 28%

Potassium 146mg 4%

Total Carbohydrates 7g 2%

Dietary Fiber 1g 4%

Sugars 3g

Protein 25g 50%

Vitamin A 7%

Vitamin C 72%

Calcium 1%

Iron 2%

* Percent Daily Values are based on a 2000 calorie diet.

Have a question or something not clear? Ask in the comments.

Blue ribbon divider used for visual effect Do you want more recipes from 101 Cooking for Two? Sign up for the newsletter and get all posts delivered straight to your inbox!
  Subscribe to 101 Cooking for Two Blue ribbon divider used for visual effect

Nutrition is for one serving. Number of servings is stated above and is my estimate of normal serving size for this recipe.

All nutritional information are estimates and may vary from your actual results. This is home cooking, and there are many variables. To taste ingredients such as salt will be my estimate of the average used.

Blue ribbon divider used for visual effect

If you like this recipe or find it useful, the pleasure of a nice 4 or 5 rating would be greatly appreciated.

Originally Published May 3, 2012.
Molly dog in the kitchen

Incoming search terms:

Easy Baked Beef Brisket – Slow and Low is Not the Tempo by Gordon Ramsay

Easy Baked Beef Brisket – Slow and Low is Not the Tempo


Remember that time you waited all day for your “low and
slow” beef brisket to finish cooking, and once it finally did, it was dry? It
left you disappointed, disillusioned, and wondering what went wrong. Well, I
won’t bore you with all the scientific, easy-to-Google details, but basically
meat can “stall” during long, low-heat methods, and never reach the proper
internal temperature to fully release all the succulent goodness. 

If you really nail it, the results can be amazing, and I’ve
gotten lucky a few times on the smoker, but this significantly faster method is
much less risky. Unless you really overcook it, you shouldn’t have to worry
about dry meat, and you can instead worry about other things, like whether you
cooked enough meat. By the way, I’m not sure if they invented it, but I adapted
this from something I saw watching an America’s Test Kitchen rerun, so if you
have issues, please contact them.

Speaking of enough meat, if you decide to use a whole
brisket, this method will work as shown, but you’ll probably need to give it a
little more time at the end to ensure it’s fork tender. Or not, but there’s
only one way to find out, so have your poking fork handy, and use as needed.
Whether you’re looking for a brisket recipe for Passover, or you’re simply
interested in moister meat in less time, I really hope you give this easy,
baked brisket recipe a try soon. Enjoy!

Ingredients for 6 portions Easy Baked Beef Brisket:

(Adapted from America’s Test Kitchen)

3 pound beef brisket (the flat half of a full brisket)

4 teaspoons kosher salt

2 teaspoons freshly ground black pepper

1/2 teaspoon cayenne

For the gravy/braising liquid:

2 tablespoons butter, oil, or rendered fat

1 large yellow onion, sliced

1 teaspoon kosher salt

4 cloves garlic, sliced

1 tablespoon minced fresh rosemary

1 cup apple juice or cider

– Bake at 325 F. for 1 1/2 hours, then reduce oven to 250 F.,
and cook for about 2 hours 15 minutes, or until fork tender.

–>

Incoming search terms:

Proudly powered by WordPress

By continuing to use the site, you agree to the use of cookies. Click here to read more information about data collection for ads personalisation

The cookie settings on this website are set to "allow cookies" to give you the best browsing experience possible. If you continue to use this website without changing your cookie settings or you click "Accept" below then you are consenting to this.

Read more about data collection for ads personalisation our in our Cookies Policy page

Close