Tag: GlutenFree

Cubano Stuffed Pork Loin (Low Carb, Gluten-Free) by Gordon Ramsay

Cubano Stuffed Pork Loin


Cubano stuffed pork loin has all the flavor of the classic sandwich, without the carbs! It’s rolled with mustard, ham, cheese, and pickles, then grilled to perfection. 

Sliced Cubano Stuffed Pork Loin on a picnic table

A Cubano, but make it low carb!

I was craving a Cuban sandwich the other day, but Shawn has been following a low carb diet so we haven’t been eating a lot of bread. Enter, Cubano stuffed pork loin!

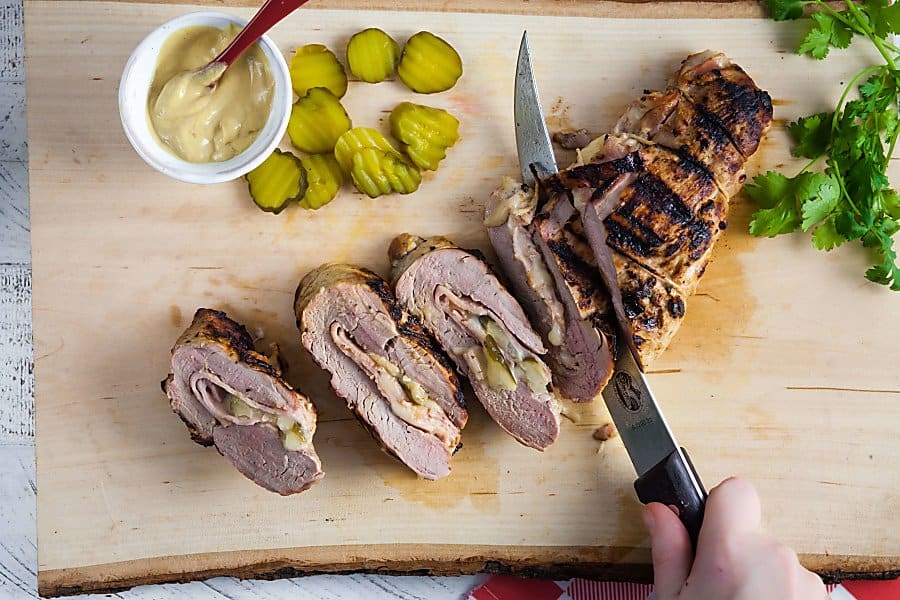
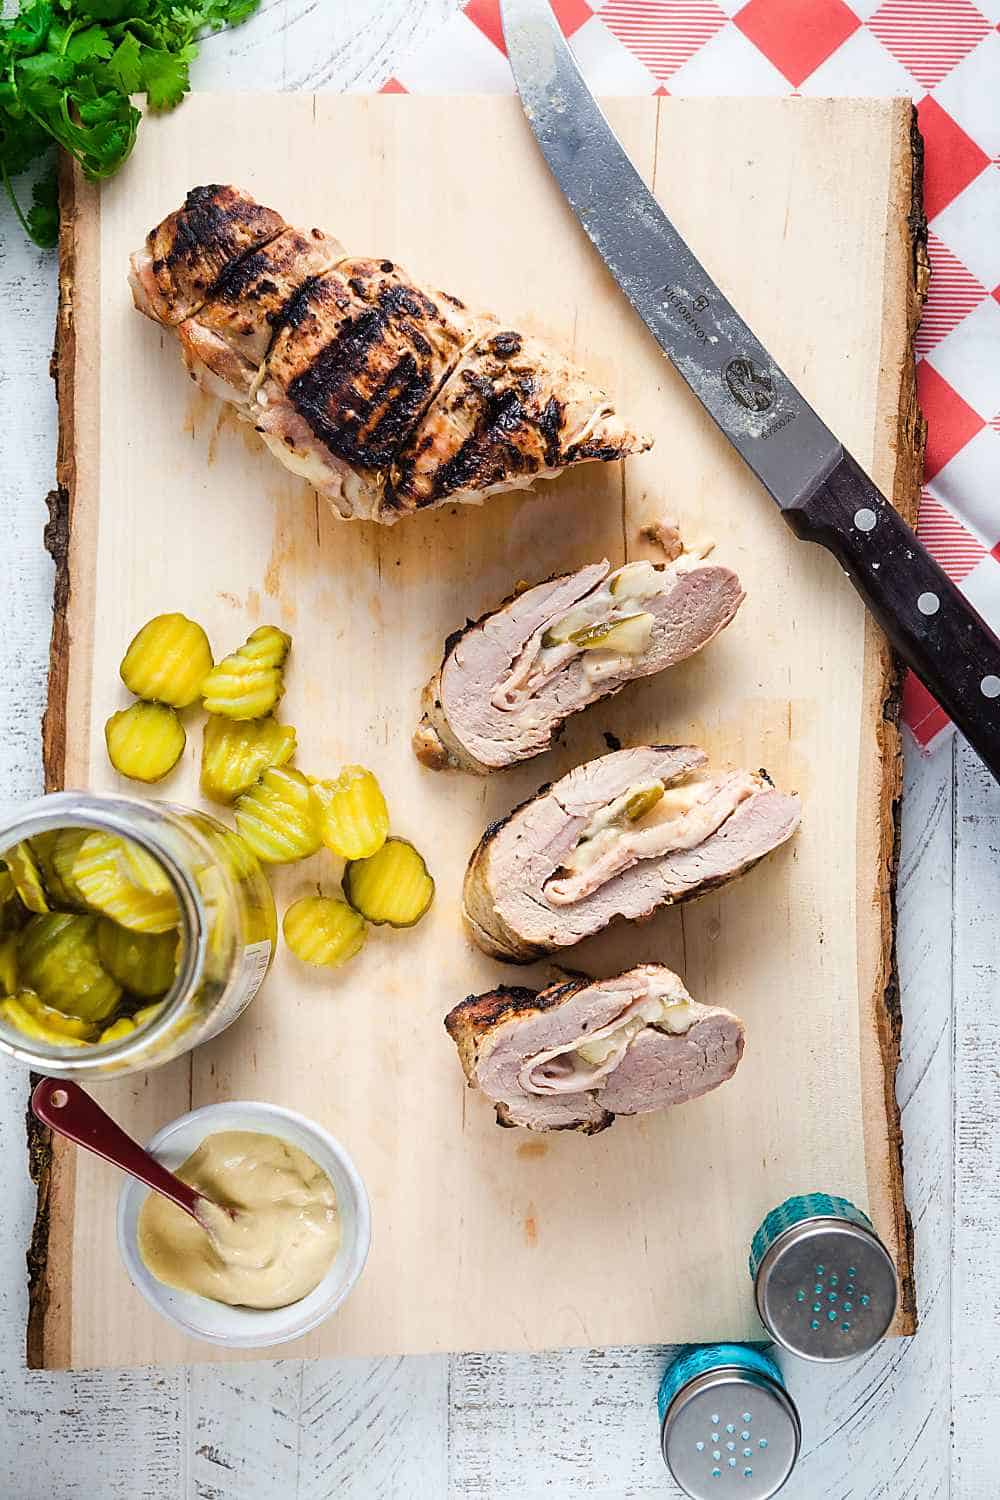
That’s right, I rolled ham, Swiss cheese, dill pickles, and mustard into a pork tenderloin marinated in garlicky mojo. Then I threw it on the grill until it was charred on the outside and gooey on the inside.

It was the best damn pork loin I’ve ever eaten. It was so juicy and flavorful! I’ll be making this Cubano pork loin all summer long. It would be perfect for the 4th of July!

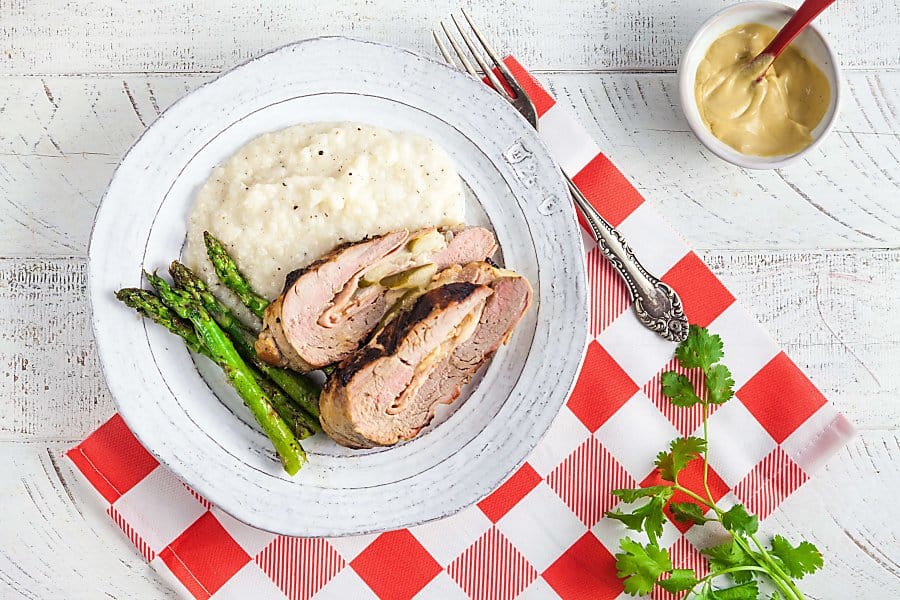
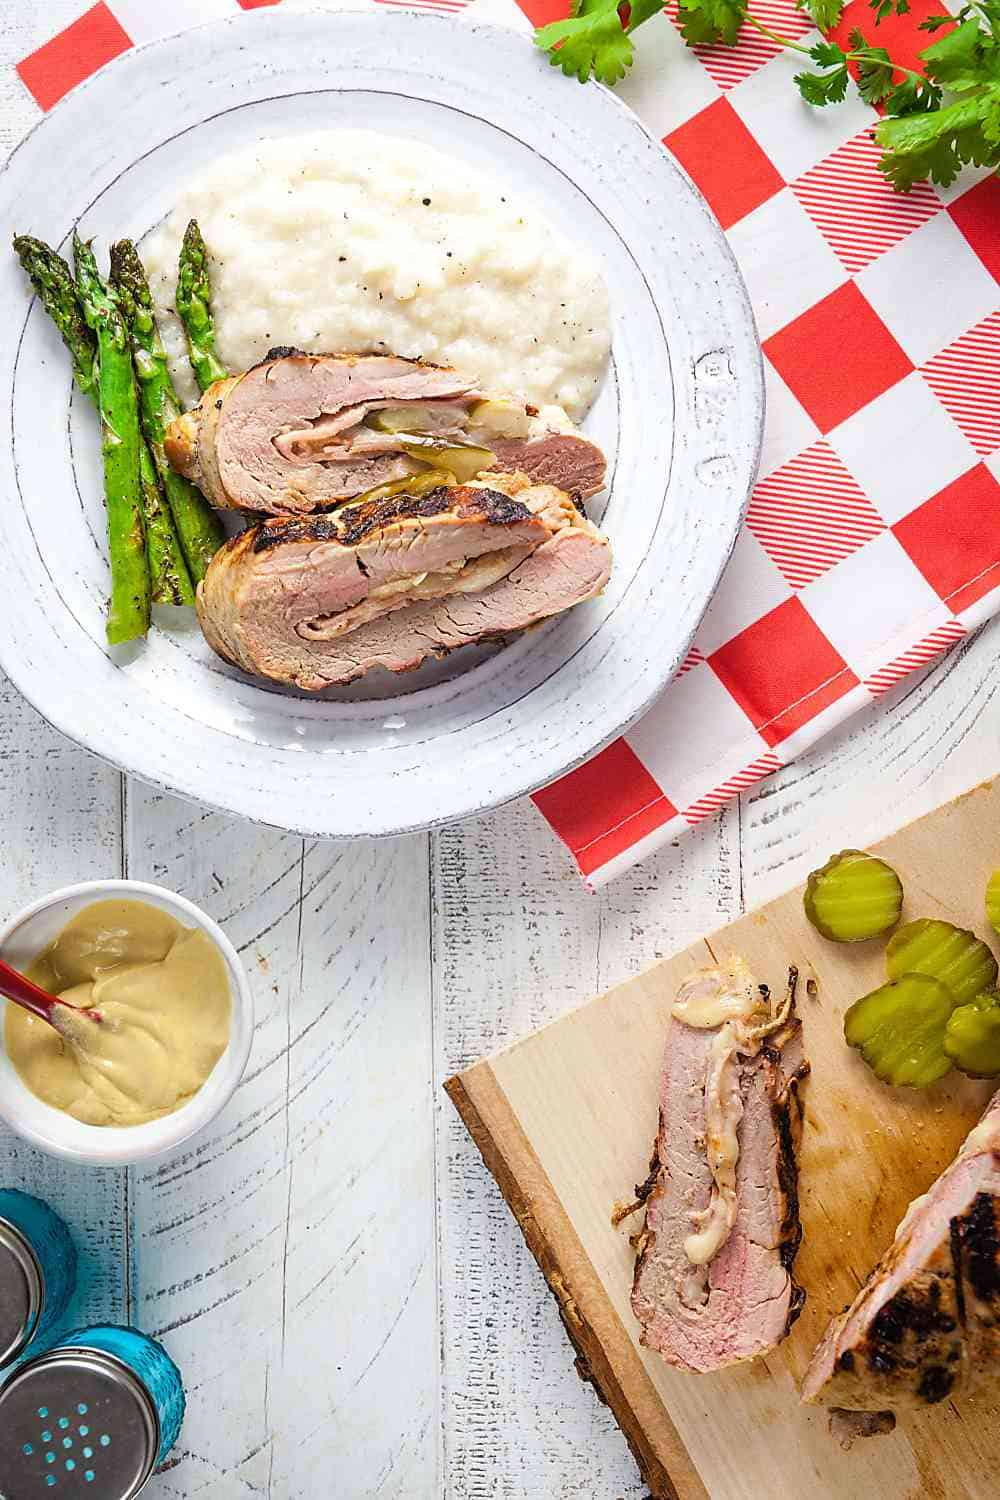
To keep our meal low carb, I served this stuffed pork loin with grilled asparagus and mashed cauliflower. If you aren’t watching carbs, slide a slice right onto a burger bun for a super awesome Cuban style sandwich. Leftovers – if you have any – are delicious straight from the fridge.

If you love Cuban flavors, you’ll also love these Cuban-Style Beef Lettuce Wraps with Pickled Onions (Paleo, Whole 30, Dairy Free) or Cuban Bean Patties with Pineapple Rice.

Slicing a cubano stuffed pork loin

How to stuff and tie pork loin:

Stuff pork tenderloin so much easier to make than it looks! First, you’ll want to butterfly your pork and pound it really thin. Hold a sharp knife parallel to your cutting board and split to pork nearly in half, length-wise. It should open like a book.

Next, cover the pork with plastic wrap and pout it with a meat mallet until it’s about ½ inch thick. Layer on your stuffing ingredients – mustard, pickles, ham, and Swiss cheese for this recipe – then, starting at the long side, tightly roll the pork around the filling.

To keep the fillings secure, you’ll need to tie the pork loin with kitchen twine. You can use short pieces of twine and knot each one at the top, or use one long piece and twist it around itself to secure it every time it comes around the top.

Here’s a video that shows you how to cut and tie the pork loin:

If you don’t have twine, you can use toothpicks to keep everything closed up tightly. In a pinch, unwaxed and unflavored dental floss with also does the job.

How to grill a stuffed pork loin:

To grill the stuffed pork loin, heat your grill to high heat. Place the pork on the grill, seam-side down, then grill for 4 minutes on each side, or until deeply browned and charred. Next, turn the heat down to medium-low and cook the pork over indirect heat for 20 minutes, or until a meat thermometer shows that it’s reached an internal temperature of 155 degrees.

Remove the pork from the grill and let it rest for at least 5 minutes before removing the twine and slicing it.

How to bake a stuffed pork loin:

If you don’t have a grill or the weather isn’t cooperating, you can also bake this Cubano pork loin in the oven.

Preheat your oven to 450 degrees and place the pork seam-side down in a roasting pan. Bake 10 minutes, or until the pork begins to brown. Then reduce the heat to 350 degrees and bake 45-55 minutes, or until the pork reaches an internal temperature of 155 degrees. As with the grilled tenderloin, you’ll want to be sure to let the pork rest for at least 5 minutes before slicing.

sliced cubano stuffed pork loin oon a wooden cutting board

Cubano Stuffed Pork Loin

Yield:
4 servings

Prep Time:
15 minutes

Cook Time:
40 minutes

Additional Time:
1 hour

Total Time:
1 hour 55 minutes

A Cubano, but make it low carb! This pork tenderloin is marinated in garlicky mojo, then stuffed with ham, Swiss cheese, pickles, and mustard. Yum!

Ingredients

  • 1 pound pork loin – butterfly and pound to 1/4 inch
  • 1/4 cup olive oil
  • 1 orange, juiced
  • 1 lime, juiced
  • 3 garlic cloves, minced
  • 1 Tablespoon Dijon mustard
  • 1/4 pound sliced ham
  • 1/4 pound sliced Swiss cheese
  • 1/2 cup dill pickles, sliced

Instructions

  1. Butterfly the pork loin and pound it to a 1/2-inch thickness. Place the pork loin in a shallow dish. Cover with the olive oil, orange juice, lime juice, and garlic; turn to coat. Cover and refrigerate at least 1 hour.
  2. Remove the pork from the marinade and place it on a cutting board. Spread the pork with mustard, then layer it with ham and Swiss. Scatter the pickles over the cheese. Starting at the long end, tightly roll the pork around the filling; secure with kitchen twine or toothpicks.
  3. Heat your grill to high. Place the pork onto the grill, seam-side down. Cook for 4 minutes on each side, until browned. Reduce heat to medium low; cook the pork loin over indirect heat for 20 minutes, or until it reaches an internal temperature of 150-155 degrees. (You can also make this stuffed pork loin in the oven: Bake it for 10 minutes at 450 degrees, then cook at 350 degrees for 45-55 minutes or until it’s cooked through.)
  4. Remove the pork loin from the grill and tent it with foil. Let it rest for at least 5 minutes, then remove the twin and slice into rounds.

Recommended Products

As an Amazon Associate and member of other affiliate programs, I earn from qualifying purchases.

Nutrition Information

Yield 4

Serving Size 1

Amount Per Serving

Calories 424 Total Fat 24g Saturated Fat 9g Trans Fat 0g Unsaturated Fat 11g Cholesterol 135mg Sodium 635mg Carbohydrates 7g Fiber 1g Sugar 4g Protein 45g


5 Healthy and Delicious Overnight Oats Ideas (Gluten-Free and Dairy-Free Options) by Gordon Ramsay

5 Healthy and Delicious Overnight Oats Ideas (Gluten-Free and Dairy-Free Options)


These Overnight Oats are a simple, healthy, and delicious breakfast option. Five delicious flavor combinations for each day of the work week!

How to make five overnight oats recipes

Overnight oats are a simple, healthy, and delicious breakfast option that’s ready to eat with minimal preparation.  

A few weeks ago, I shared how to make smoothie freezer packs for quick breakfasts on the run. But when you want something a little more substantial, you’ll be glad you tried this overnight oats recipe.

While we all know oatmeal is a nutritious breakfast staple, sometimes it gets a bad rap for being boring. We can fix that though – with five different ways to customize your oatmeal breakfast, you’ll never think of oatmeal as being boring again!  

While this recipe includes a few topping recommendations I just so happen to love, feel free to personalize your overnight oats to fit your taste buds! I’d love to hear your ideas!

Overhead view of Steel cut oats alongside other ingredients to make an Overnight Oats recipe

Overnight Oats Ingredients:

You only need a few ingredients to prepare this make-ahead breakfast. You’ll also need small jars to store them in. I use these 9.8 oz jars from The Container Store, but you can pick whatever works for you.  Mason jars work great! Just be sure it has a very tight lid to keep your oats fresh.

Start with your favorite oats, then add yogurt and almond milk to your container, then stick them in the fridge overnight.  You can even let them sit a few nights if you’re meal prepping! In the morning, simply add the toppings of your choice right before you eat.

Steel cut oats: Oats are the foundation of a delicious overnight oats recipe. While I prefer steel cut oats, you can use any kind you want, except quick cooking or one-minute oats.  The quick cooking oats turn to mush, and you don’t want that.

Greek Yogurt: I like to top my overnight oats with greek yogurt because it’s so high in protein.  Plus, it’s delicious! You can use vegan greek yogurt if you prefer a dairy-free breakfast. For that, I really love using Trader Joe’s cultured coconut milk. 

Coconut Milk: I prefer unsweetened coconut milk for this recipe because it’s super tasty, and I usually have it on hand for my morning coffee. But you can use the dairy or non-dairy milk of your choice. Almond milk also works really well in this recipe. 

Fruits and Nuts: The topping combinations you can choose from for your overnight oats are endless! Below you will find a few of my favorite choices, but go ahead and get creative. Just remember not to add your toppings until you’re about to eat. Otherwise, they can get mushy.  To save even more time, portion out your toppings into small containers or bags in advance. This reduces the amount of time you spend preparing your meal in the morning.

5 Healthy and Delicious Overnight Oats Ideas (Gluten-Free and Dairy-Free Options) 1

Delicious Overnight Oats Ideas

Mixed Berry and Chia Seed Overnight Oats

  • Oats
  • Coconut milk
  • Greek yogurt
  • Mixed berries
  • Chia seeds

Banana and Walnut Overnight Oats

  • Oats
  • Almond milk
  • Greek yogurt
  • Sliced bananas
  • Chopped walnuts

Pomegranate and Kiwi Overnight Oats

  • Oats
  • Coconut milk
  • Greek yogurt
  • Pomegranate seeds
  • Kiwi slices

Strawberry and Nut Butter Overnight Oats

Apple and Granola Overnight Oats

  • Oats
  • Coconut milk
  • Greek yogurt
  • Apple slices
  • Granola

Overnight oats with bananas

Healthy and Delicious Overnight Oats

Yield:
4

Prep Time:
5 minutes

Additional Time:
8 hours

Total Time:
8 hours 5 minutes

With only 3 simple ingredients as the base for this recipe, it doesn’t get much easier. Customize your breakfast with your favorite combination of toppings. You can eat your overnight oats cold, but if you prefer a warm breakfast you can heat them in the microwave for 1-2 minutes before adding your toppings!

Ingredients

  • 1 cup steel cut oats
  • 1 cup plain Greek yogurt
  • 1 cup coconut milk, or milk of your choice

Instructions

  1. Add uncooked oats to the jar or container of your choice.  (Note: Ingredient amounts may need to be adjusted based on the size of your container. This recipe is based on a 9.8 oz jar.)
  2. Add yogurt, and coconut milk to the container, put the lid on your jar and place it in the refrigerator.  
    Refrigerate at least 8 hours, to allow the oats to soak up the liquid ingredients.
  3. Remove your container from the refrigerator, stir the ingredients, and enjoy warm or cold with the toppings of your choice.

Notes

Make It Dairy Free: Use dairy-free milk and dairy free-yogurt to make vegan overnight oats

Make It Gluten Free: Use gluten-free oats

Meal Prep Option: Your overnight oats should last in the refrigerator for up to 5 days.

Nutrition Information

Yield 4

Serving Size 1

Amount Per Serving

Calories 262 Total Fat 13g Saturated Fat 10g Trans Fat 0g Unsaturated Fat 2g Cholesterol 6mg Sodium 50mg Carbohydrates 27g Fiber 3g Sugar 2g Protein 11g


Incoming search terms:

Gluten-Free Goddess Recipes: Gluten-Free Chocolate Cupcakes by Gordon Ramsay

Gluten-Free Goddess Recipes: Gluten-Free Chocolate Cupcakes


Gluten free chocolate cupcake recipe with coffee flavored icing

Cupcakes for the In Crowd…

Gluten-free cupcakes are hot. Or should I say, HAWT. Tack on vegan status, too, and you’ve got a trend worthy of the most BoHo WeHo GoGo. So I’m reprising this chocolate cupcake recipe to tempt you into baking this week. These little beauties remind me of Devil’s Food Cake. Dark, moist and chocolatey.

So grab your inner Domestic Goddess by the hand and stir up some trouble.

But before we get to (what happens to be my favorite) chocolate cupcake recipe from the archives, I want to share something. Maybe it’s the new moon just around the corner in early June, that cyclic siren pulling us toward wholeness, to embracing our shadow, urging us to let go, shed the outworn for the sake of authenticity. Or maybe it’s the fresh start of a new summer season, possessing me with cravings for leafy walks and the scent of lavender with its clean as a cloud fragrance, conjuring flashes of new beginnings.

Whatever it is, I surrender to it.

I came across these Polaroids during our recent move to Texas.

I won’t tell you how many years have passed since these images were taken. How many moons have waxed and waned. Let’s just say my sons and I are warm weather babies, born into sunlit heat and generous greenery, the open window sounds of summer, our lullabies.

Looking back across the seasons feels dreamlike. I float through it. And all too soon realize I cannot grasp anything. I cannot hold on to the past. My hands are empty. And that’s okay. Though a secret piece of me sometimes aches for that once clear definition my mothering role carved out for me. My days are fluid now. And soft. And I’ve been thinking.

After a certain age you get, well. Tired.

Tired of squeezing your self into one-size-fits-normal. Tired of accommodating expectations. Weary of scanning your body through a Madison Avenue filter. Exhausted pretending you even care about Top 40 pop, manicures, or fashion trends (it’s obvious, you don’t). I am increasingly irritated by this ancient automatic reflex to fit in, find the perfect hair color, be nice. That nice woman. The one the neighbors like.
It sneaks in slowly on tiny paws, this anarchy.

This wildness.

It starts in dreams and keeps you awake at night with its low throated hum. You can feel it growing, toothy and buzzing inside you, like some fractal shattering cracked spiral candy. Like flinging honey and bee stings into thunder. Inescapable. A rush. A roaring undertow- this need for life. A life lived true.

Karina
xox

Gluten free chocolate cupcakes with coffee icing

Karina’s Wheat-Free Chocolate Cupcakes with Coffee Icing- a Dairy-Free, Gluten-Free Vegan Recipe

Gluten-free chocolate cupcake heaven. Yep. And if you don’t care for the taste of coffee, use rice milk or coconut milk in the batter in place of the coffee and make a vanilla, coconut, or chocolate flavored icing.

Preheat the oven to 350ºF. Line a 12-cup cupcake pan with parchment or paper liners.

Ingredients:

3/4 rounded cup sorghum flour

3/4 rounded cup potato starch, cornstarch or tapioca starch

1/2 cup unsweetened cocoa powder

1 cup organic cane sugar

1/2 teaspoon sea salt

1 teaspoon baking powder

1 teaspoon baking soda

1 teaspoon xanthan gum

1 cup warm coffee (not too hot or it will make the starch gluey)

1 tablespoon Ener-G Egg Replacer beaten with 1/4 cup warm water

3 tablespoons organic canola or coconut oil

2 teaspoons bourbon vanilla extract

1/2 teaspoon light tasting rice vinegar

Instructions:

Whisk together the flours and dry ingredients.

Add in the coffee, egg replacer, oil, vanilla and vinegar. Beat the batter for a full two to three minutes until all the ingredients are incorporated and the batter is smooth.

Using an ice cream scoop, plop the batter into the cups and smooth the tops.

Bake in the center of a preheated oven till done- about 20 minutes or so.

Cool the cupcakes on a wire rack (don’t let them sit in the baking pan too long or they’ll get soggy).

Frost when completely cooled. See recipe for coffee flavored icing below.

Notes on gluten-free vegan batter:

Gluten-free vegan batters are a tad different than wheat and white flour batters. They are stiffer at first, then stretch and get sticky as the xanthan gum and egg replacer do their thing.

If the batter “climbs” the beaters, slow down the speed and slightly lift the beaters to encourage the batter to move back down into the bowl. Move your beater around the bowl in figure eights, at a slight angle. Practice your technique- soon you’ll be winging around gluten-free vegan baking like a pro.

Vegan Coffee Icing Recipe

Ingredients:

2 cups confectioner’s (powdered) sugar

2-3 tablespoons Spectrum Organic Shortening or vegan margarine

2-4 ounces cold coffee, as needed

1 teaspoon bourbon vanilla

Instructions:

Starting with the least amount of liquid, beat the sugar to incorporate the shortening, coffee and vanilla. if you need more liquid, add a small amount at a time. beat for two minutes or so until smooth.

If you need to stiffen the frosting, add a little more confectioner’s sugar.

Chill the frosting before using it. I chill it, covered, for roughly an hour.

Frost the cupcakes. Cover in an air-tight container until serving. best eaten the first day. If making ahead of time, chill frosted cakes briefly in the freezer before wrapping individually and freezing.

Cook time: 1 hour, total

Yield: Serves 12

Recipe Source: glutenfreegoddess.blogspot.com

All images & content are copyright protected, all rights reserved. Please do not use our images or content without prior permission. Thank you.

Enjoy sugary treats in moderation. Gluten-Free Goddess advises consuming no more than 2 tablespoons of sugar a day. 

Proudly powered by WordPress

By continuing to use the site, you agree to the use of cookies. Click here to read more information about data collection for ads personalisation

The cookie settings on this website are set to "allow cookies" to give you the best browsing experience possible. If you continue to use this website without changing your cookie settings or you click "Accept" below then you are consenting to this.

Read more about data collection for ads personalisation our in our Cookies Policy page

Close