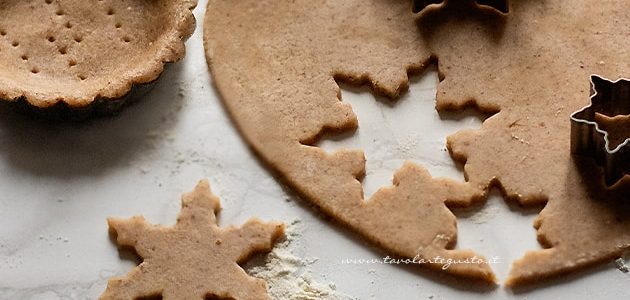
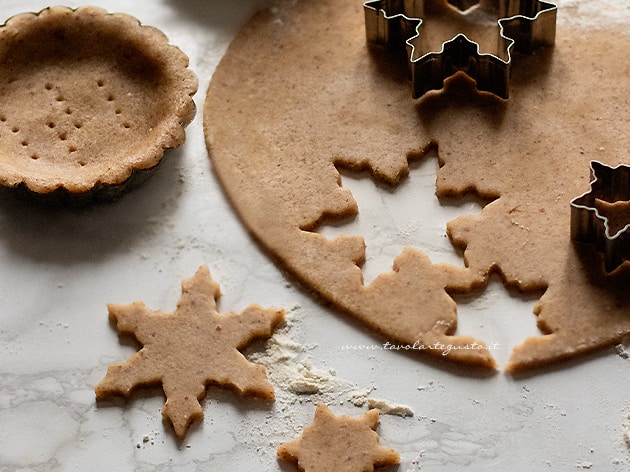
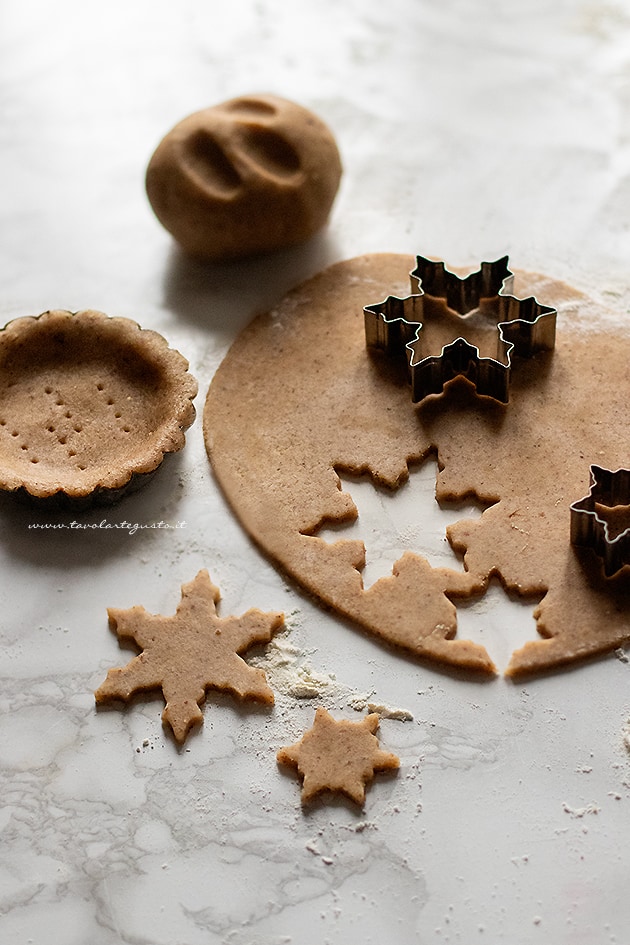
There Shortcrust pastry with hazelnuts it's a base delicious! Variant of classic shortcrust pastry, in this case made with hazelnut flour in the dough that gives a rustic taste it's a exquisite scent! And it is ideal to prepare be one Hazelnut tart to be stuffed to taste, that Cookies with nuts, tartlets, baskets, tarts, mignon …
It is also a very easy and quick preparation. For the realization you can use both the hazelnut flour already ready; both whole hazelnuts (I recommend with peel for the most intense flavor) to pulverize in the mixer! the result does not change! Yes accomplishes in a few minutes with the super proven method is with that without butter! Turns out simple to model, it does not crack when it lies down and you can give birth to infinite shapes! it's a once cooked you will realize his absolute goodness: one soft and crumbly hazelnut shortcrust pastry to the bite, from nutty flavor! Divine!
Discover also:
Hazelnut cake (soft with a crunchy surface of grains and chocolate)
Shortcrust pastry recipe with hazelnuts
PREPARATION TIMES
Preparation
Cooking
Total
15 minutes
35 minutes
50 minutes
Ingrediants
Quantity for 1 tart of 24 cm – 40 biscuits
200 g of 100% flour + 130 g of hazelnut flour (or whole pulverized hazelnuts) + 1 teaspoon for sprinkling
165 gr of soft butter at room temperature (or 75 gr of sunflower oil)
1 whole egg (medium size)
2 egg yolks (small size)
130 grams of granulated sugar
1 teaspoon of vanilla extract (or 1 sachet or the seeds of 1 berry)
1 pinch of salt
Method
How to make shortcrust pastry with hazelnuts
First of all, follow step by step the whole procedure you find in SHORT PASTRY
As you can see, the ingredients are identical, only the addition of the hazelnut flour to mix at the 00's changes.
In the link you will find all the useful tips from preparation, to cooking, to conservation!
Here she is Shortcrust pastry with hazelnuts
Prepare the Recipe! Follow me on Instagram @tavolartegusto and share your creation with the hashtag #tavolartegusto. You will enter my gallery!
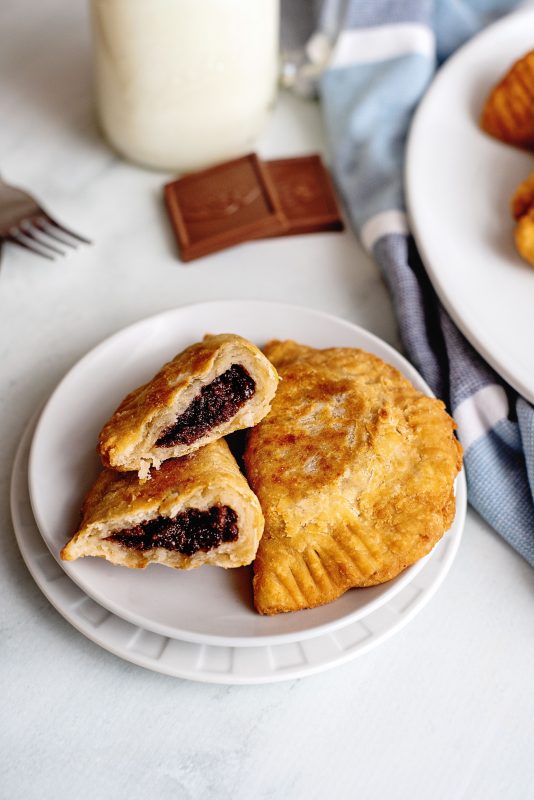
An old fashioned, made from scratch, chocolate fried pies has no equal. In the fried pie world, I have two favorites: Peach and Chocolate. For an amazing peach pie like my great grandmother made, you have to start with dried peaches. Fresh or canned just can’t pack the wallup of flavor that dried ones do. Click here for the peach fried pie recipe and if you want to watch me make them with Al Roker – just for kicks.
And for fried chocolate pies like I grew up with, you have to make your own chocolate paste out of sugar, butter, and cocoa powder, like my Aunt Sue does and you have to use the recipe that I put in my first cookbook, like I’m sharing with you here.
Can I Use Canned Biscuit Dough?
Note: You can make these with canned biscuit dough but they won’t be the same. They will still be good in a pinch though. You can also make these simply by sticking a mini chocolate bar inside each one – but it won’t be the same, either. They will still be good in a pinch, though! Just do what you have time to do and put your heart into it. The most important step in cooking isn’t the ingredients you use or how intricate the preparation, it’s the process of making something yummy for someone because you love them. That makes everything taste better.
Now let’s make some Chocolate fried pies…
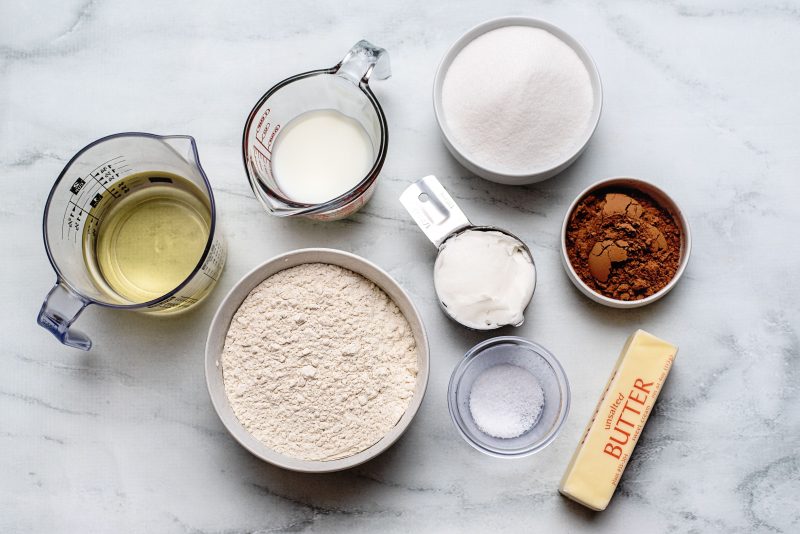
Ingredients for Chocolate Fried Pie Crust and Filling
For the crust you’ll need: Shortening (like Crisco or coconut oil, I’m using generic), milk, salt, and all purpose flour.
For the chocolate paste filling you’ll need: Sugar, butter, and cocoa powder.
Most of my family’s old recipes don’t use baking chocolate and such, but cocoa powder instead because it was so much more affordable.
Place flour, salt, and shortening in a bowl. Stir together really well and then cut the shortening into the flour with a long tined fork.
Or a pastry cutter if you’re feeling fancy.
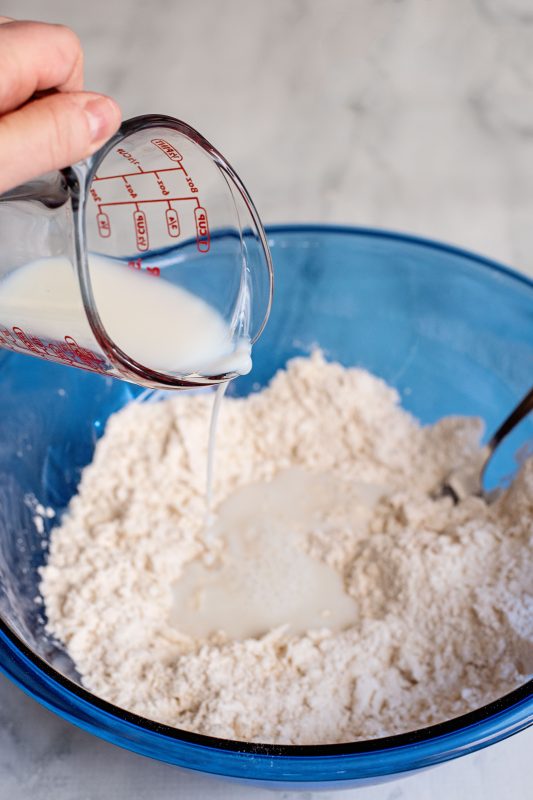
Pour milk into flour mixture.
Stir it up really well.
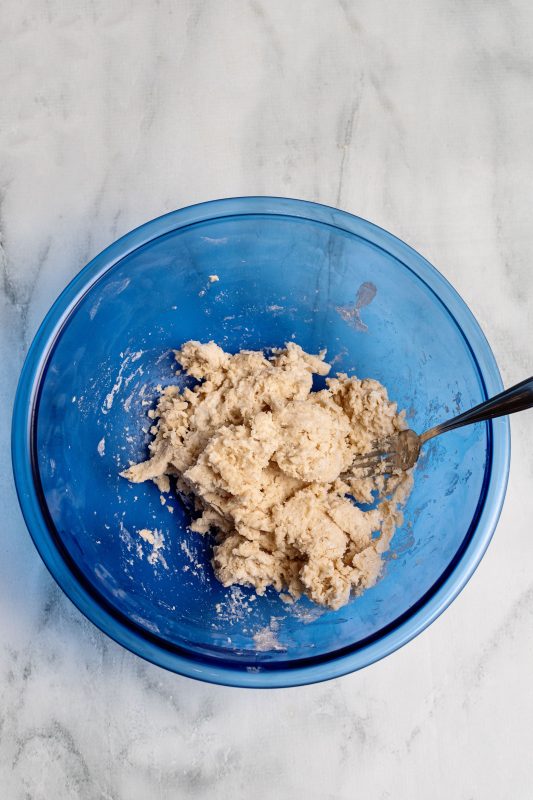
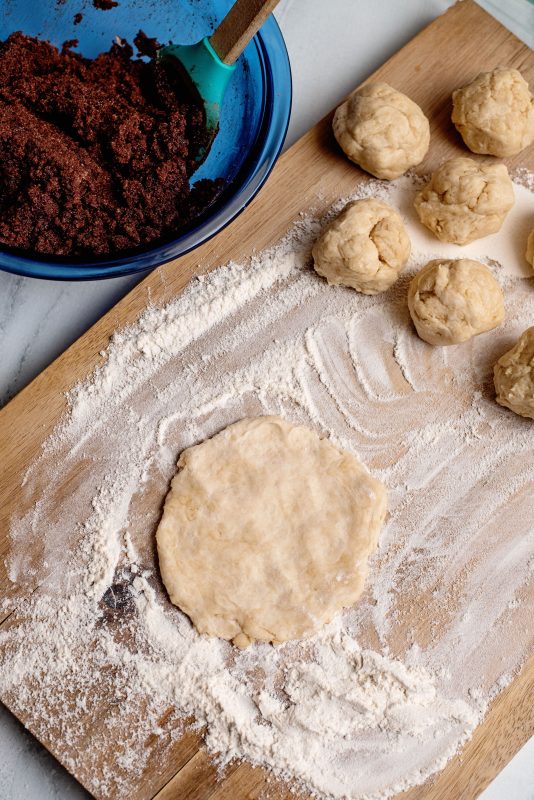
You may need to add more milk, and that is perfectly okay. Add a tablespoon or so at a time until it forms a ball of dough.
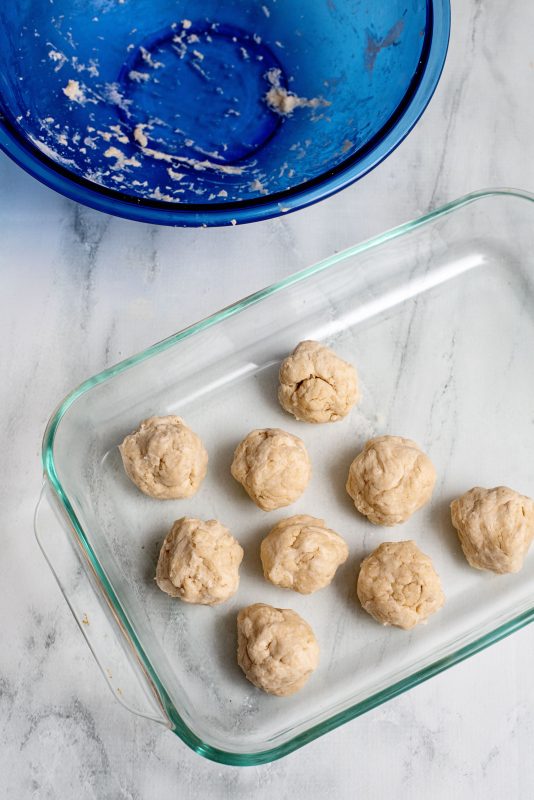
Divide that up into ten ball shaped portions.
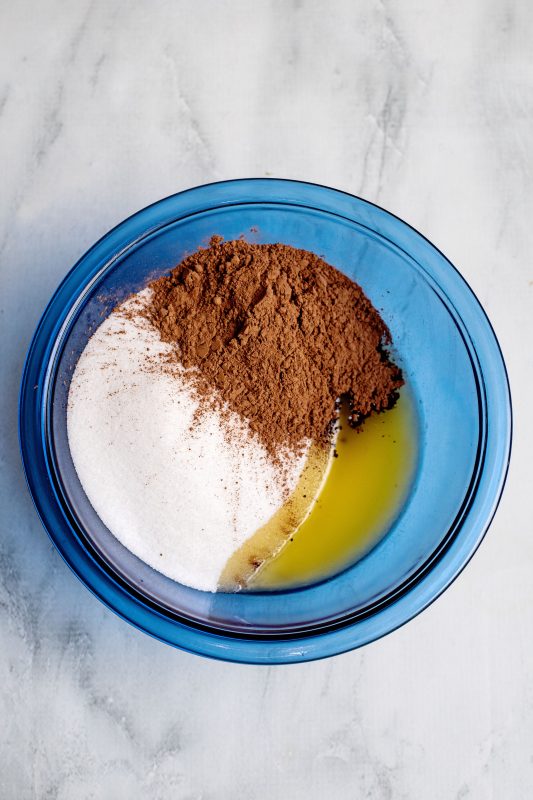
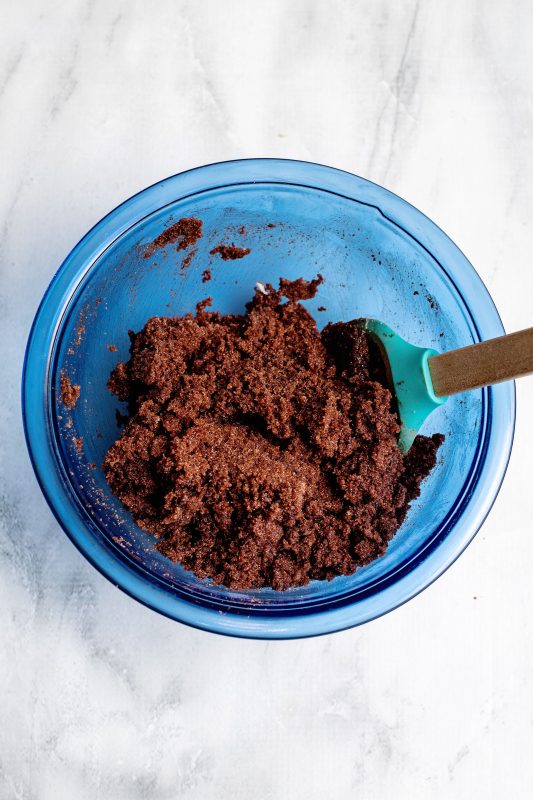
In a medium mixing bowl, place melted butter, sugar, and cocoa powder.
Stir it up really well
It will form a paste. Note: This is a gritty chocolate paste and it is utterly delicious.
Alright now we need to take each of those dough balls and make them into a 6 inch (or so) circle.
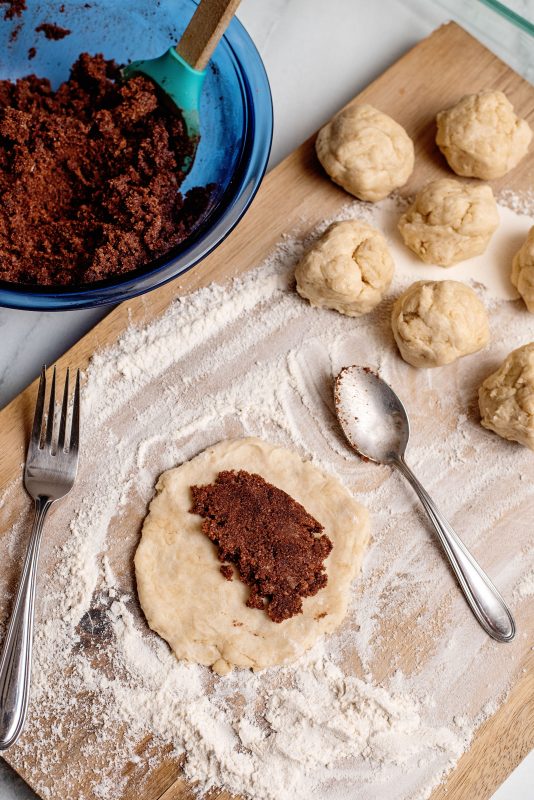
Now place about 2 tablespoons of filling in the center of each.
THEN, dip your fingertips in water and run them around the edges to help them stick together.
Fold over and crimp edges lightly with a fork.
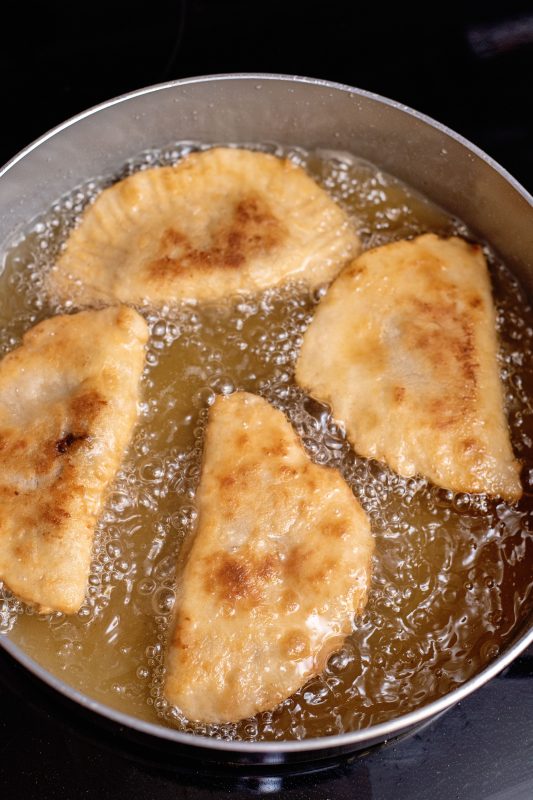
Preheat about 1/4 inch of oil in a large skillet on medium high for about five minutes, then turn it down to medium and carefully add your pies a few at a time, careful not to overcrowd.
Let them cook until browned on one side, then flip and cook until browned on the other as well. This will just take a few minutes.
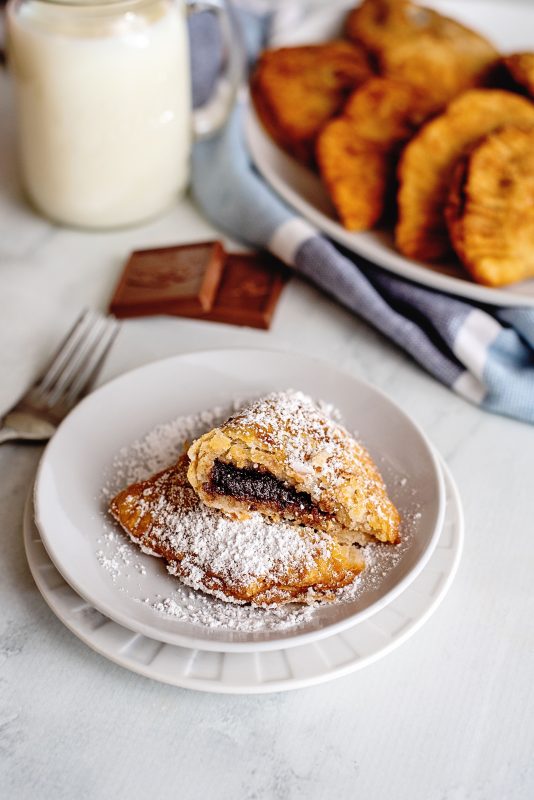
Remove to paper towel lined platter.
Let cool slightly before eating.
Or add some powdered sugar over the top before you enjoy. Or not, do whatever cranks your tractor!
Share with your friends!
Chocolate Fried Pies (Pie Day Friday!)
Ingredients
2Cupsall purpose flour
1teaspoonsalt
1/2cupshortening
1/2cupmilkmore if needed
vegetable oilfor frying
filling
2cupssugar
6tablespoonsunsweetened cocoa powder
1/2cup1 stick butter or margarine, melted
Instructions
In a medium bowl, combine the flour and salt. Cut in the shortening with a long tined fork. Add the milk and stir until the dough sticks together.
Divide the dough into ten ball shaped portions.
In a separate bowl, stir together melted butter, cocoa powder, and sugar until it forms a paste.
Pour oil to a depth of 1/4 inch in a large skillet and place over medium high heat to preheat while you assemble pies.
On a floured surface, roll or pat each dough ball into a 6 inch circle. Place 2 tablespoons of chocolate paste in center of each. Dip fingertips in water and run around outside edges of crust. Fold over and crimp with fork to seal.
After oil has heated for at least five minutes, reduce heat to medium. Carefully add a few pies at a time to hot oil and cook until browned on one side, flip and brown on the other.
Remove to paper towel lined plates and repeat until all pies are cooked.
Cool slightly before serving.
Store leftover pies at room temp for up to three days.
Previous Pie Day Friday Posts:
“Everyone has gifts, they just open them on different occasions.”
~Author unknown. Submitted by Jenny. Click here to submit your own.
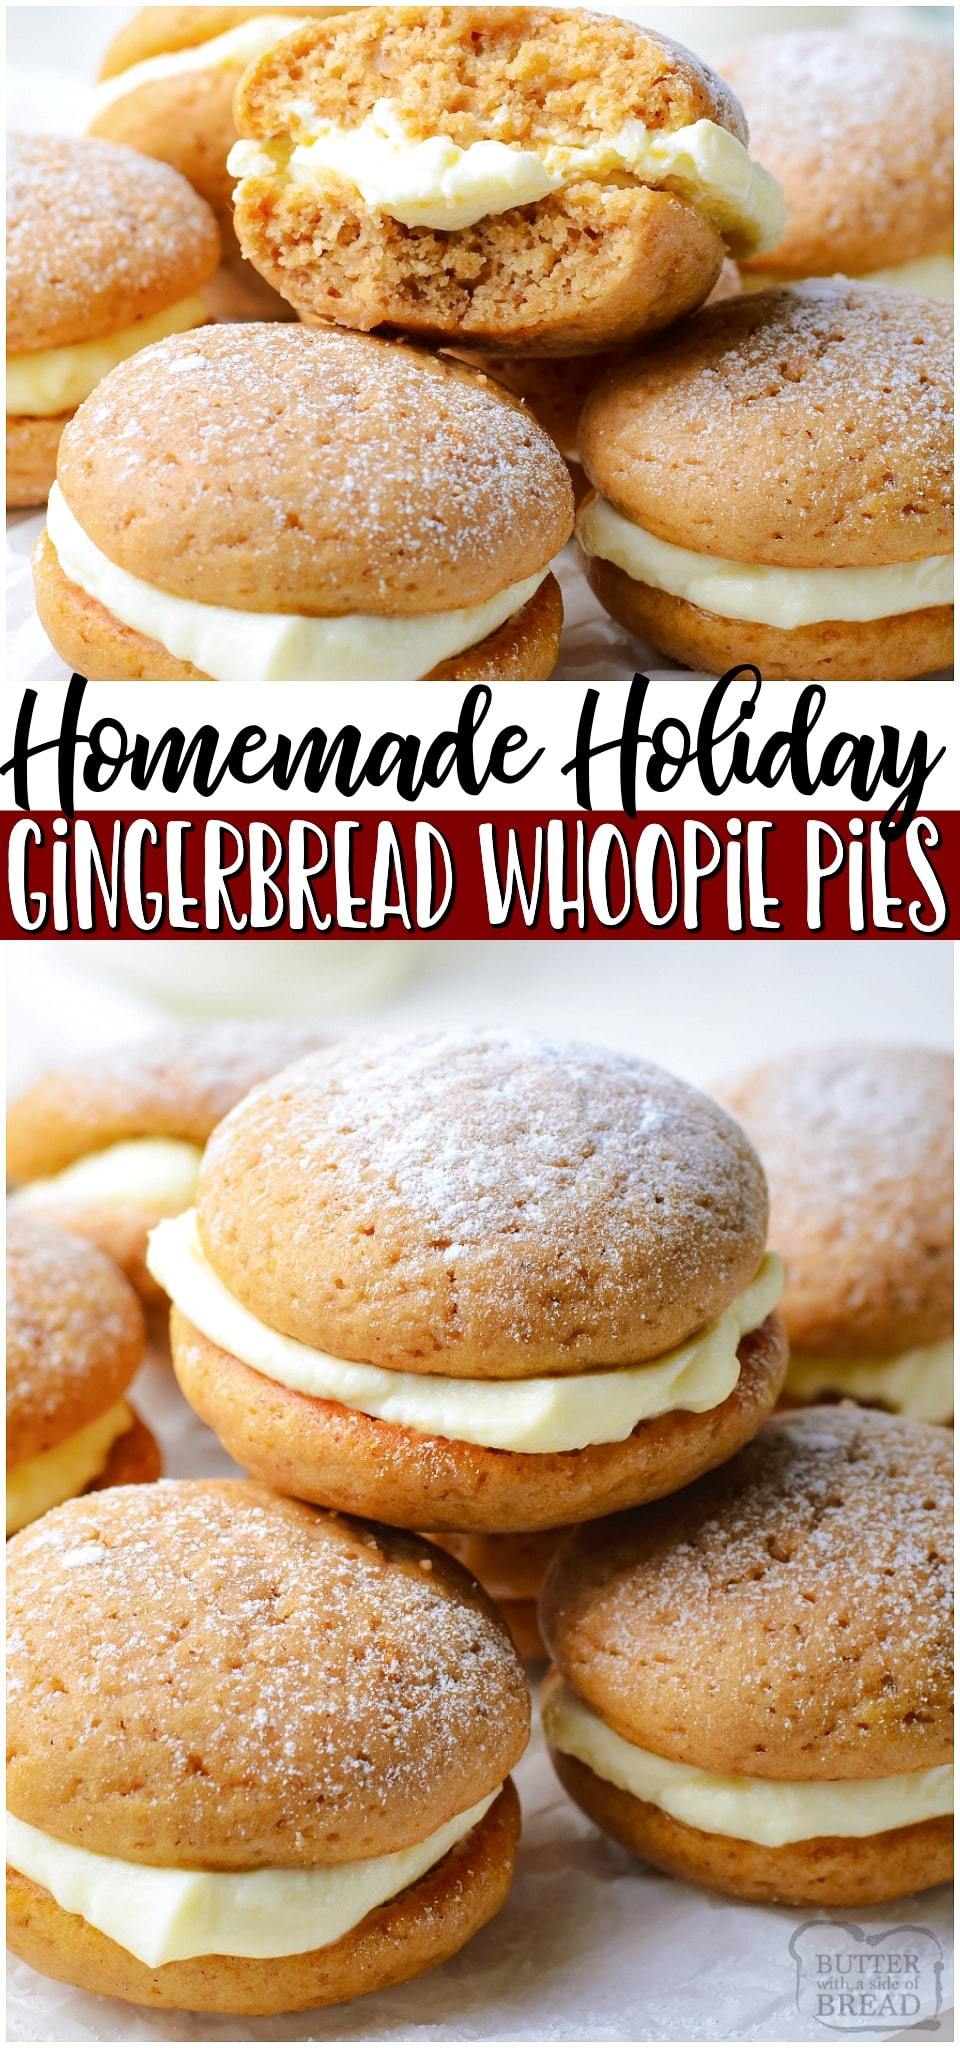
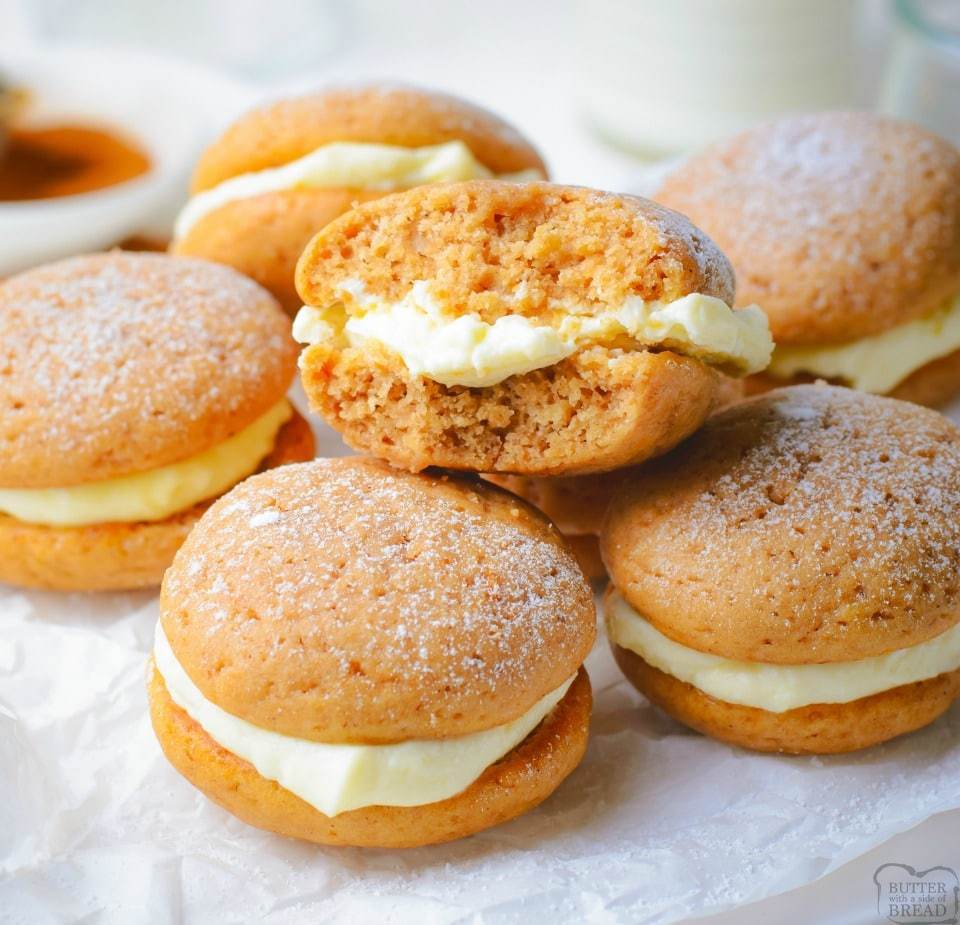
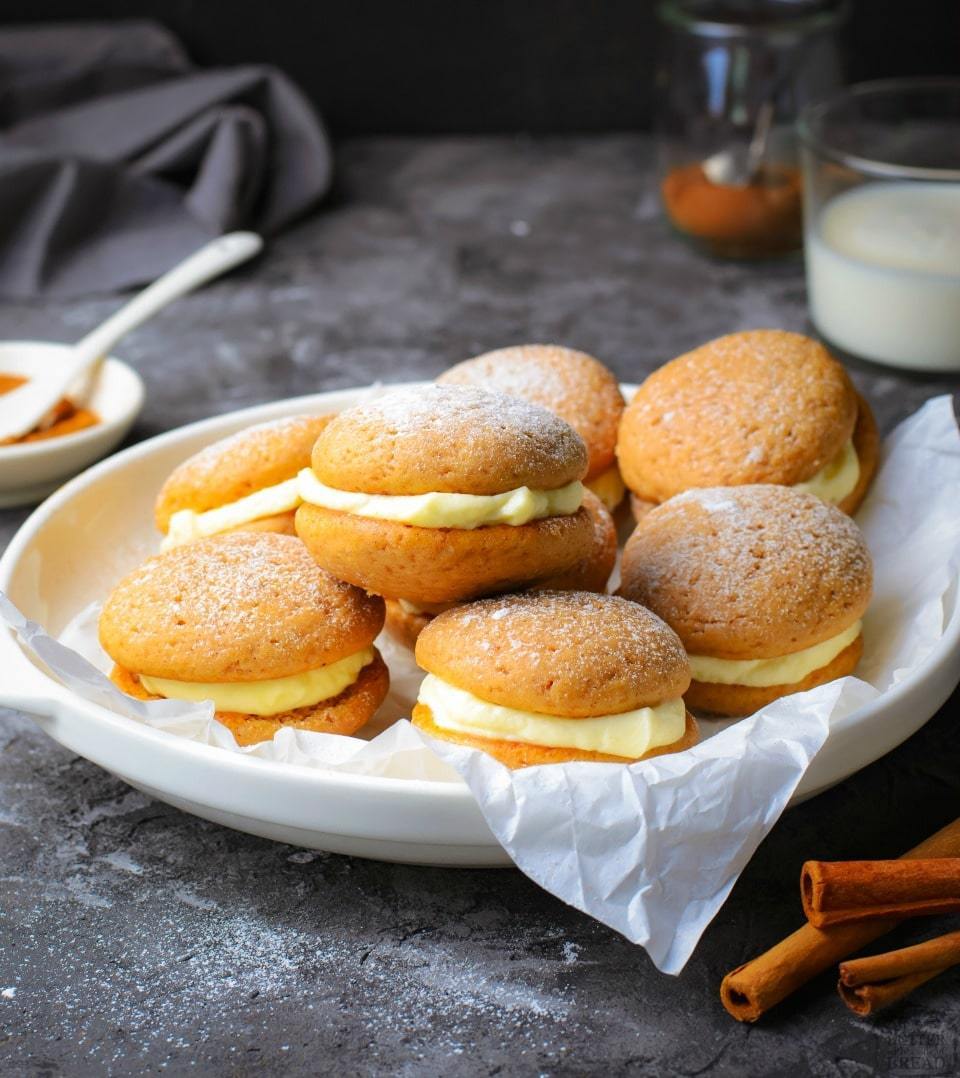
Gingerbread whoopie pies are soft, spiced gingerbread cookies with a lovely cream cheese filling. Perfect gingerbread treat for the holidays!
These tasty cream cheese frosted gingerbread whoopie pies are a holiday hit but since they’re made with basic pantry ingredients, you can enjoy them all year long if you wanted to. Bring some holiday spirit in March, July, or late August and I’m sure no one will complain! Such a great treat when you want something a little more unique and sweet.
What are gingerbread whoopie pies?
Whoopie pies are pillowy soft dome shaped cookies that are given a nice frosting-like filling. While traditional whoopie pie recipes are chocolate this one is gingerbread flavored! Even better, the filling is a nice, rich, and creamy cream cheese filling that pairs great with that gingerbread flavor we love and expect in every bite.
Gingerbread whoopie pie ingredients
For the whoopie pies you will need:
-Flour: We need 1 cup of all-purpose flour to make a gluten-filled base for the cookie dough.
-Baking soda: This is the leavening agent that helps the cookies to puff up while baking. We need 1/3 teaspoons of baking soda to do this.
-Sugar: 1/3 cup of brown sugar will help to add a depth of flavor, sweetness and a little caramelization around the cookie edges when they set.
-Spices: We need 1/2 teaspoon of ground ginger, 1/3 teaspoon of cinnamon and 1/8 teaspoon each of ground nutmeg and ground cloves so that we can get a well spiced cookie.
-Salt: 1/4 teaspoons of salt will help to enhance the flavors in this dish.
-Vanilla: We need 1 teaspoon of vanilla extract. Use high quality vanilla for better results.
-Egg: One egg will work as the binder for the cookie dough so that they don’t fall apart before being eaten.
-Butter: Adding a richness and fat into the mix is 1/4 cup of melted butter.
-Molasses: 1 Tablespoon of this adds brown color and that “special something” we get in gingerbread cookies, making these really taste like the real deal.
-Milk: This will help to a little more moisture to the dough so they turn out perfectly. We need 1 tablespoon of milk to do this.
For the cream cheese frosting we will need:
-Cream cheese: The star of the show in this simple frosting recipe- we need 1/4 cup of softened cream cheese to really get the creamy texture we want.
-Butter: With 1 ounce of softened and unsalted butter, we can get a great depth of flavor.
-Powdered sugar: With 3/4 cup of powdered sugar we can get a smooth and sweet filling.
-Vanilla: Adding a little flavor to the frosting is 1/3 teaspoon of vanilla. Use high quality for better flavor.
How to make gingerbread whoopie pies
Mix together the flour, ginger, cinnamon, nutmeg, cloves, salt, and baking soda in a medium sized bowl.
In a large bowl, combine the melted butter, brown sugar and molasses.
Whisk in the egg, milk, and vanilla extract until they are well combined.
Add the dry ingredients to the wet ones and then carefully mix until just combined.
Cover the bowl in cling wrap and then place it in the fridge for 1 hour (at minimum) but up to 12 hours.
Preheat your oven to 350 degrees F and then scoop out the dough in 1 tablespoon sized scoops and roll them into a ball. Place the balls 2 inches apart on a prepared baking sheet.
Bake the dough balls for 10-15 minutes or until they are puffed up and just set. Let them cool completely before you start frosting.
When you’re ready to frost, beat together the cream cheese and butter until fluffy in a mixing bowl.
Whisk in the powdered sugar and vanilla extract until combined.
Spread or pipe the frosting on the bottom of a cookie and then top with another cookie forming a cookie sandwich. Repeat with the remaining cookies until all have been completed.
Let the frosted cookies chill for 30 minutes and then dust with powdered sugar, if desired. Enjoy!
Gingerbread Whoopie Pies
Gingerbread whoopie pies are soft, spiced gingerbread cookies with a lovely cream cheese filling. Perfect gingerbread treat for the holidays!
Print
Pin
Rate
Course: Cakes, Dessert
Cuisine: American
Keyword: Gingerbread Whoopie Pies
Prep Time: 35minutes
Cook Time: 15minutes
Total Time: 50minutes
Servings: 8
Calories: 255kcal
Ingredients
Whoopie Pies
1cupall-purpose flour
1/3tspbaking soda
1/3cupbrown sugar
1/2tspground ginger
1/3tspcinnamon
1/8tspground nutmeg
1/8tspground cloves
1/4tspsalt
1tspvanilla extract
1egg
1/4cupbutter, melted
1Tbspmolasses
1Tbspmilk
Cream Cheese Frosting
1/4cupcream cheese, softened
1ozunsalted butter, softened
3/4cuppowdered sugar
1/3tspvanilla extract
Instructions
In a medium bowl, add flour, ginger, ground cinnamon, nutmeg, cloves, salt, and baking soda.
In another large bowl, combine together melted butter, brown sugar, and molasses. Whisk in egg, milk, and vanilla extract until they are well-combined.
Add the dry ingredients to the wet ingredients. Carefully mix until just combined.
Use a cling wrap and cover the bowl. Put it in the fridge for at least 1 hour. Preferably up to 12 hours.
Preheat oven to 350ºF. Scoop 1 tablespoon of chilled dough. Roll into a ball. Ensure that cookie balls are placed 2 inches apart on the prepared baking sheet.
Bake balls for around 10-15 minutes, until they are puffed and just set. Let whoopies cool completely before you start frosting.
Beat together cream cheese and butter until fluffy. Add powdered sugar and vanilla extract. Whisk until well combined. This forms the frosting.
Spread or pipe about 2 teaspoons of filling onto the bottom of a cookie. Top with another cookie, forming a sandwich. Repeat with remaining cookies.
Chill for 30 minutes. Dust chilled whoopie pies with powdered sugar, if desired. Enjoy!
Do I have to keep gingerbread whoopie pies in the fridge?
Yes, once frosted with the homemade cream cheese frosting, these cookies should be kept stored inside of an airtight or covered container in the fridge for up to a week.
Can I freeze gingerbread whoopie pies?
Yes! These cookies do great in the freezer. I recommend storing them layered in an airtight container so that they don’t accidentally get frozen together.
More fabulous holiday recipes you’re sure to enjoy!
Gingerbread whoopie pies are soft, spiced gingerbread cookies with a lovely cream cheese filling. Perfect gingerbread treat for the holidays! They’re easy to make, taste great and are always a crowd-pleasing favorite!
Related
We send FREE RECIPE cards every month! Want ’em?
FREE Printable Recipe Cards + have access to our FREE 15-Minute Meals!
The cookie settings on this website are set to "allow cookies" to give you the best browsing experience possible. If you continue to use this website without changing your cookie settings or you click "Accept" below then you are consenting to this.
Read more about data collection for ads personalisation our in our Cookies Policy page


 These tasty cream cheese frosted gingerbread whoopie pies are a holiday hit but since they’re made with basic pantry ingredients, you can enjoy them all year long if you wanted to. Bring some holiday spirit in March, July, or late August and I’m sure no one will complain! Such a great treat when you want something a little more unique and sweet.
 Gingerbread whoopie pie ingredients
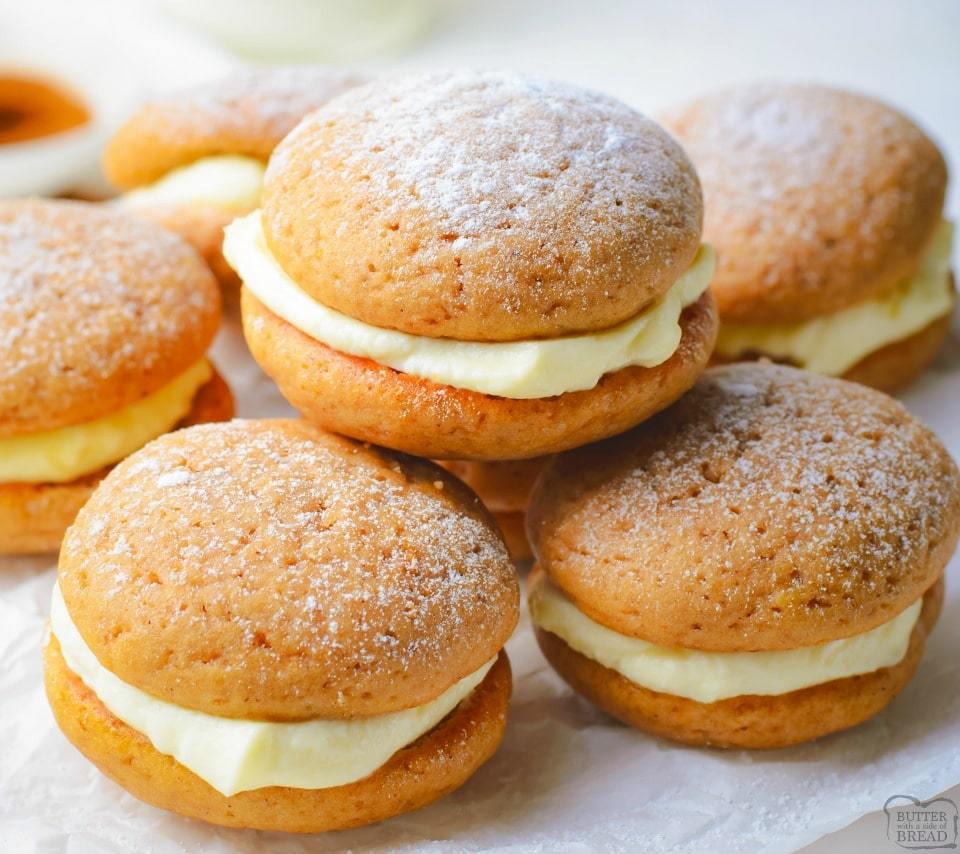 For the cream cheese frosting we will need:
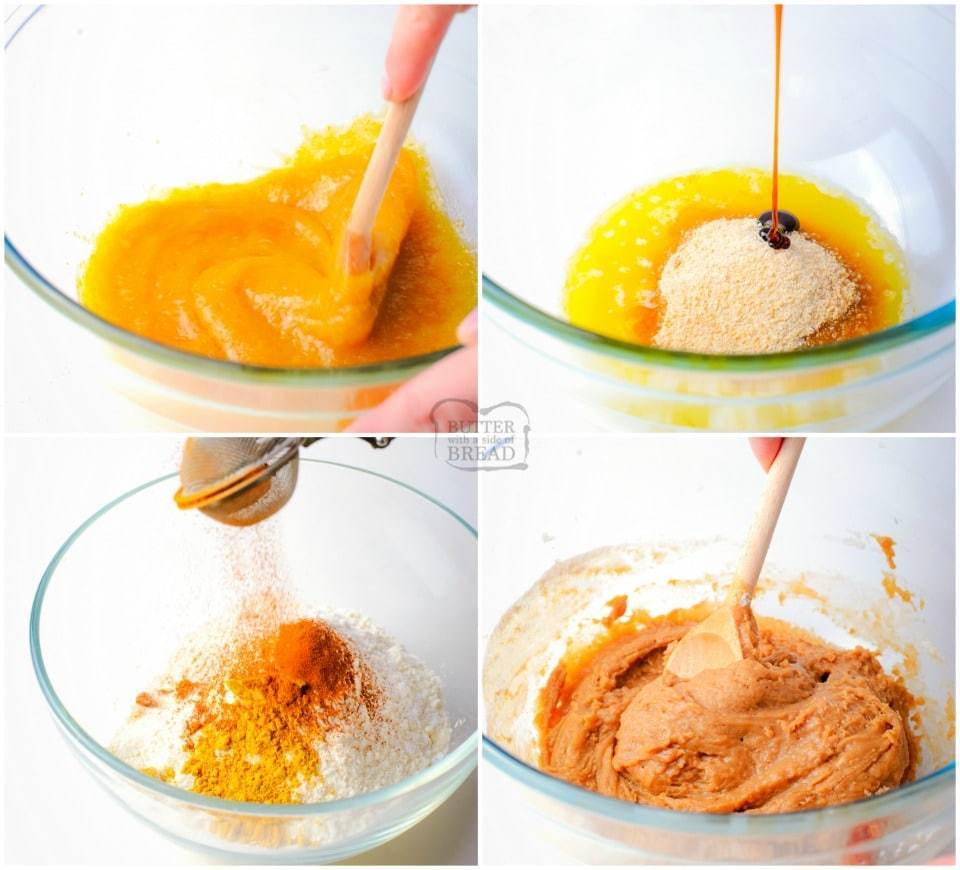 How to make gingerbread whoopie pies
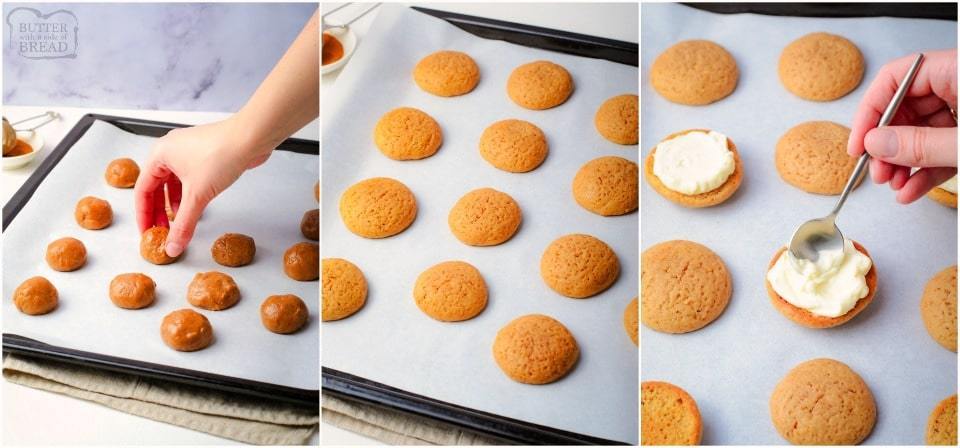 Preheat your oven to 350 degrees F and then scoop out the dough in 1 tablespoon sized scoops and roll them into a ball. Place the balls 2 inches apart on a prepared baking sheet.
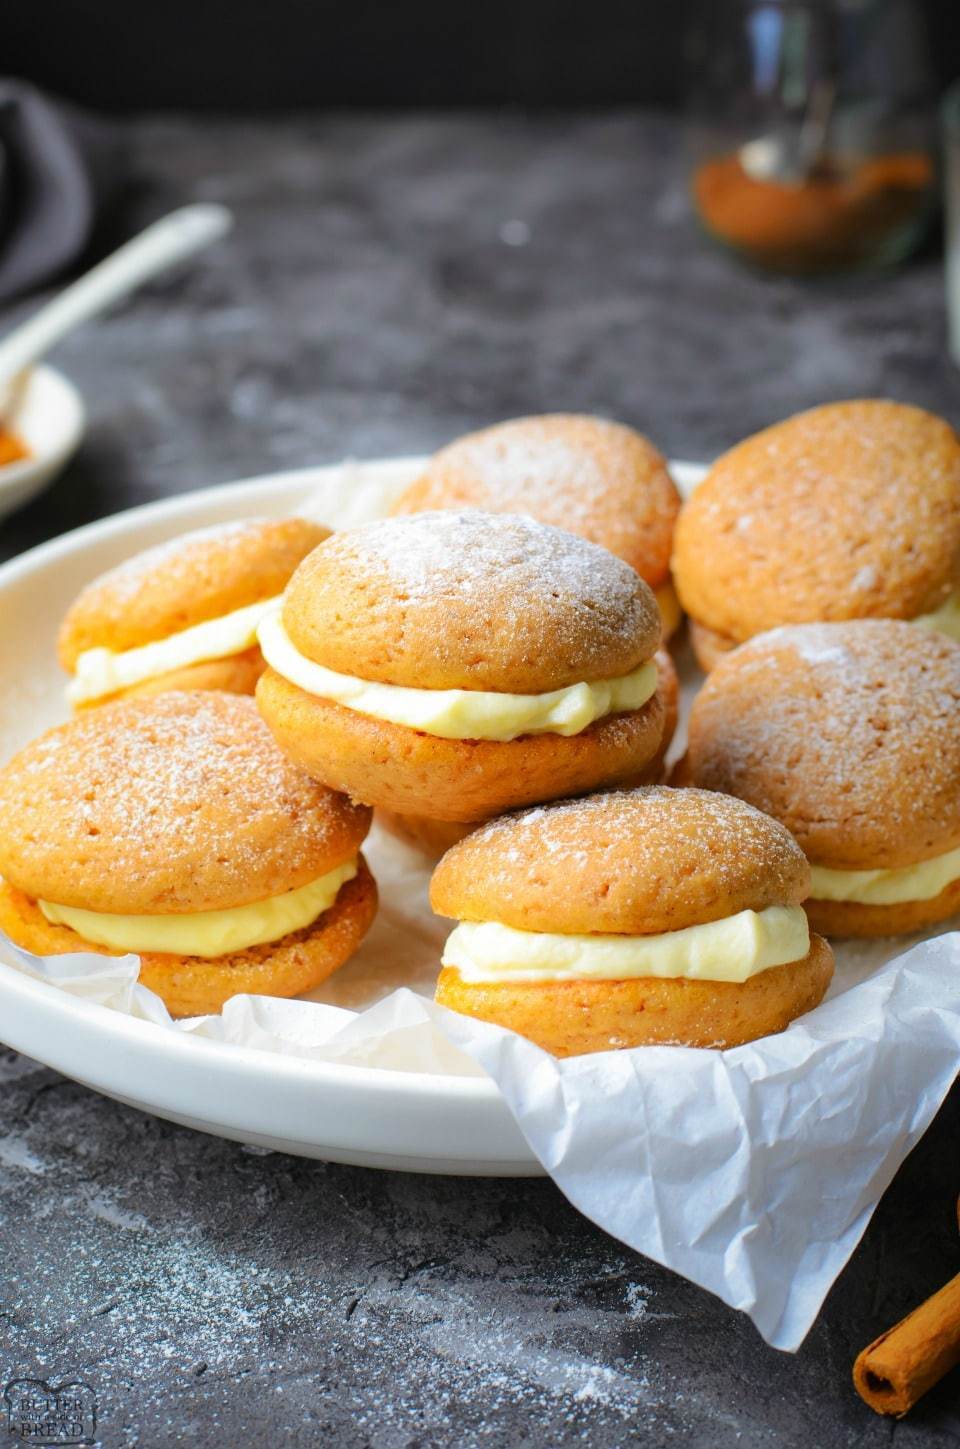

 More fabulous holiday recipes you’re sure to enjoy!