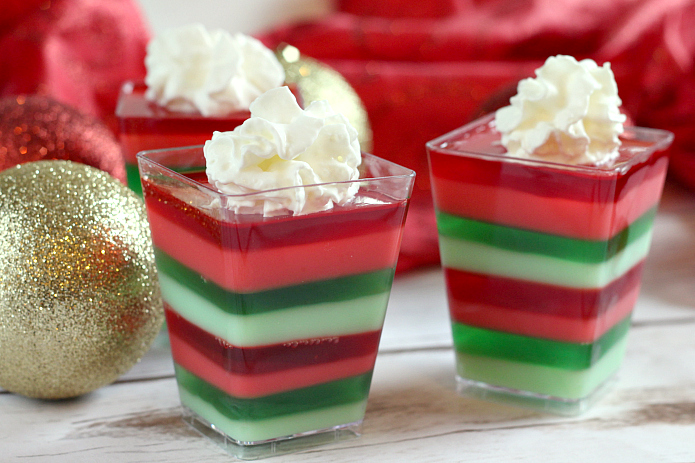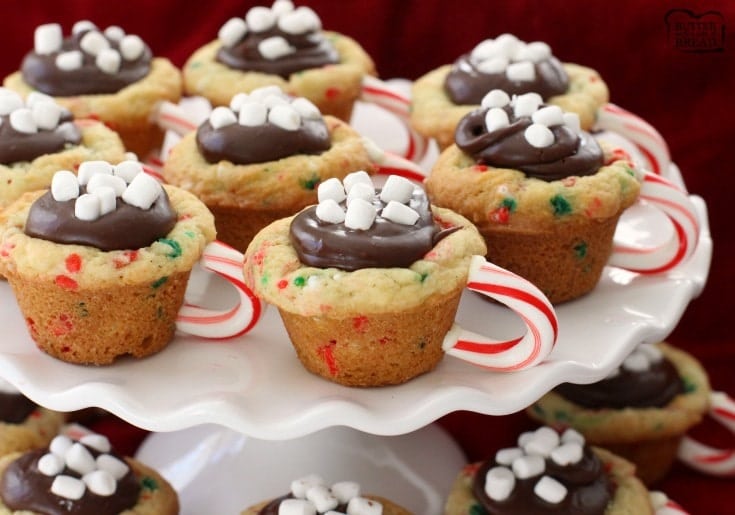
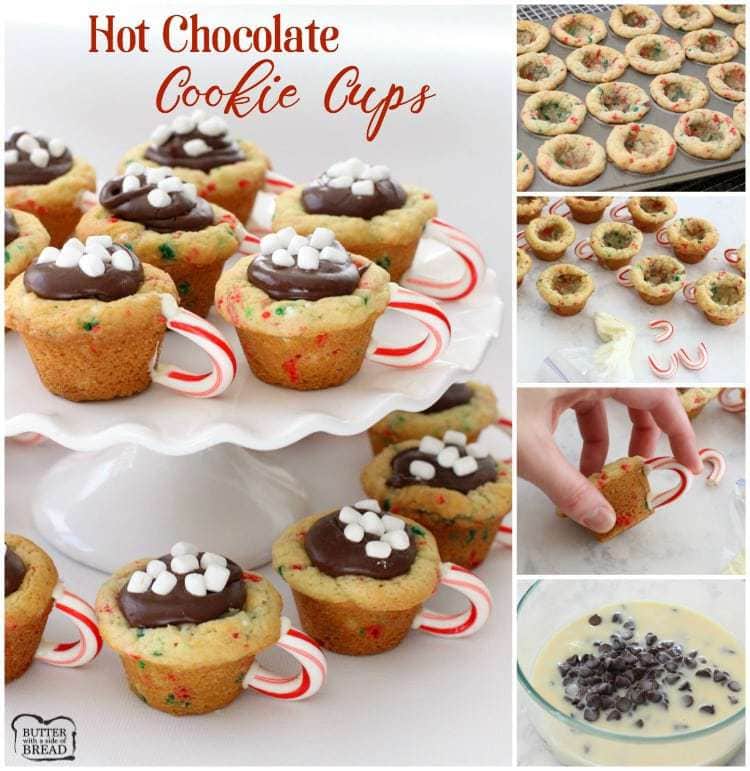
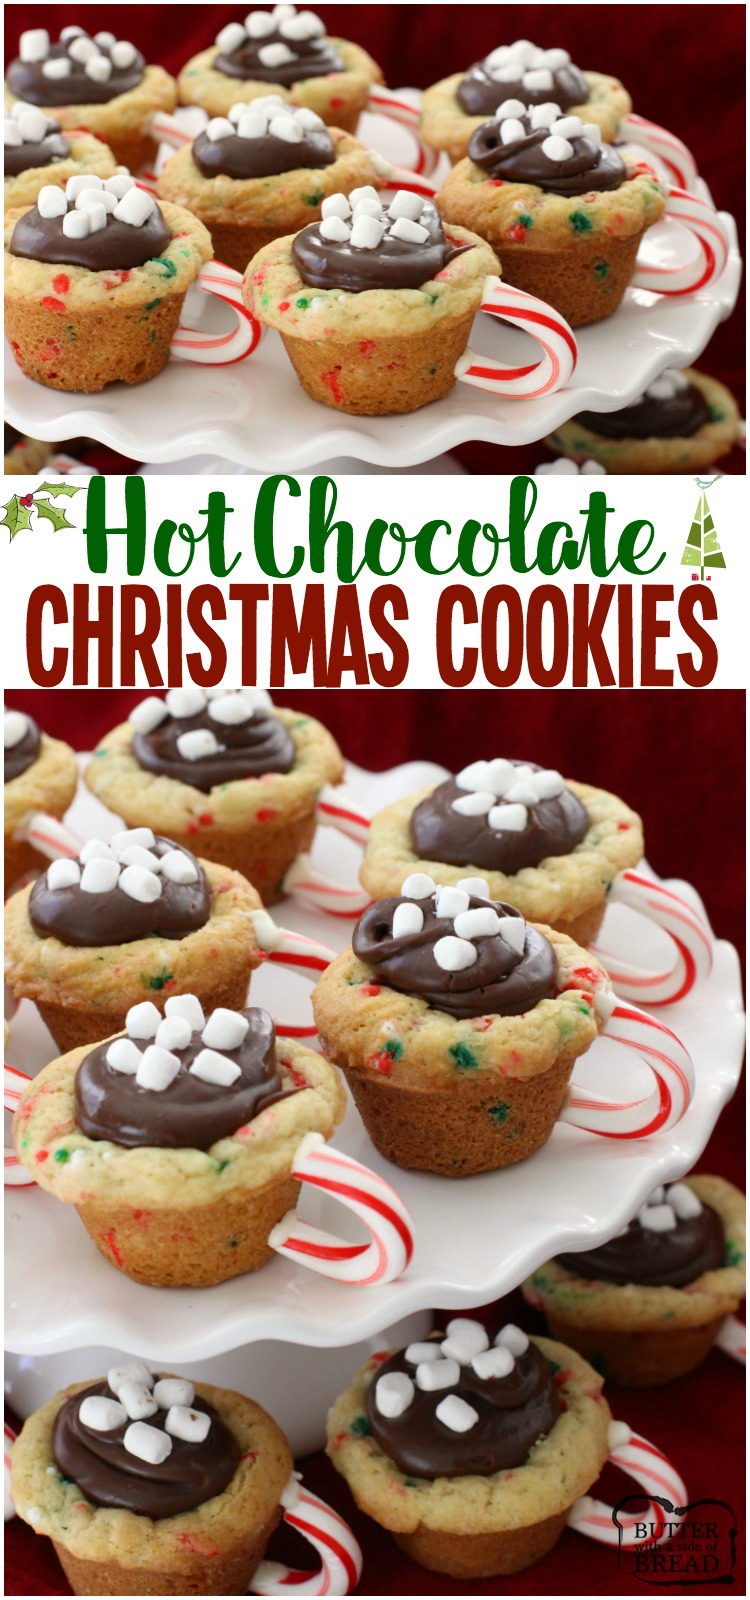
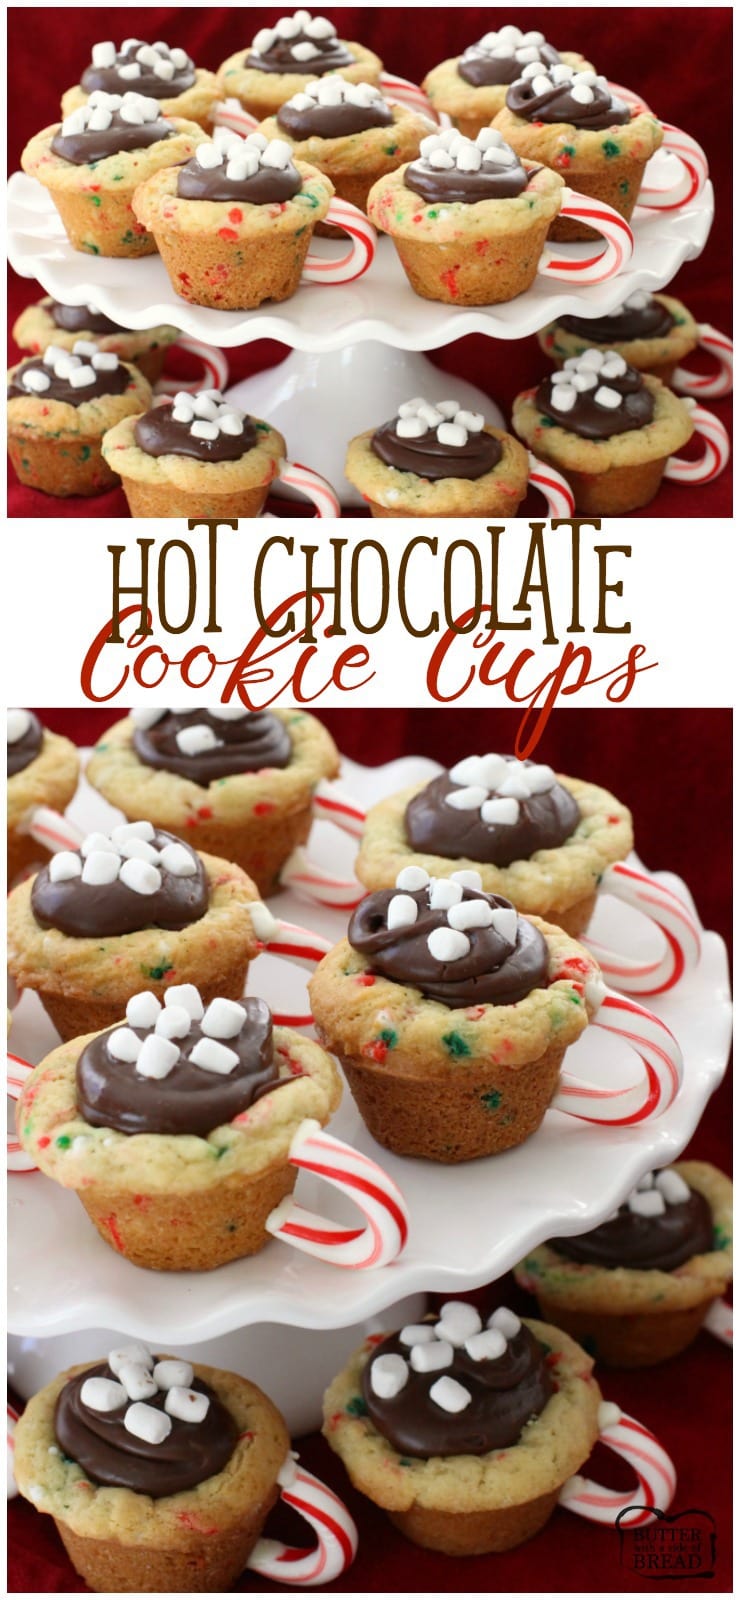
Hot Chocolate Cookie Cups are the most fun & festive Christmas cookies ever! Sugar cookie cups filled with fudge, mini marshmallows & sprinkles with a darling candy cane handle!
Hot Chocolate Cookie Cups are my favorite Christmas cookie ever! They’re super cute, so festive and absolutely delicious. I saw these darling Hot Chocolate Marshmallow Cookies that Noreen made over at Party Pinching not too long ago and those gave me an idea! I morphed them with my Peanut Butter Fudge Cookies and the result? These darling, delicious perfectly festive Christmas cookies! They’re quite easy to make, especially if you have little helpers. Enjoy!
How to make Hot Chocolate Christmas Cookies
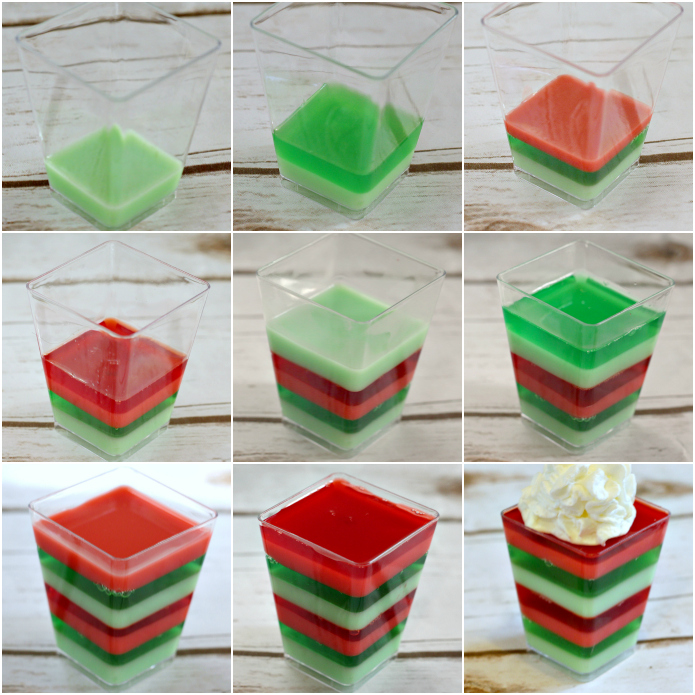
You make Hot Chocolate Christmas Cookies in 3 phases: the cookie cups, the cookie cup fudge filling and then assembling them all. Mix together the cookie cup dough and place scoops in a mini muffin tin. Bake the cookies, then use a small measuring spoon to indent each cookie. Let the cookies cool for about 15 minutes, then overturn them onto a cooling rack to cool completely. The fudge filling is made from 3 simple ingredients: sweetened condensed milk, chocolate chips and vanilla extract. Heat the condensed milk and chocolate chips, then stir in the vanilla and stir until smooth. I transferred my fudge filling into a quart sized ziplock bag and cut a corner to pipe it into the cookies. Top the fudge filling with tiny marshmallows that are the size that comes in hot chocolate packets. Use kitchen scissors to cut the curved part of mini candy canes and adhere them to the sides of your cookie cups with melted white chocolate. Let the cookies cool to set the candy cane handles and fudge filling, then serve & enjoy!
How do you make the best Christmas Sugar Cookies?
Sugar cookie dough is sticky, but once it’s sufficiently chilled, it’s much more workable. Resist the urge to add more flour to the dough before chilling! If you add too much flour, the ratio of wet to dry ingredients is off and the cookies end up drier and more crumbly.
Do not melt the butter! The butter needs to be softened (at room temperature), but using melted butter will ruin the cookies.
Spend a little extra time when you mix the butter and sugars. Creaming them together for 2-3 minutes will improve the consistency of your cookies.
Preheat the oven. This will help your cookies turn out right every time!
 Hot Chocolate Christmas Cookie Cups
- 1 cup sugar
- 1/2 cup softened butter
- 1 egg
- 1 tsp. vanilla
- 1/3 cup sour cream
- 1/2 tsp. salt
- 1/2 tsp. baking soda
- 2 cups flour
- 2 TBSP holiday sprinkles
Fudge Filling:
- 2 cups semi-sweet chocolate chips
- 1 (14 ounce) can sweetened condensed milk
- 1 teaspoon vanilla extract
You’ll also need:
- 24 mini candy canes
- tiny marshmallows*
- 1 TBSP white chocolate chips, melted
- Making the cookie cups: Preheat the oven to 350 degrees F. Spray a mini muffin tin with cooking spray.
- With a hand mixer, cream together sugar and butter. Add egg and vanilla. In separate bowl, combine sour cream, salt and soda. Add flour and sour cream to butter mixture, beat until smooth. Add 2-3 TBSP holiday sprinkles and mix just until combined. Scoop dough out using a 2 TBSP cookie scoop and put one in each mini muffin cup. No need to roll the dough to make it smooth- it will all bake the same.
- Bake cookies for 15-18 minutes, making sure they’re not getting too brown at the end. {If they are, pull them out.}
- Right after you take them out, use a small measuring spoon to push into the middle of each cookie cup, creating a space for the fudge filling to go. You don’t want to push through the cookie completely- but make sure you create a big enough space.
- Let cool in the pan for 10-15 minutes, then gently run a thin knife along the sides to pop them out. If you greased the pan well, you shouldn’t have any problems here!
- To make the fudge filling: Combine the chocolate chips and sweetened condensed milk in a microwave safe bowl. Mix lightly and microwave on high for 1-2 minutes. I have a powerful microwave, so mine only took 1 minute. The mixture doesn’t look melted, but give it a few gentle stirs and you’ll see it’s heated well enough. Add vanilla and stir again until smooth.
- Transfer about 3/4 the fudge into a quart-sized ziplock bag. Squeeze the fudge into a corner and snip the corner off. Now you can easily pipe the fudge into the cookies! The great thing about this fudge too is that it sets up super fast, so feel free to fill the cookies well, so that the fudge goes above the cookie- it will set up and not run out! If your fudge gets too solid, just pop it back in the microwave for 10-15 seconds.
- To assemble the cookies: Cut the rounded part off the candy canes and adhere them to the side of each cookie cup with melted white chocolate. This is actually real easy- just put white chocolate on the cut portion of the candy cane, press it to the side of the cookie cup, then set it down on the counter until white chocolate is solid. After about a minute, the candy cane handle is well attached to the cookie cup!
- Fill each cookie cup with fudge. Place several tiny marshmallows on top. Let cool.
- Store cookies in an airtight container on the counter top, or in the fridge for up to 1 week.
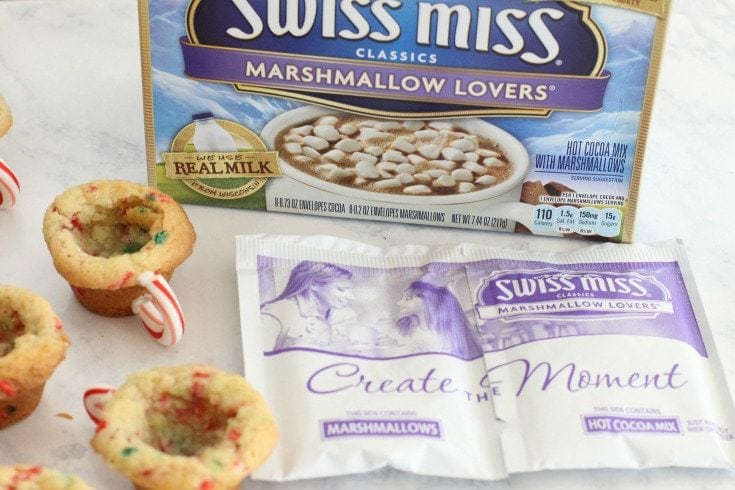
*The tiny marshmallows can be found next to the hot chocolate. My grocery stores no longer carry the separate containers of them, so I buy the “Marshmallow Lovers” hot chocolate packets. Inside the box the hot chocolate and tiny marshmallows are in separate envelopes. You’ll need about 2 envelopes for this recipe.
If you liked these Hot Chocolate Cookie Cups, check out these other Christmas treats:

HOT CHOCOLATE COOKIE CUPS
Hot Chocolate Cookie Cups are festive Christmas cookies! Sugar cookie cups filled with fudge, mini marshmallows & sprinkles. Love the candy cane handle!
Servings: 24
:
Ingredients
- 1 cup sugar
- 1/2 cup softened butter
- 1 egg
- 1 tsp. vanilla
- 1/3 cup sour cream
- 1/2 tsp. salt
- 1/2 tsp. baking soda
- 2 cups flour
- 2 TBSP holiday sprinkles
- Fudge Filling:
- 2 cups semi-sweet chocolate chips
- 1 14 ounce can sweetened condensed milk
- 1 teaspoon vanilla extract
- You’ll also need:
- 24 mini candy canes
- tiny marshmallows*
- 1 TBSP white chocolate chips melted
Instructions
-
Making the cookie cups: Preheat the oven to 350 degrees F. Spray a mini muffin tin with cooking spray.
-
With a hand mixer, cream together sugar and butter. Add egg and vanilla. In separate bowl, combine sour cream, salt and soda. Add flour and sour cream to butter mixture, beat until smooth. Add 2-3 TBSP holiday sprinkles and mix just until combined. Scoop dough out using a 2 TBSP cookie scoop and put one in each mini muffin cup. No need to roll the dough to make it smooth- it will all bake the same.
-
Bake cookies for 15-18 minutes, making sure they’re not getting too brown at the end. {If they are, pull them out.}
-
Right after you take them out, use a small measuring spoon to push into the middle of each cookie cup, creating a space for the fudge filling to go. You don’t want to push through the cookie completely- but make sure you create a big enough space.
-
Let cool in the pan for 10-15 minutes, then gently run a thin knife along the sides to pop them out. If you greased the pan well, you shouldn’t have any problems here!
-
To make the fudge filling: Combine the chocolate chips and sweetened condensed milk in a microwave safe bowl. Mix lightly and microwave on high for 1-2 minutes. I have a powerful microwave, so mine only took 1 minute. The mixture doesn’t look melted, but give it a few gentle stirs and you’ll see it’s heated well enough. Add vanilla and stir again until smooth.
-
Transfer about 3/4 the fudge into a quart-sized ziplock bag. Squeeze the fudge into a corner and snip the corner off. Now you can easily pipe the fudge into the cookies! The great thing about this fudge too is that it sets up super fast, so feel free to fill the cookies well, so that the fudge goes above the cookie- it will set up and not run out!
-
If your fudge gets too solid, just pop it back in the microwave for 10-15 seconds.
-
To assemble the cookies: Cut the rounded part off the candy canes and adhere them to the side of each cookie cup with melted white chocolate. This is actually real easy- just put white chocolate on the cut portion of the candy cane, press it to the side of the cookie cup, then set it down on the counter until white chocolate is solid. After about a minute, the candy cane handle is well attached to the cookie cup!
-
Fill each cookie cup with fudge. Place several tiny marshmallows on top. Let cool.
-
Store cookies in an airtight container on the countertop, or in the fridge for up to 1 week.
-
*The tiny marshmallows can be found next to the hot chocolate. My grocery stores no longer carry the separate containers of them, so I buy the “Marshmallow Lovers” hot chocolate packets. Inside the box the hot chocolate and tiny marshmallows are in separate envelopes. You’ll need about 2 envelopes for this recipe.

Hot Chocolate Cookie Cups are festive Christmas cookies! Sugar cookie cups filled with fudge, mini marshmallows & sprinkles. Love the candy cane handle!