Tag: 101

Pretzel Candies | 101 Cooking For Two by Gordon Ramsay


Super easy chocolate pretzel candies are a great sweet and salty combo. They are perfect for “take a treat” to school, an office party, or even give them as gifts. Just three ingredients and no skill will get you these delicious candies.Pretzel Candies on mat

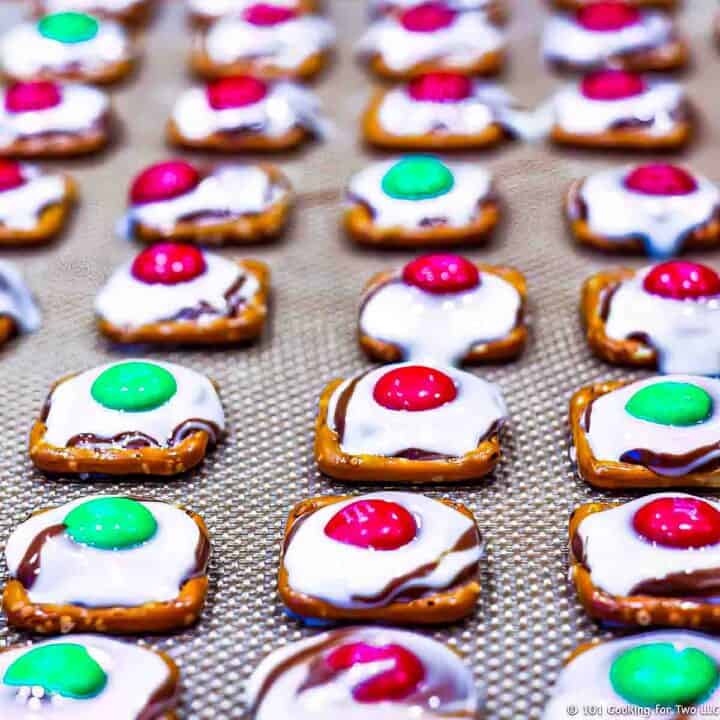
I call this holiday cooking for the non-cook. Spread some pretzels on a cookie sheet, top with a chocolate kiss. Soften the chocolate in a low oven for a few minutes and press in an M and M and allow.

Skill level 1/10. If you can’t do this one, you need to stop reading food blogs.

My Rating

My rating system. Great 5 out of 5

5-ish. I really can’t live on them but good.

Banner for Christmas Candy RecipesThis recipe is part of Christmas Candy Recipes. Check out other easy candy recipes.

Pro Tips: Recipe Notes for Pretzel Candies

While several blogs have done variations, I’m going with Chocolate Pretzel Treats at allrecipes.com as the inspiration piece.
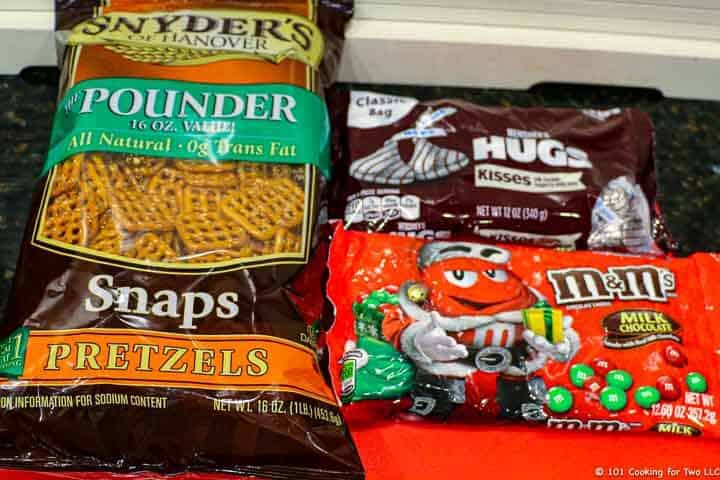
The Pretzels

A small pretzel is mandatory to get this right. The square pretzels are an excellent choice, but a more traditional shape will work fine since we are going to let the candies cool before moving them.

The Candies

I am using “hugs,” but regular candy kisses will work fine. Hershey Kisses are brown chocolate and Hugs are white with stripes.

Hugs are a little more interesting and add some holiday cheer. There were 78 Hugs in the package.

Then top with an M & M candy. Again regular, but I’m using the holiday colors here.

The Oven

Oven temp recommendations vary some from 175 to 300, with the most common being 200. I’m going with that. I feel higher temps will melt the outside before the inside of the hug is soft.

You are NOT trying to melt the chocolate. Just soften it. Bake for a few minutes and as soon as they kisses are shiny, remove them and press in the M&M’s.

If not soft enough, pop them back in for 30-60 seconds.  When done, they can firm up at room temperature or faster in a freezer.

Non-Stick is Needed

Use parchment paper or oven baking mats. These candies will stick to trays.

Other Sweet Treat Recipes You May Enjoy

Spicy Candied Bacon

Old Fashion Popcorn Balls

Homemade Candied Nuts

Crock Pot Chocolate Peanut Clusters

Blue ribbon divider used for visual effect

ingredients for pretzel candies

Preheat oven to 200 degrees.

Pretzels with candies on to on tray


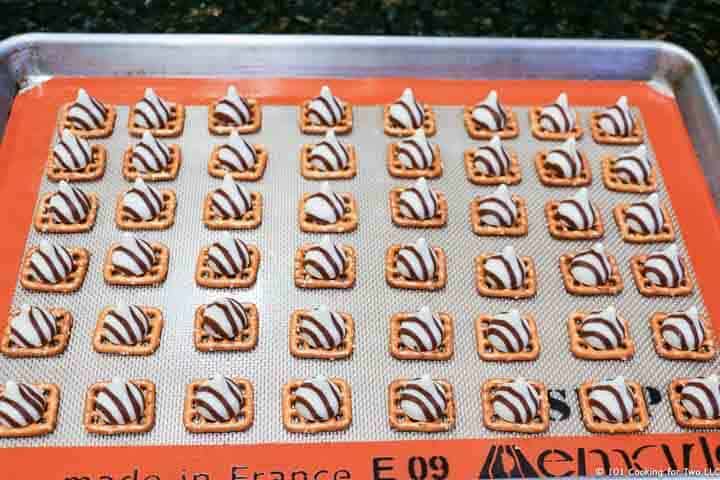
Cover a baking sheet with parchment paper or a baking mat. Spread pretzels on the sheet spaced not to touch. Top with an unwrapped chocolate kiss or hug.

pressing candy into melted chocolate


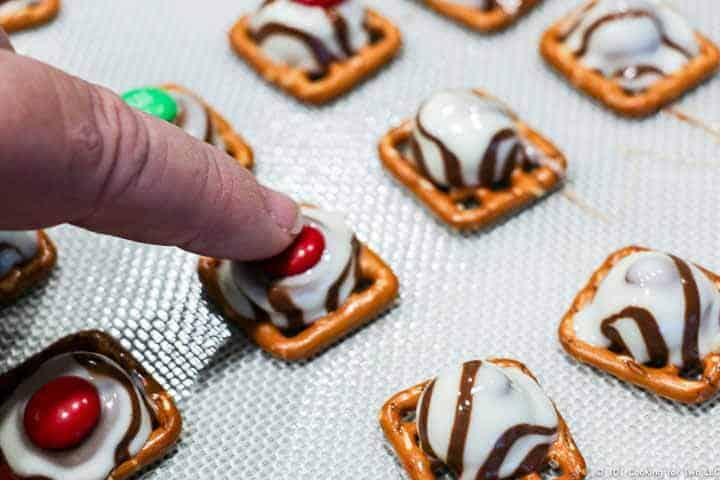
Bake until chocolate is shiny but not melted. Watch continuously, and it should be about 4 minutes. Remove from the oven and press M&M into the kiss. If not soft enough, then place back in the oven for 30-60 seconds.

pretzel candies on tray

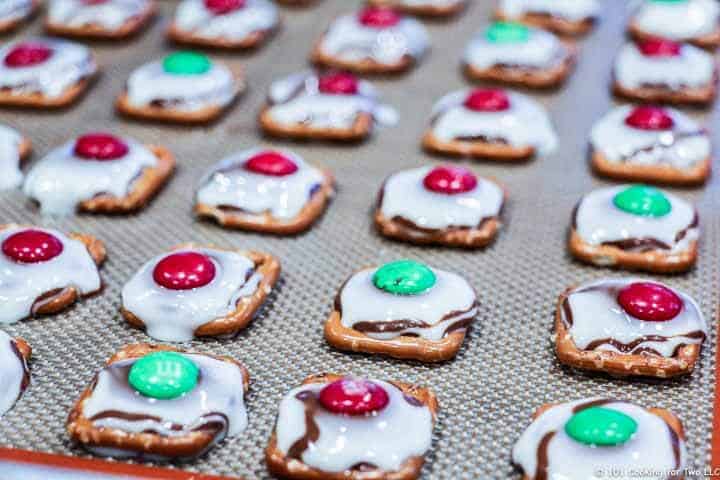
Allow to cool. Room temperature is alright, but the freezer is faster.

img class=”alignce,nter size-full wp-image-8459″ src=”https://www.101cookingfortwo.com/wp-content/uploads/2014/12/Pin-Me-Chocolate-Pretzel-Buttons.jpg” alt=”Chocolate Pretzel Buttons from 101 Cooking For Two” width=”320″ height=”1170″ />

Blue ribbon


Do you want more recipes from 101 Cooking for Two? Sign up for the newsletter and get all posts delivered straight to your inbox!
Subscribe to 101 Cooking for Two

Pretzel Candies

Super easy chocolate pretzel candies are a great sweet and salty combo. They are perfect for “take a treat” to school, an office party, or even give them as gifts. Just three ingredients and no skill will get you these delicious candies they can’t stop eating.

Prep Time5 mins

Cook Time5 mins

Total Time10 mins

Course : Appetizer

Cuisine : American

Servings/Adjust Amount: 78 pieces

78

Ingredients

  • 1 Snyder pretzel ‘snaps’or other small pretzel
  • 1 Hershey kisses or Hugs
  • 1 M & M

Instructions

  • Preheat the oven to 200 degrees.

  • Cover a baking sheet with parchment paper or a baking mat.

  • Spread pretzels on the sheet spaced not to touch.

  • Top with an unwrapped chocolate kiss or hug.

  • Baking until chocolate is shiny but not melted. Watch continuously and it should be about 4 minutes.

  • Remove from oven and press M&M into the kiss. If not soft enough then place back in the oven for 30-60 seconds.

  • Allow to cool on the tray. Room temperature is alright, but the freezer is faster.

Recipe Notes

Pro Tips

  1. Preheat oven. The melting time is short and you need to know what you are doing.
  2. You need to use small pretzels.
  3. Keep a very close eye on the candy in the oven. When it is shiny, pull it out and try to press the M & M into it. It may need another 30-60 seconds back in the oven. You are NOT trying to melt the chocolate, just soften.
  4. Good covered at room temperature for 3-4 days.
  5. Do not try on a tray without parchment paper or a baking mat.
  6. Let the candies cool some on the tray before trying to remove.


Check Out Other Great Recipes

Graphic for visual directory

Make it Perfect First Time and Every TimeDon’t miss out, check the full post above. Almost every recipe includes easy step by step photo instructions so you can visualize yourself cooking this recipe along with helpful tips and options.

Blue ribbon divider used for visual effect

Calories: 32kcal | Carbohydrates: 5g | Protein: 3g | Fat: 3g | Saturated Fat: 3g | Cholesterol: 1mg | Sodium: 1mg | Sugar: 5g


Nutrition is generally for one serving. Number of servings is stated above and is my estimate of normal serving size for this recipe.


All nutritional information are estimates and may vary from your actual results. This is home cooking, and there are many variables. To taste ingredients such as salt will be my estimate of the average used.

Originally published December 7, 2014. Updated with increased cooking options and refreshed photos.
Molly and Lilly in snow

Banana Nut Muffins | 101 Cooking For Two by Gordon Ramsay


Easy banana nut muffins are the best way to use ripe bananas. They are soft, moist, and full of flavor. Perfect for breakfast or just a special snack.

banana nut mufffin on rack


Banana nut muffins are one of my all-time favorite things and these are a great tasty muffin. Good enough to hide a couple of bananas just to use for muffins later.

This recipe is an easy bake (3/10) with only a bit of hand mixing with ingredients you already have on hand. Just follow the simple step by step photo instructions.

My Rating
My rating system. Great 5 out of 5


We loved them. Enough said.

Pro Tips: Recipe Notes for Banana Nut Muffins

Most of the internet recipes are approximately the same but a few interesting points.

The Amount of Bananas

The ratio of liquid (wet) ingredients to dry ingredients can really throw recipes like this way off, and the number and size of bananas just scream they will make your muffins fail.

The solution is to use a large measuring cup to mash the bananas and then fill the remaining volume out with the remaining liquid ingredients to a specific amount – 2 cups here.

So use two or three bananas.

Why Ripe Bananas?

For muffins and almost any banana recipe, we want ripe or “overripe” bananas. Why? They are sweeter and make the recipe much better than greener bananas.

Amylase is the enzyme that breaks down the starch in bananas into sugar, making the bananas sweet. Another enzyme will break down cell walls and soften the banana. And a third enzyme will change the color of the banana peel.

Other Tips

Do not over mix the batter and just pour the batter into the cups and let it settle in by itself. Do not pack it in.

The sugar and PAM topping forms a nice crust, so do not skip on the sugar.

A tablespoon or two of strong coffee may increase the “banana taste.” Add it in the liquid before topping off with milk.

Never use baking powder with aluminum.

The nutmeg is optional.

Use the nuts you like. You will need 3/4 to 1 cup. You can sprinkle some on top with the sugar for a nice touch.

Good at room temperature for 3-4 days and will freeze nicely for 3-4 months.

Other Banana Nut Recipes

Banana Nut Bread

Oven Baked Banana Pancake

Cream Cheese Filled Banana Bread

Banana Nut Cookies

Banana Nut Cake

Blue ribbon divider used for visual effect

ingredients for banana nut muffins

Sugar and Flour are missing from the picture.

Preheat oven to 350 (not convection this time).

mashing banana with fork in bowl

Mash the bananas well in a 2 cup measuring cup.

bowl in microwave

Melt 1/3 cup of butter in the microwave. About 25 seconds depending on your microwave.

measuring bowl with 2 cups of liquid

Add one egg to the banana and mix until well combined. Add the butter, 1 1/2 teaspoon vanilla, and add just enough milk to make 2 cups of the “liquid.”

chopped nuts on board

You need about 3/4 cup of chopped nuts.  I use walnuts but use pecans, or other nuts are fine.

mix all dry ingredients in bowl

Combine the dry ingredients in a larger bowl; the nuts with 1 1/2 cup AP flour, 3/4 cup sugar, 1 teaspoon salt, 2 teaspoon baking powder, 1/2 teaspoon each of baking soda, cinnamon, and nutmeg (optional).

adding wet ingredients into dry

Mix the wet into the dry and only mix until all the dry is incorporated. Do not over mix.

filling cupcake paper with batter

Prepare 12 cupcake baking cups. I gave the pan a good spray of PAM, so they won’t stick. Pour the batter into the cups.

sprinkle a little sugar on top

Sprinkle the tops with a generous amount of sugar. Spray the sugar with PAM.

bake until golden brown and toothpick comes out clean

Bake until a toothpick comes out clean, for me 23 minutes. Some variability due to the oven differences should be expected

Blue ribbon

Other Muffin Recipes

Easy Apple Fritter Muffins

Strawberry Cinnamon Muffins

Whole Wheat Blueberry Muffins

Blue ribbon divider used for visual effect


Do you want more recipes from 101 Cooking for Two? Sign up for the newsletter and get all posts delivered straight to your inbox!
Subscribe to 101 Cooking for Two

Banana Nut Muffins

Easy banana nut muffins are the best way to use ripe bananas. They are soft, moist, and full of flavor. Perfect for breakfast or just a special snack.

Prep Time10 mins

Cook Time23 mins

Total Time33 mins

Author: Dan Mikesell AKA DrDan

Course : Sweets

Cuisine : American

Servings/Adjust Amount: 12 servings

12

Ingredients

Wet

  • 2-3 bananasripe
  • 1 egglarge
  • 1/3 cup butter
  • 1 1/2 teaspoon vanilla
  • milkto make 2 cups of liquid

Dry

  • 1 1/2 cup AP flour
  • 3/4 cup sugarplus more for the top
  • ¾ cup nuts
  • 1 teaspoon salt
  • 2 teaspoons baking powder
  • 1/2 teaspoon baking soda
  • 1/2 teaspoon cinnamon
  • 1/2 teaspoon nutmegoptional

Instructions

  • Preheat oven to 350.

  • Mash 2-3 bananas well in a 2 cup measuring cup.

  • Melt 1/3 cup of butter in the microwave. About 25 seconds depending on your microwave.

  • Add one egg to the banana and mix until well combined. Add the butter, 1 1/2 teaspoon vanilla, and add just enough milk to make 2 cups of the “liquid.”

  • You need about 3/4 cup of chopped nuts.  I use walnuts but use pecans, or other nuts are fine.

  • Combine the dry ingredients in a larger bowl; the nuts with 1 1/2 cup AP flour, 3/4 cup sugar, 1 teaspoon salt, 2 teaspoon baking powder, 1/2 teaspoon each of baking soda, cinnamon, and nutmeg (optional).

  • Mix the wet into the dry and only mix until all the dry is incorporated. Do not over mix.

  • Prepare 12 cupcake baking cups. I gave the pan a good spray of PAM, so they won’t stick. Pour the batter into the cups.

  • Sprinkle the tops with a generous amount of sugar. You can add a few nuts if you want. Lightly spray the sugar with PAM.

  • Bake until a toothpick comes out clean, for me 23 minutes. Some variability due to the oven differences should be expected

Recipe Notes

Pro Tips

  1. The bananas should be at least ripe but overripe is better. 2-3 will do.
  2. A tablespoon or two of strong coffee may increase the “banana taste.” Add it in the liquid before topping off with milk.
  3. Never use baking powder with aluminum.
  4. The nutmeg is optional.
  5. Do not over mix the batter and just pour the batter into the cups and let it settle in by itself. Do not pack it in.
  6. The sugar and PAM topping forms a nice crust, so do not skip on the sugar.
  7. Use the nuts you like. You will need 3/4 to 1 cup. You can sprinkle some on top with the sugar for a nice touch.
  8. Good at room temperature for 3-4 days and will freeze nicely for 3-4 months.


Check Out Other Great Recipes

Graphic for visual directory

Make it Perfect First Time and Every TimeDon’t miss out, check the full post above. Almost every recipe includes easy step by step photo instructions so you can visualize yourself cooking this recipe along with helpful tips and options.

Blue ribbon divider used for visual effect

Calories: 231kcal | Carbohydrates: 32g | Protein: 4g | Fat: 10g | Saturated Fat: 4g | Cholesterol: 27mg | Sodium: 294mg | Potassium: 221mg | Fiber: 2g | Sugar: 15g | Vitamin A: 200IU | Vitamin C: 2mg | Calcium: 48mg | Iron: 1mg


Nutrition is generally for one serving. Number of servings is stated above and is my estimate of normal serving size for this recipe.


All nutritional information are estimates and may vary from your actual results. This is home cooking, and there are many variables. To taste ingredients such as salt will be my estimate of the average used.

Molly and Lilly Dogs playing in snow

Incoming search terms:

Candied Bacon | 101 Cooking For Two by Gordon Ramsay


Time to get your evil on with this must-try candied bacon recipe. Great finger food for “bring a dish” holiday party or have it for breakfast. Just follow these easy step by step photo instructions.
candied bacon on plate

This is an evil little recipe that could make you sick from gorging. Candied bacon is caramelized sugar that is crispy and sweet. And then you can add a touch of heat to spice it up. BACON HEAVEN!

There is absolutely nothing healthy about this recipe. I hang my doctor’s head in shame thinking about it. So, it is time to “get your evil on.”

One of my most popular posts has been Sweet and Spicy Chicken Bacon Wraps. I wanted to change it up a little… who needs that chicken anyways.

Just bacon, sugar, and spice should do. So, I combined the bacon wrap recipe with my How to Cook Bacon in the Oven post.

My Rating
My rating system. Great 5 out of 5


What did you expect with bacon? You will be the hit of the party.

Pro Tips: Recipe Notes for Candied Bacon

The Bacon

I used thick-sliced good quality bacon. If you use thinner bacon, the cooking time will decrease some. Also, ovens vary, so keep an eye on it the first time you do it.

The Coating

I checked around before doing this recipe. There was Emeril’s Cayenne-Candied Bacon on Food Network. From that, I switched out the cumin which I like for chicken for cayenne pepper to spice it up a bit.

I suggest light brown sugar but many recipes use maple syrup. That will leave the bacon too sticky for finger food but ok for breakfast.

I think the chili powder is mandatory so it is not just sweet bacon. I highly recommend the cayenne if it is for parties.

The Preparation – One Side or Two Sides? – Do I Need a Rack?

Many of the recipes only coating one side of the bacon. If you don’t use the rack, the one-sided coating is a good idea.

Many recipes didn’t use a rack for drainage. I tried it both ways and a rack although not mandatory is a good idea. But again, only coat one side of no rack.

Now we are the subject of the rack. You need oven-safe racks. You will use them over and over. I have some linked in my shop, but many stores handle them. Just be sure they are oven safe and not just cooling racks.

You get the bacon up and out of the drained fat. You don’t have to do that with plain bacon, but with the sugar coating, you want to elevate it.

Lastly, the bacon will puddle some fat on it during cooking. Let it cool a few minutes then pat it off.

Summary of the Tips to Get it Right

  1. This is an oven-baked recipe. There are other recipes for stovetops but the results will not be as good.
  2. Thicker sliced bacon will work better.
  3. A rack, while not mandatory, will get much better results.
  4. Bake until crispy. This is not the time for wimpy bacon. But that time will vary by the thickness of the bacon and your oven so times are approximate.
  5. Pat some of the fat off the top of the bacon after removal from the oven. But let it cool for a few minutes before moving to the cooling area. But get it off the rack before it sticks.
  6. May be served warm or cold. About 5 minutes in a 350-degree oven will reheat nicely or a few seconds in the microwave.
  7. Good refrigerated for 2-3 days and can be frozen if on parchment or wax paper.

Other Candy Party Recipes

Sweet and Spicy Chicken Bacon Wraps

Homemade Candied Nuts

Holiday Candy Recipe Roundup

Pictures are for a triple batch with three pounds of bacon that yielded 66 pieces.

bacon and spices for candied bacon

Preheat oven to 350 convection or 375 conventional.

mixing spices in glass bowl

Mix 1/2 cup light brown sugar with one tablespoon chili powder and 1/2 teaspoon cayenne pepper (optional).

prep pan with rack and foil

Prep baking tray with aluminum foil to help clean up and a rack. Spray heavy with PAM.

trimming fat off bacon

Cut bacon strips in half and trim any large chunks of fat.

coating bacon with spices

Dip bacon in the brown sugar mixture and coat well.

sprinkle more spice on top of the bacon

Spread over the prepared rack leaving a little space then give the bacon a light dusting of additional sugar and spice.

cooked bacon on rack nicely brown

Bake until bacon appears done which is dark along the edges. About 20 minutes for me but start checking at 15 minutes. The sugar can begin to burn when left in too long.

patting off the extra fat from the bacon

Remove from the oven and let sit for a few minutes and carefully pat off any pools of fat on top of the bacon with a paper towel.

candied bacon cooling on a rack

Then transfer for cooling.  Another rack, a baking mat, parchment paper or just a plate should do. Do not “drain” on a paper towel due to sticking.

Candied Bacon on large plate

Do you want more recipes from 101 Cooking for Two? Sign up for the newsletter and get all posts delivered straight to your inbox!
Subscribe to 101 Cooking for Two

Candied Bacon

Time to get your evil on with this must-try candied bacon recipe. Great finger food for “bring a dish” holiday party or have it for breakfast. Just follow these easy step by step photo instructions.

Prep Time10 mins

Cook Time20 mins

Total Time30 mins

Author: Dan Mikesell AKA DrDan

Course : Appetizer

Cuisine : American

Servings/Adjust Amount: 22

22

Ingredients

  • 1 pound baconthick sliced
  • 1/2 cup light brown sugar
  • 1 tablespoon chili powder
  • 1/2 teaspoon cayenne pepperoptional

Instructions

  • Preheat oven to 350 convection or 375 conventional.

  • Mix 1/2 cup light brown sugar with one tablespoon chili powder and 1/2 teaspoon cayenne pepper (optional but recommended).

  • Prep baking tray with aluminum foil to help clean up and a rack. Spray heavy with PAM.

  • Cut bacon strips in half and trim any large chunks of fat.

  • Dip bacon in the brown sugar mixture and coat well.

  • Spread over the prepared rack leaving a little space then give them a light dusting of additional sugar and spice.

  • Bake until bacon appears done which is dark along the edges. About 20 minutes for me but start checking at 15 minutes. The sugar can begin to burn when left in too long. Remove from oven and let sit for a few minutes and pat off any pools of fat on top the paper towel carefully.

  • Then transfer for cooling, another rack, a baking mat, parchment paper or just a plate should do. Do not “drain” on a paper towel due to sticking.

Recipe Notes

Pro Tips:

  1. This is an oven-baked recipe. There are other recipes for stovetops but the results will not be as good.
  2. Thicker sliced bacon will work better.
  3. A rack, while not mandatory, will get much better results.
  4. Bake until crispy. This is not the time for wimpy bacon. But that time will vary by the thickness of the bacon and your oven so times are approximate.
  5. Pat some of the fat off the top of the bacon after removal from the oven. But let it cool for a few minutes before moving to the cooling area. But get it off the rack before it sticks.
  6. May be served warm or cold. About 5 minutes in a 350-degree oven will reheat nicely or a few seconds in the microwave.
  7. Good refrigerated for 2-3 days and can be frozen if on parchment or wax paper.
  8. I suggest following the food safety rules. Do not store at room temperature.


Check Out Other Great Recipes

Graphic for visual directory

Make it Perfect First Time and Every TimeDon’t miss out, check the full post above. Almost every recipe includes easy step by step photo instructions so you can visualize yourself cooking this recipe along with helpful tips and options.

Blue ribbon divider used for visual effect

Calories: 117kcal | Carbohydrates: 5g | Protein: 7g | Fat: 7g | Saturated Fat: 3g | Cholesterol: 20mg | Sodium: 361mg | Potassium: 118mg | Fiber: 1g | Sugar: 5g | Vitamin A: 134IU | Calcium: 8mg | Iron: 1mg


Nutrition is generally for one serving. Number of servings is stated above and is my estimate of normal serving size for this recipe.


All nutritional information are estimates and may vary from your actual results. This is home cooking, and there are many variables. To taste ingredients such as salt will be my estimate of the average used.

Editor Note: Originally published May 24, 2015. Updated with expanded options and refreshed photos.

Play with me PLEASE

Play with me PLEASE

Proudly powered by WordPress

By continuing to use the site, you agree to the use of cookies. Click here to read more information about data collection for ads personalisation

The cookie settings on this website are set to "allow cookies" to give you the best browsing experience possible. If you continue to use this website without changing your cookie settings or you click "Accept" below then you are consenting to this.

Read more about data collection for ads personalisation our in our Cookies Policy page

Close