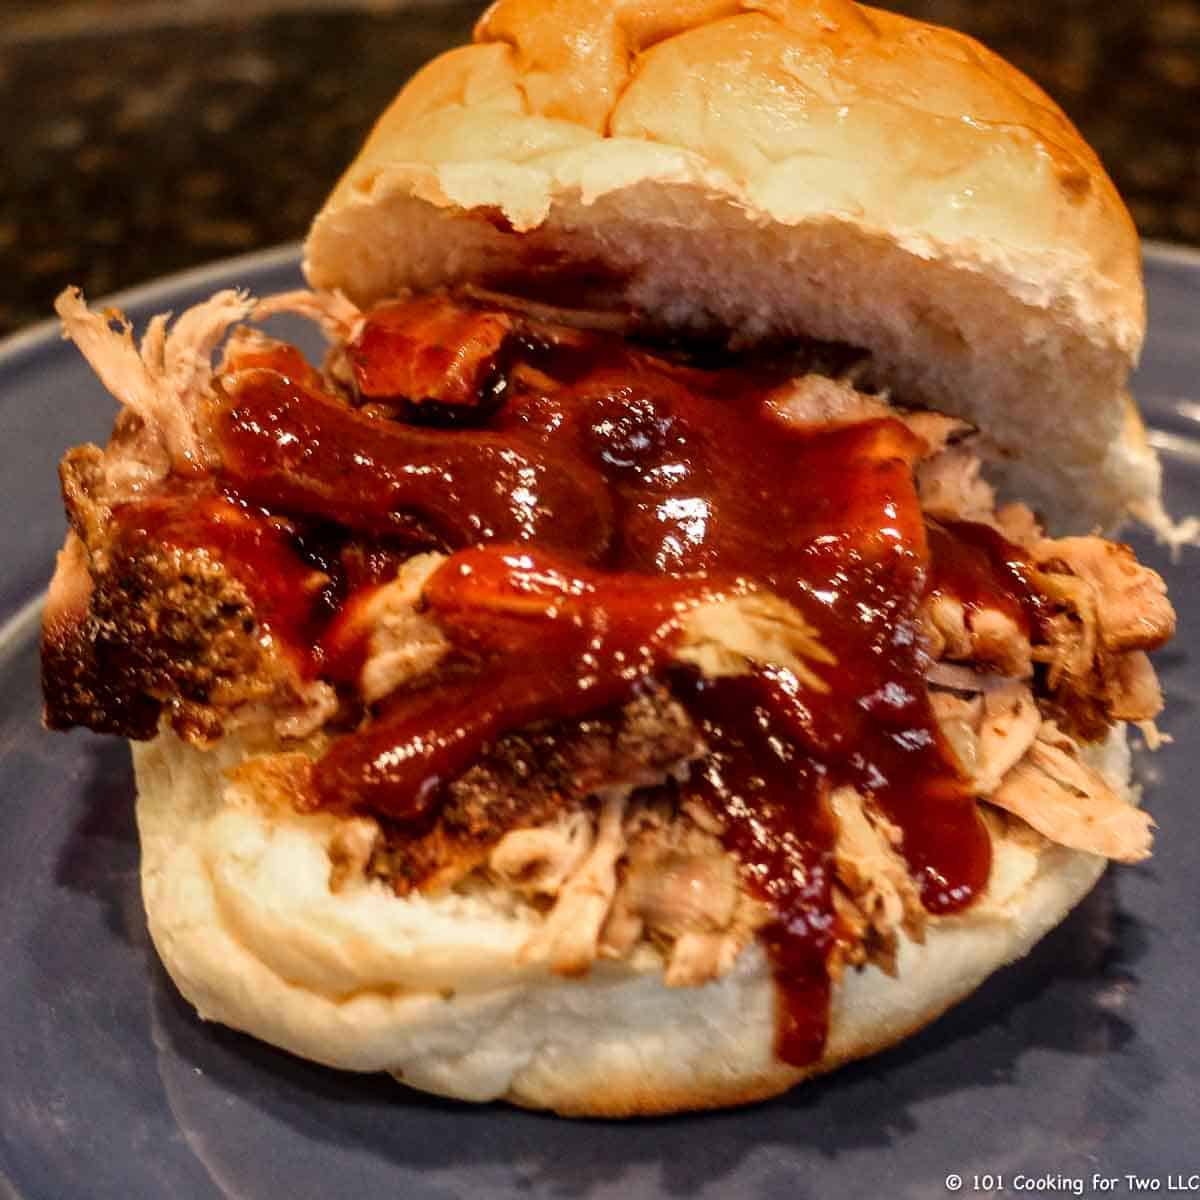
It is pulled pork season, graduation and summer parties, but not everybody has a smoker. But you want great pulled pork anyways. Here are six simple recipes all with easy to follow step by step photo instructions to help you out.
Everybody deserves great pulled pork, and there are just so many ways to get there. So I will assume you do not have a smoker but would love pulled pork but with only a little work.
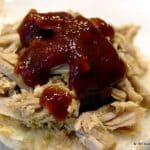
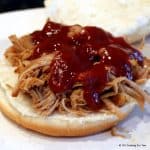
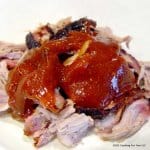
“Real” Pulled Pork from Pork Butt
Real pulled pork must come from pork butt. It is just the way it is folk. But it doesn’t need to be hard nor do you require a smoker.
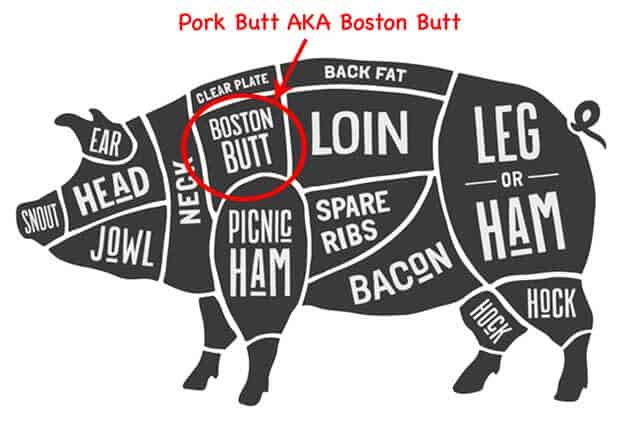
What is Pork Butt AKA Boston Butt?
Like many cuts of meat, there are multiple names about the same thing. Pork butt and Boston butt are the same.
Pork shoulder is the thinner area of this cut but is commonly cooked and used the same as the butt. It has a bit less marbling and less fat and is usually not separated from the butt. But usually, the term pork shoulder is used interchangeably with pork butt and Boston butt.
If you are wondering, butt means thick, so that is why the term “butt” is used. Lastly, the picnic ham and picnic shoulder are not the same as this cut.
First Grilled/Smoked Pulled Pork from Butt. This is the real thing done on your gas grill set up to smoke.
Pulled Pork on a Gas Grill – Not That Hard
How to cook pulled pork on a gas grill? Not all of us have smokers. There are a lot of gas grill out there. Shouldn’t we have pulled pork too? I say yes. Pulled pork for all and with a little planning it is not that hard.
Check out our recipe Add to Saved RecipesGo to Saved Recipes
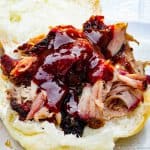
My Oven Pulled Pork from Pork Butt. This is what I usually do when I get a pork butt. So easy and the house smells wonderful.
And the last of the “real pulled pork from butt recipes,” but it comes out of your crock pot. It seems everybody wants this recipe.
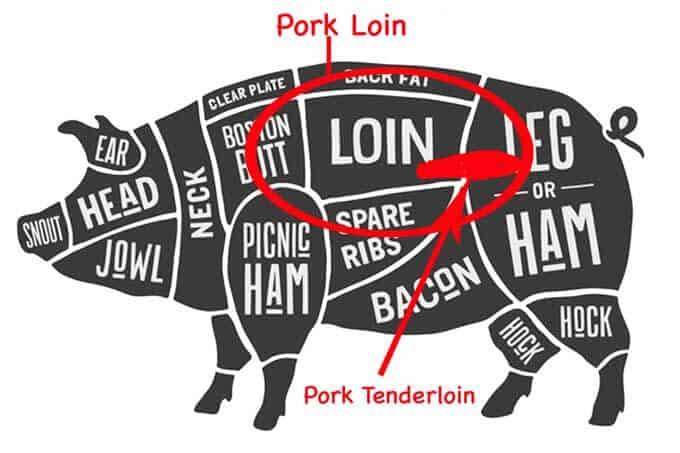
“Fake” Pulled Pork from Other Cuts of Pork
Other cuts of pork can be used for a “fake” pulled pork. Here are a couple of pork loin and a pork tenderloin method.
Both will produce near pork butt quality pork that is much lower in fat. The term “shredded” pork may be more accurate.
I have used the pork loin methods for cooking for groups up to 50 servings. And I love the smaller tenderloin version.
Crock Pot Pulled Pork Loin
Healthy and low fat “pulled” pork from a pork loin using a slow cooker is almost no work recipe with these easy step by step photo instructions. Use it for BBQ, use it for Mexican or anywhere you want a moist and tasty shredded pork.
Check out our recipe Add to Saved RecipesGo to Saved Recipes
One Last Thing
To have great BBQ, you need a great sauce. This is it. This could make cardboard taste good but add it to some great pulled pork, and you are in pig heaven.
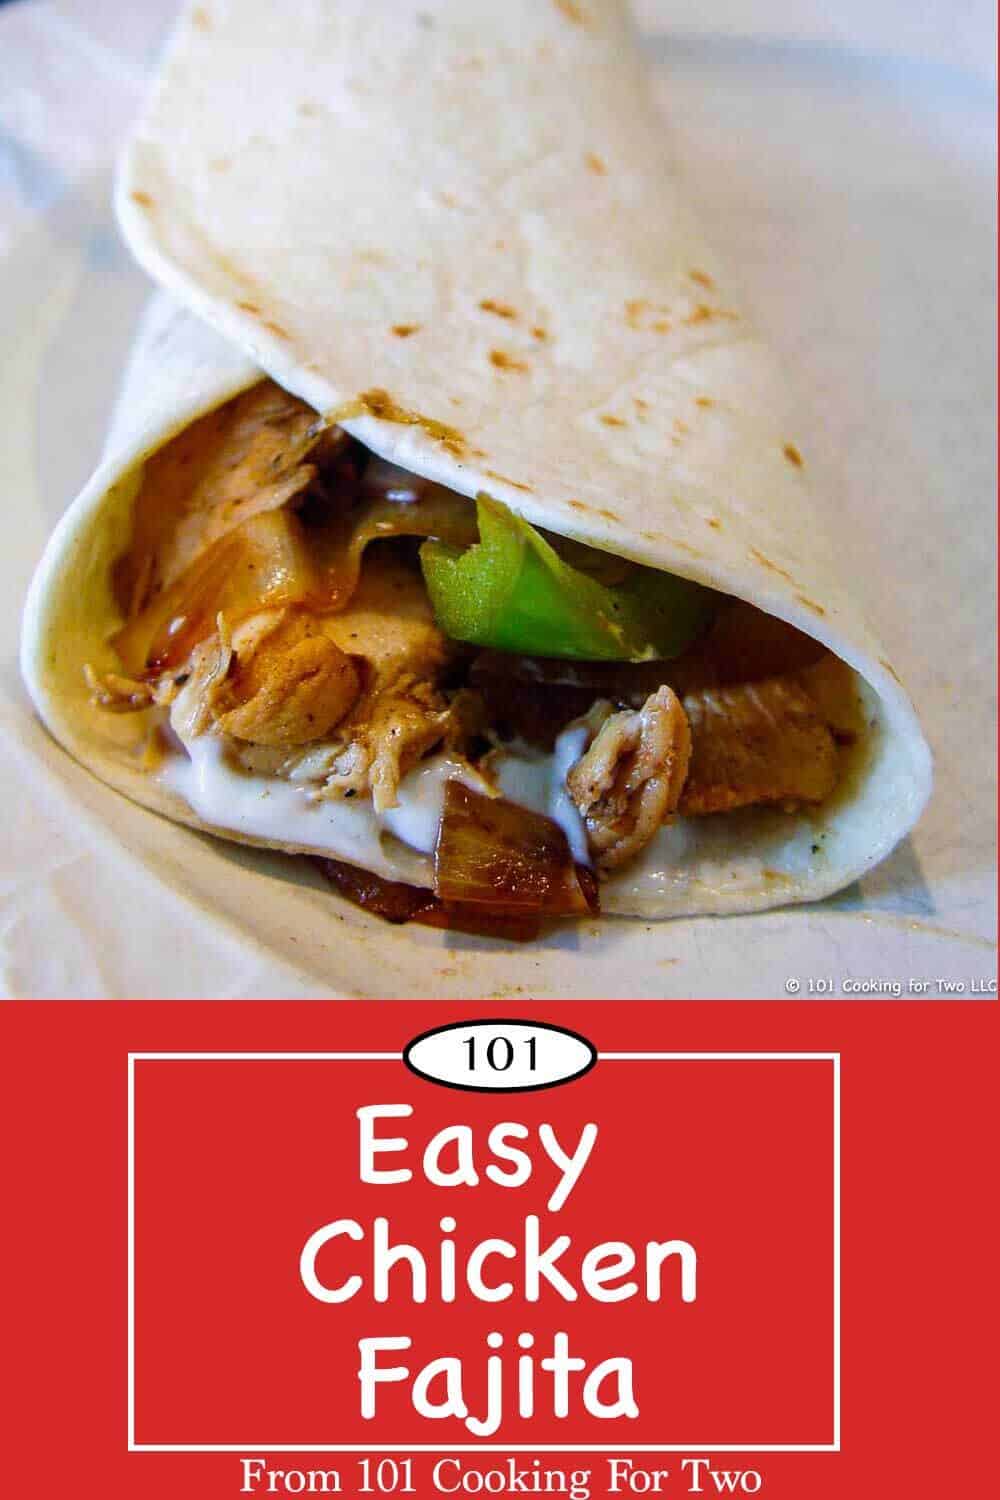
It’s easy to great restaurant quality chicken fajitas with the best-tasting chicken. Just follow the simple step by step photo instructions. Only a little work and almost no skill and you have a new house favorite.
Editor’s Note: Originally Published May 3, 2012. Republished with expanded explanation and discussion along with updated photos.
Only a little work and almost no skill and you have a new house favorite. Happy almost Cinco de Mayo.
Here is the “other” restaurant favorite: Beef Steak Fajita, I knew that chicken wouldn’t be far behind.
I always go back and forth chicken or beef… beef or chicken… What to do? Your choice. But both are easy and if you care, much cheaper at home. Another candidate for house favorite recipe.
Start with chicken, clean it and cut up. Now marinade for a few hours, cook in a heavy cast iron skillet then do some veggies, and you are good to go.
My Rating
I always love great Mexican, and this is it.
Pro Tips: Recipe Notes for Easy Chicken Fajitas
I wanted something that would fit ingredients that I almost always have on hand. I’ll do an “inspired by” to an Allrecipe.com recipe. There are many great finds there. I kicked the spice up some and added expanded explanation.
What Chicken to Use?
Fresh chicken is preferred here. Use skinless boneless breasts or thighs. I don’t recommend precooked shredded chicken like a rotisserie chicken.
I cut the chicken into strips and then broke them up during cooking. This gives a little of that shredded texture while still having chunks. Cut them into small cubes if you want, but I think that looks like dog food.
The Secret to the Great Taste
The key to why this recipe is so good is the marinade. Most home recipes are some dry spice mix from the store. It is just not acceptable after you try this.
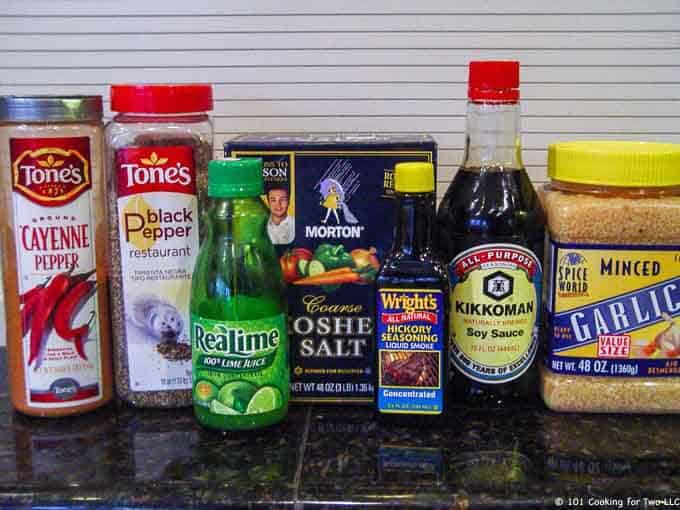
Start by mixing a marinade in a 1-gallon zip lock. 2 tablespoon lime juice, 4 tablespoon water, 1 tablespoon olive oil, 1 teaspoon kosher salt, 1/4 teaspoon liquid smoke, 1/2 teaspoon cayenne pepper, 1/ 4 teaspoon pepper, 1 teaspoon soy sauce, 1-2 cloves of garlic crushed.
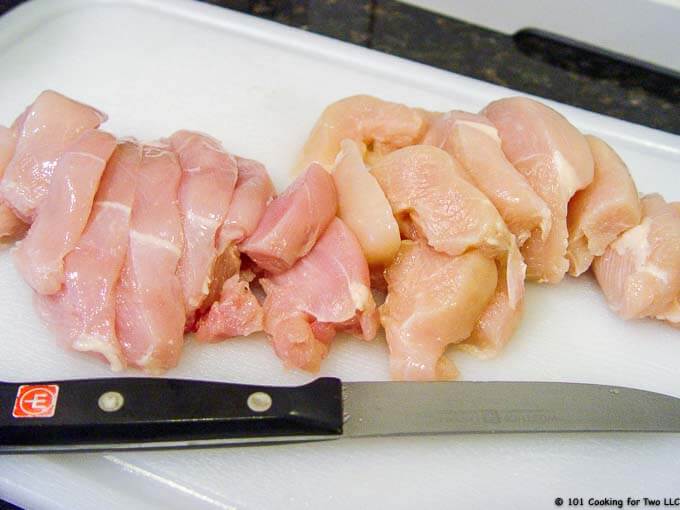
Clean and trim about 1 1/2 pound of skinless boneless chicken breasts. This is about 2 medium-large ones. Don’t worry if you’re a little over or under that amount. Cut the chicken into strips about 1/2 inch thick.
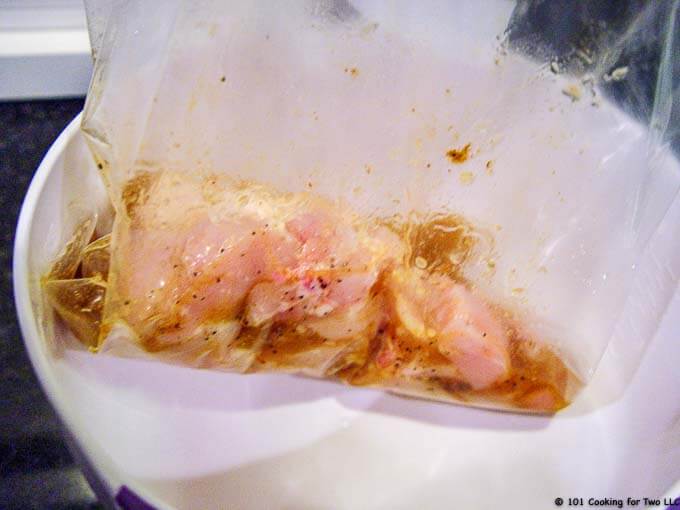
Add to the marinade and refrigerate for at least 2 hours. Overnight is fine also.
When ready to cook. Put 1 teaspoon oil in a large cast iron pan and heat over medium-high heat. While heating, slice up a large onion and one or two peppers. I like a medium red and green pepper. If your pepper is large, you only need one. Mix 1 tablespoon water, 1 teaspoon lime juice and 1 teaspoon soy sauce in a small bowl.
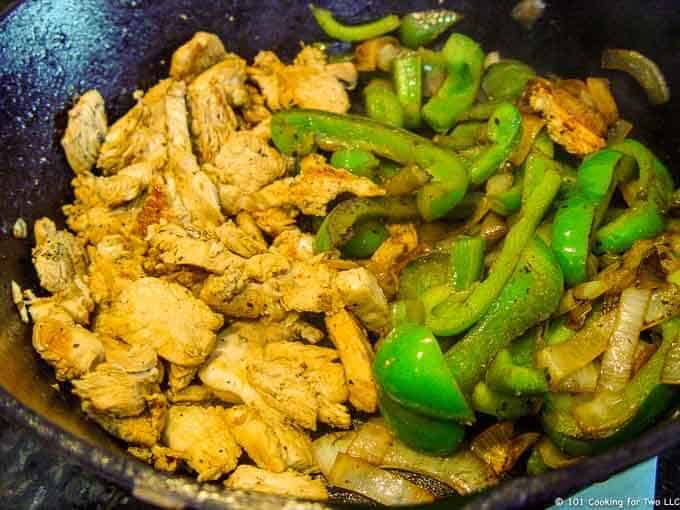
When the oil is hot, add the veggies and after a few minutes add the water, soy sauce, and lime mixture. When onions are nicely browned (about 8-9 minutes), Remove from pan and set aside and cover.
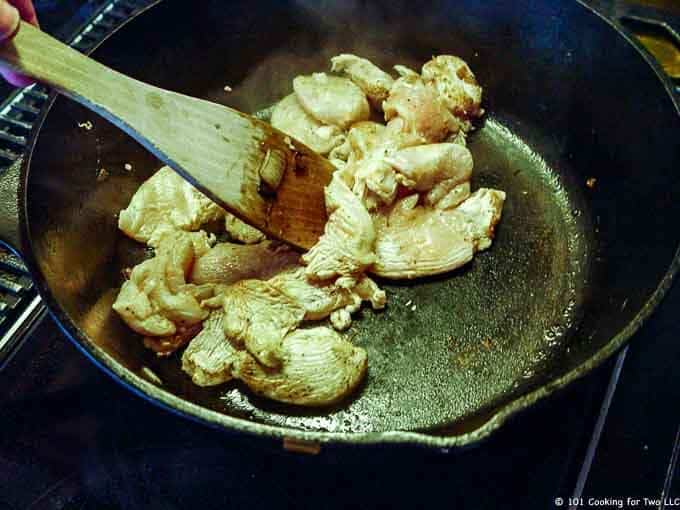
Add a little oil to the pan. When hot, add the drained chicken and brown. Near the end of cooking, break apart the chicken with a wooden spoon. This will make much smaller pieces and prove the meat is cooked. About 8-9 minutes. Please check a few of the large piece with an instant-read thermometer to be sure you are to 165 degrees.
When the chicken is done, move the meat to one side and add the veggies back to the pan. Cook and stir for a minute or two until veggies are reheated.
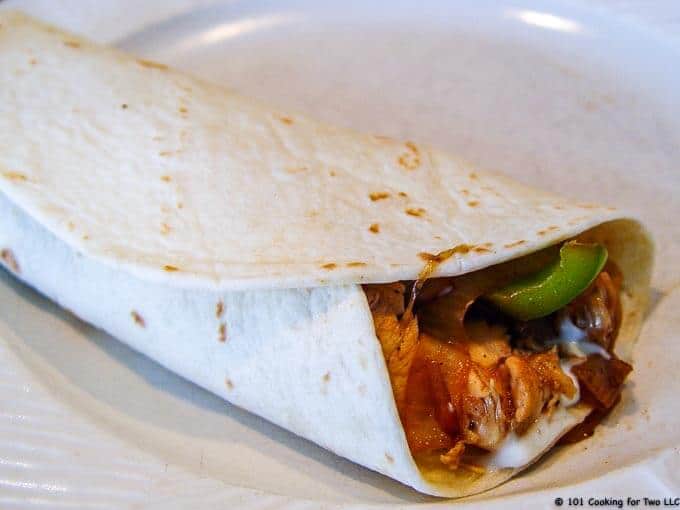
Serve with heated tortillas, sour cream, guacamole and anything else you like. An easy way to heat tortillas is to sprinkle a dish towel with some water put tortillas inside and heat in a microwave on high for one minute.
Do you want more recipes from 101 Cooking for Two? Sign up for the newsletter and get all posts delivered straight to your inbox!
Easy Chicken Fajitas
It’s easy to great restaurant quality chicken fajitas with the best-tasting chicken. Just follow the simple step by step photo instructions. Only a little work and almost no skill and you have a new house favorite.
Prep Time10mins
Cook Time20mins
Total Time30mins
Course : Main Course
Cuisine : Mexican
Keyword : Chicken Fajitas, Fajitas
Servings/Adjust Amount: 4servings
4
Ingredients
2skinless boneless chicken breasts – cut into thin slices or cubes
Marinade
2tablespoonslime juice
4tablespoonswater
1tablespoonolive oil
1teaspoonkosher salt
1/4teaspoon liquid smoke
1/2teaspooncayenne pepper
1/4teaspoonpepper
1teaspoonsoy sauce
1-2clovesgarlic – crushed
Veggies
1teaspoonoil
1pepper – large or 2 medium – green or red
1onion – large
1tablespoonwater
1teaspoonsoy sauce
1teaspoonlime juice
Serving
4-6flour tortillas
sour cream
cheese
salsa
Guacamole
Instructions
Start by mixing a marinade in a 1-gallon zip lock. 2 tablespoon lime juice, 4 tablespoon water, 1 tablespoon olive oil, 1 teaspoon kosher salt, 1/4 teaspoon liquid smoke, 1/2 teaspoon cayenne pepper, 1/ 4 teaspoon pepper, 1 teaspoon soy sauce, 1-2 cloves of garlic crushed.
Clean and trim about 1 1/2 pound of skinless boneless chicken breasts. This is about 2 medium-large ones. Don’t worry if you’re a little over or under that amount. Cut the chicken into strips about 1/2 inch thick.
Add the chicken to the marinade and refrigerate for at least 2 hours. Overnight is fine also.
When ready to cook. Put 1 teaspoon oil in a large cast iron pan and heat over medium-high heat. While heating, slice up a large onion and one or two peppers. I like a medium red and green pepper. If your pepper is large, you only need one.
Mix 1 tablespoon water, 1 teaspoon lime juice and 1 teaspoon soy sauce in a small bowl. When the oil is hot, add the veggies and after a few minutes add the water, soy sauce, and lime mixture.
When onions the (about 8-9 minutes), Remove from pan and set aside and cover.
Add a little oil to the pan. When hot, add the drained chicken and brown. Near the end of cooking, break apart the chicken with a wooden spoon. This will make much smaller pieces and prove the meat is cooked — about 8-9 minutes. Please check a few of the large piece with an instant-read thermometer to be sure you are to 165 degrees.
When the chicken is done, move the meat to one side and add the veggies back to the pan. Cook and stir for a minute or two until veggies are reheated.
Serve with heated tortillas, sour cream, guacamole and anything else you like. An easy way to heat tortillas is to sprinkle a dish towel with some water put tortillas inside and heat in a microwave on high for one minute.
Recipe Notes
Pro Tips
You can use chicken breast or thighs.
I prefer to use two smaller peppers so I can have a mixture of color, but the day of the pictures, I only had a huge green pepper.
Raw chicken only here. This is not a recipe for precooked chicken.
The lime juice is important.
There has a touch of heat. Cut down the cayenne if you want.
I didn’t cover how to assemble your fajita. I think you know what you like if you are reading this. I did add a tip for the tortillas.
Nutritional information is for chicken and veggies only.
Nutrition Facts
Easy Chicken Fajitas
Amount Per Serving
Calories 172Calories from Fat 54
% Daily Value*
Total Fat 6g9%
Saturated Fat 1g5%
Polyunsaturated Fat 1g
Monounsaturated Fat 4g
Cholesterol 70mg23%
Sodium 666mg28%
Potassium 146mg4%
Total Carbohydrates 7g2%
Dietary Fiber 1g4%
Sugars 3g
Protein 25g50%
Vitamin A7%
Vitamin C72%
Calcium1%
Iron2%
* Percent Daily Values are based on a 2000 calorie diet.
Have a question or something not clear? Ask in the comments.
Do you want more recipes from 101 Cooking for Two? Sign up for the newsletter and get all posts delivered straight to your inbox!
Nutrition is for one serving. Number of servings is stated above and is my estimate of normal serving size for this recipe.
All nutritional information are estimates and may vary from your actual results. This is home cooking, and there are many variables. To taste ingredients such as salt will be my estimate of the average used.
If you like this recipe or find it useful, the pleasure of a nice 4 or 5 rating would be greatly appreciated.
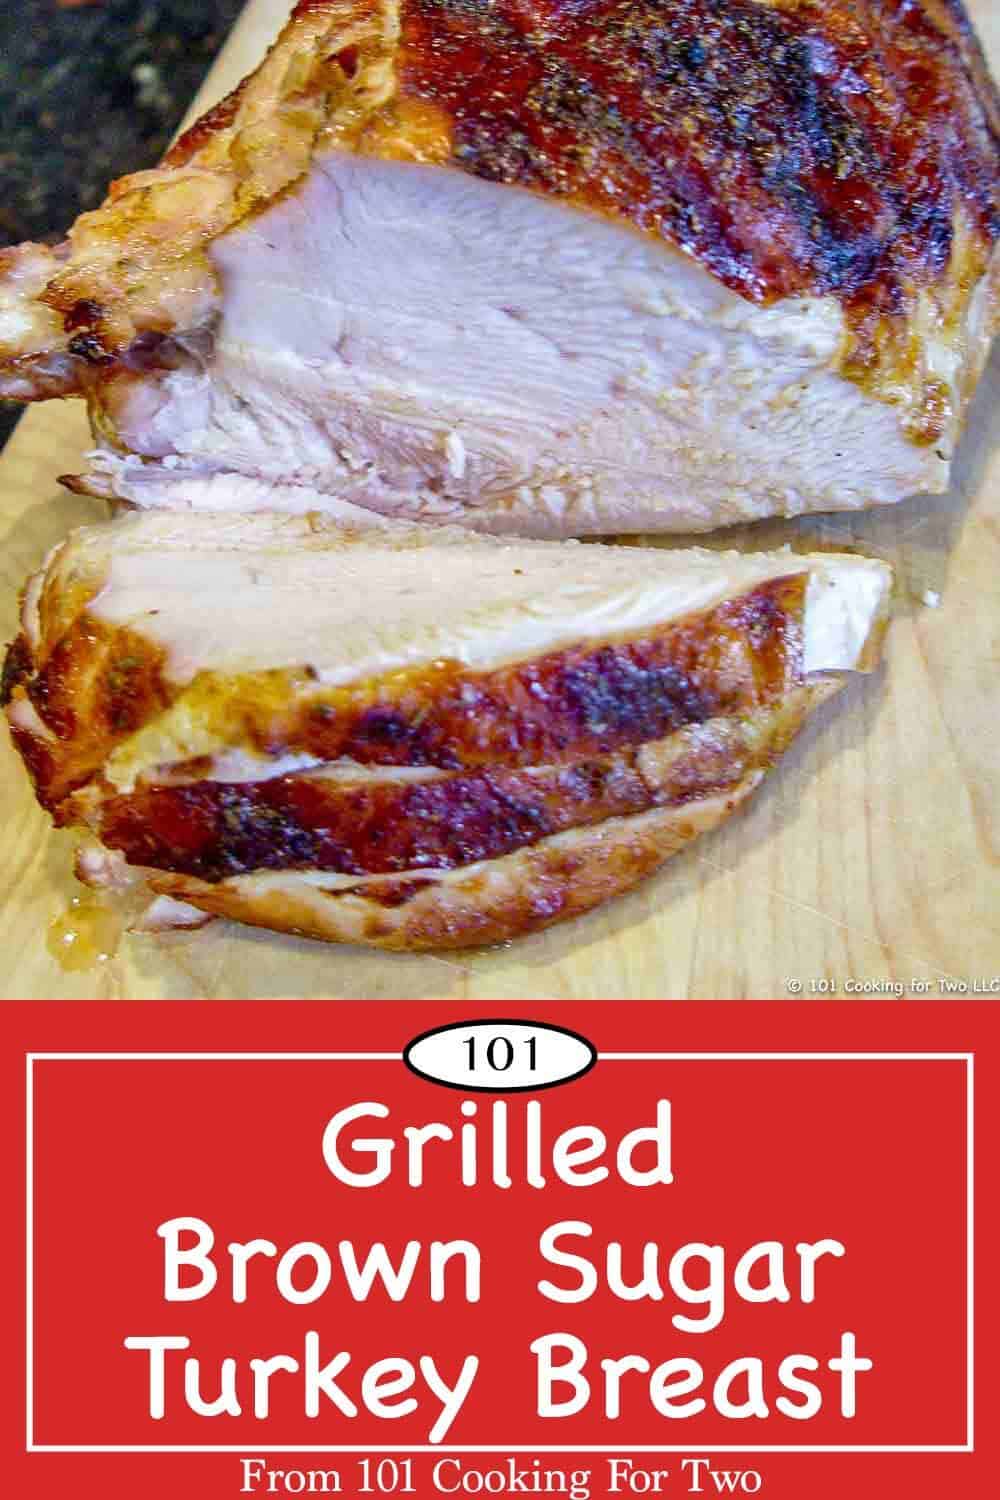
Let’s learn to grill a half turkey beast to be moist with brown sugar rub. Just follow these easy step by step photo instructions for a great grilled turkey breast.
Editor’s Note: Originally Published May 1, 2012. Now updated with more detailed instructions and updated photos. Plus a discussion of previously frozen turkey breasts.
This has been on my cooking “bucket list” for several years. So a smile came on my face when I found a half fresh uninjected turkey breast at our local market
So what to do with my prize? Straight grilling? That would be nice and easy with great taste, but it deserved more.
I started with a recipe I saw last summer in the Chicago Tribune with a brown sugar brine and rub. A good start but I lots of modifications plus I simplified and added more details to the instructions.
My Rating
Almost a 5. I’m a “turkey guy” meaning there is almost no turkey recipe I don’t love. This one is worth some love.
Pro Tips: Recipe Notes on Grilled Turkey Breast
Brining the Turkey Breast
I’m starting with a brine which I think is important for a grilled turkey or turkey breast. But I want to say something forcefully, DO NOT BRINE A PREVIOUSLY INJECTED OR BRINED TURKEY BREAST. I will repeat that a few times before we are done.
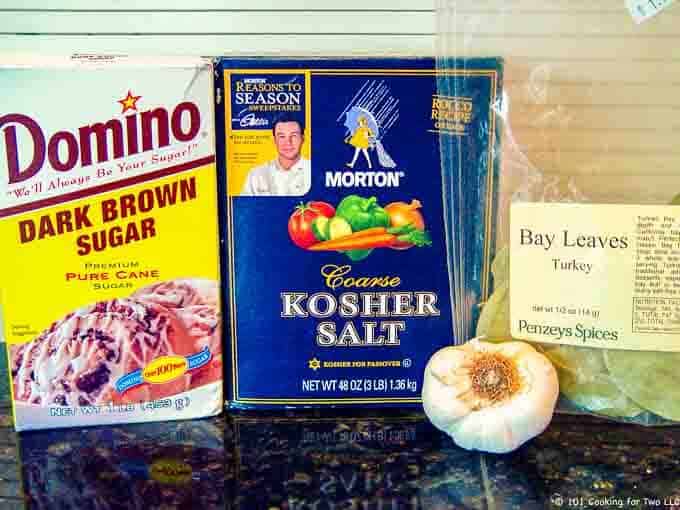
I’m suggesting a fairly standard turkey brine of 2 quarts of water and 1/4 cup of kosher salt. I have added a few other flavors with the garlic, brown sugar and bay leaf.
You can use the brine to introduce other favors that you want. Add some apple cider, perhaps a quarted orange. Go wild. But the most important thing is the salt to fluid ratio stay approximate the same. It is not an exact science, so just keep it close.
A quick salt note. 1 teaspoon table salt = 1 1/4 teaspoon Morton kosher salt = 2 teaspoons Diamond Crystal kosher salt
Refrigerate for 3-6 hours. Be sure to rinse off the brine and pat dry. Also, do not use the salt in the rub.
Grill Temperature
The grill surface temperature is important, and we are going to use some indirect grilling also. Do not fear it is not hard. But you do need a grill surface thermometer. The one in the grill lid is useless. Please DO NOT depend on it.
We will be starting with a grill surface temperature of 350-400 degrees over the entire surface.
That is a bit lower than we usually do chicken (450), but due to the thickness, it needs to be lower. Yep, I said that right, thicker meat needs lower temperature and longer time to allow the heat to penetrate but that also leads to more drying so a brine or injuction is needed here.
We will brown the skin some, flip the skin up and turn off half the grill and point the thicker side to the heat. We want about 350 degrees (oven roasting temperature) at the junction of the direct and indirect side.
While this technique is for this recipe, you can see a fuller discussion of grill surface temperature at Beginner’s Guide to Grilling on a Gas Grill.
What about other Turkey Breasts?
Yes, you can but with some modifications.
Full thaw before starting.
Use a large knife and from the back side, split completely through the breast bone. Break the bone and butterfly the breast by pressing flat.
Almost all of these breasts are injected or brined so DO NOT BRINE and keep the salt out of the rub.
The cooking time will vary by total weight and thickness so watch the internal temperature and cook to 165. If the skin is getting too brown, you need to tent lightly with foil.
You also may need more rub to cover the increased surface area.
Turkey Safety:
Like any poultry, your turkey should be assumed to be contaminated. A frozen turkey breast must be thawed fully according to the package instructions.
The turkey must not be in the food danger zone of 40-140 degrees for more than 2 hours. Lots more details in my complete guide to frozen turkey breasts listed in the next section.
For poultry safety please see Chicken… To Rinse or Not To Rinse?
Other Turkey Breast Recipes
How To Roast a Turkey Breast with Gravy I love this recipe and do it every few months for leftovers.
Butter Turkey Tenderloin – Pan Seared Oven Roasted with Gravy
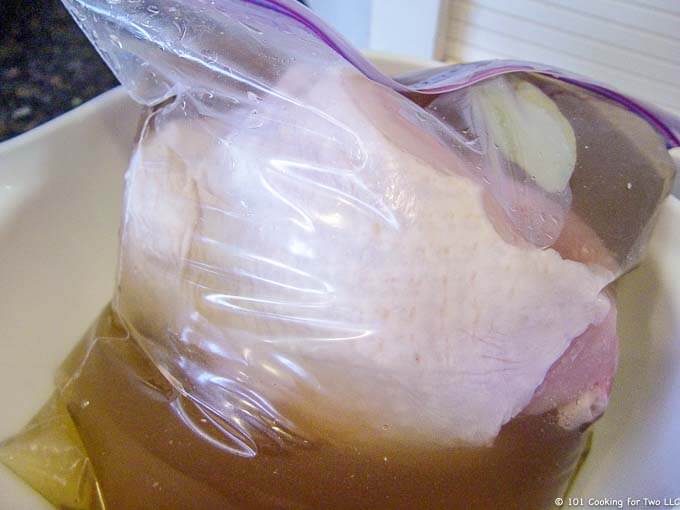
If your turkey breast is not injected or previously brined, brining is an excellent idea. Start with a brine: 2 qt. of water and add 1/4 cup each of kosher salt and brown sugar. Crush 2-3 cloves of garlic and add 2-3 bay leaves.
Trim and clean a 3 1/2 to 4 1/2 pound turkey breast. This is about 4 1/2 lbs. of turkey breast. Add the turkey to the brine and refrigerate for 3-6 hours.
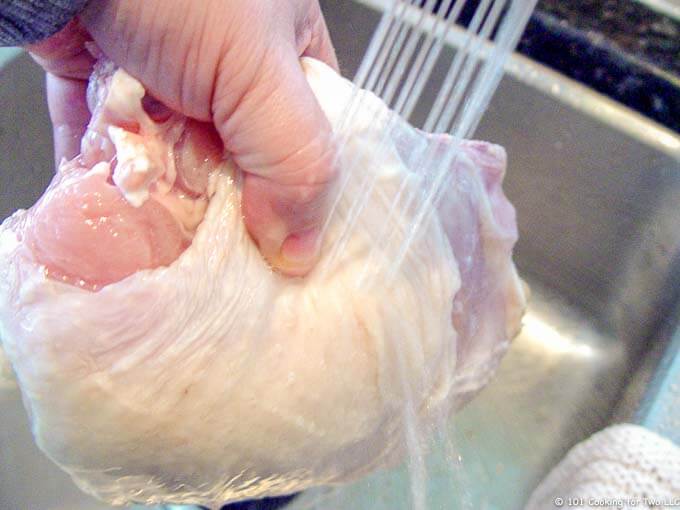
Rinse the brine off the turkey breast carefully.
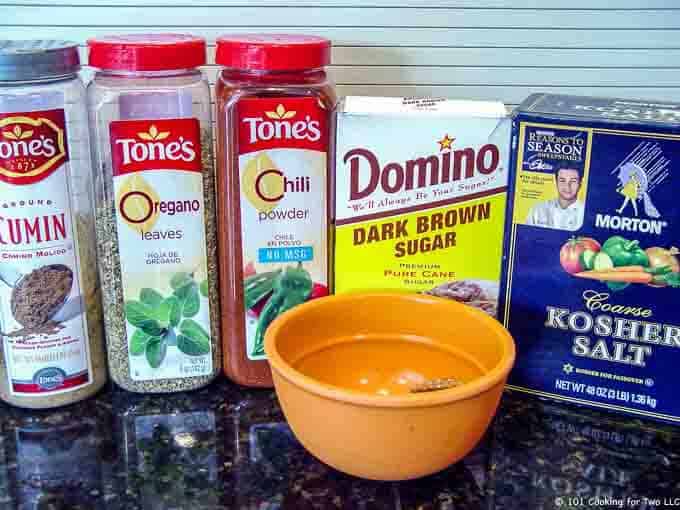
Preheat grill to a grill surface temperature of 350 to 400. Mix a rub of 2 tablespoons brown sugar, 1 teaspoon chili powder, 1/2 teaspoon each oregano and cumin. Add 1 teaspoon kosher salt if you did not brine or if you are sure the breast was not injected.
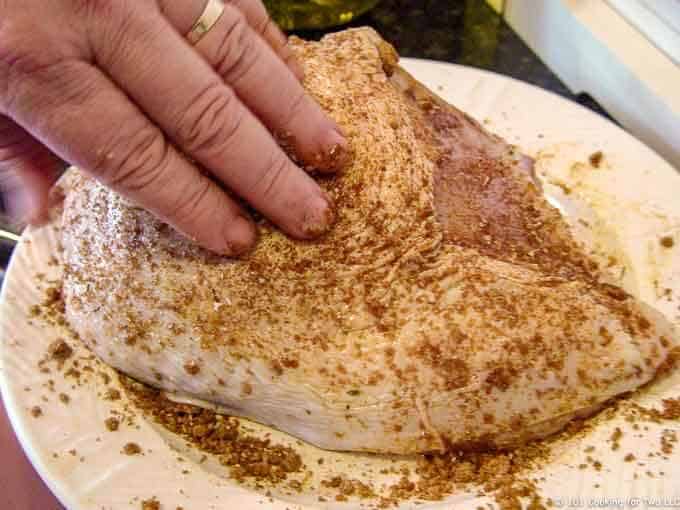
Rinse the breast well, pat dry then brush with a little oil. Apply the rub.
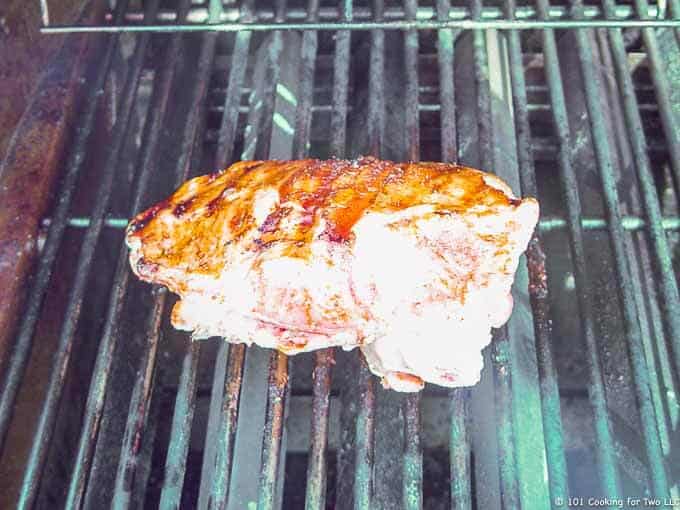
Grill skin side down for about 8- 10 minutes to get some browning of the skin then flip and turn off the direct heat the side of the grill with the meat. Place the thick side of the breast towards the heat. Keep the temp of the grill 350 to 375. Keep the lid closed and your hands off as much as possible.
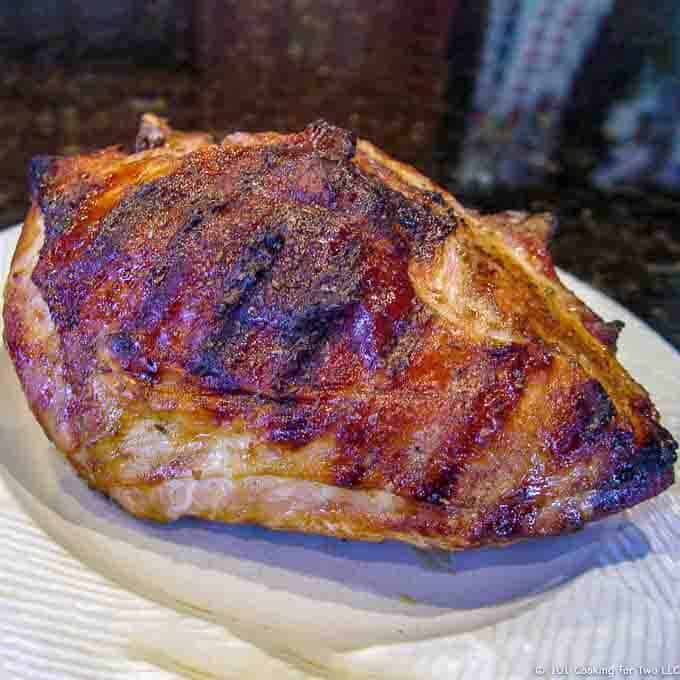
Cook until internal temp of 165 (about 1 3/4 to 2 hours). Remove from heat and let rest for 10 minutes before serving.
Do you want more recipes from 101 Cooking for Two? Sign up for the newsletter and get all posts delivered straight to your inbox!
Grilled Turkey Breast
Let’s learn to grill a half turkey beast to be moist with brown sugar rub. Just follow these easy step by step photo instructions for a great grilled turkey breast.
Prep Time10mins
Cook Time2hrs
Total Time5hrs
Course : Main Course
Cuisine : American
Keyword : Grilled Turkey, Grilled Turkey Breast, Turkey Breast
Servings/Adjust Amount: 8servings
8
Ingredients
3 1/2-5poundsfresh turkey breast
The Brine- Only if not injected or previously brined
2qtswater
1/4cupkosher salt
1/4cupbrown sugar
2-3clovesgarlic – crushed
2-3bay leafs
Rub
2tablespoonsbrown sugar
1teaspoonkosher salt – only if not brining and not injected
1teaspoonchili powder
1/2teaspoonoregano
1/2teaspooncumin
2teaspoonsoil
Instructions
If your turkey breast is not injected or previously brined, brining is an excellent idea. Start with a brine: 2 qt. of water and add 1/4 cup each of kosher salt and brown sugar. Crush 2-3 cloves of garlic and add 2-3 bay leaves.
Trim and clean a 3 1/2 to 5 pound turkey breast. This is about 4 1/2 lbs. of turkey breast. Add the turkey to the brine and refrigerate for 3-6 hours. Rinse the brine off the turkey breast carefully.
Preheat grill to a grill surface temperature of 350 to 400. Mix a rub of 2 tablespoons brown sugar, 1 teaspoon chili powder, 1/2 teaspoon each oregano and cumin. Add 1 teaspoon kosher salt if you did not brine or if you are sure the breast was not injected.
Rinse the breast carefully, pat dry then brush with a little oil. Apply the rub.
Grill skin side down for about 8- 10 minutes to get some browning of the skin then flip and turn off the direct heat the side of the grill with the meat. Place the thick side of the breast towards the heat. Keep the temp of the grill 350 to 375. Keep the lid closed and your hands off as much as possible.
Cook until internal temp of 165 in the thickest part and several other locations. Generally about 1 3/4 to 2 hours). Remove from heat and let rest for 10 minutes before serving.
Recipe Notes
Pro Tips
Only brine if the breast is not injected and not pre-brined.
Do not add the salt to the rub if you brine or the breast was injected.
The brine can be modified for other flavors. See the post for some suggestions.
To do this right, you need to check the grill surface temperature and to use an instant-read thermometer to determine the endpoint.
Remember the minimum safe internal temperature for turkey is 165 in the thickest part of the breast. I check 3-4 points before removal.
While this recipe is for a fresh non-injected breast, you can adopt a whole previously frozen breast. Please see the discussion in the post above.
I’m using a serving size of 1/2 pound. Will a good serving, it has no seconds nor leftovers built in like my normal turkey recipes.
Nutrition Facts
Grilled Turkey Breast
Amount Per Serving (8 oz)
Calories 266Calories from Fat 90
% Daily Value*
Total Fat 10g15%
Saturated Fat 3g15%
Cholesterol 105mg35%
Sodium 654mg27%
Potassium 4mg0%
Total Carbohydrates 4g1%
Sugars 2g
Protein 39g78%
Vitamin A1.5%
Calcium0.4%
Iron1%
* Percent Daily Values are based on a 2000 calorie diet.
Have a question or something not clear? Ask in the comments.
Do you want more recipes from 101 Cooking for Two? Sign up for the newsletter and get all posts delivered straight to your inbox!
Nutrition is for one serving. Number of servings is stated above and is my estimate of normal serving size for this recipe.
All nutritional information are estimates and may vary from your actual results. This is home cooking, and there are many variables. To taste ingredients such as salt will be my estimate of the average used.
If you like this recipe or find it useful, the pleasure of a nice 4 or 5 rating would be greatly appreciated.
The cookie settings on this website are set to "allow cookies" to give you the best browsing experience possible. If you continue to use this website without changing your cookie settings or you click "Accept" below then you are consenting to this.
Read more about data collection for ads personalisation our in our Cookies Policy page