Tag: GlutenFree

Gluten-Free Goddess Recipes: Gluten-Free Gingersnap Cookies by Gordon Ramsay

Gluten-Free Goddess Recipes: Gluten-Free Gingersnap Cookies


Gluten free gingersnaps from Karina, Gluten-Free Goddess

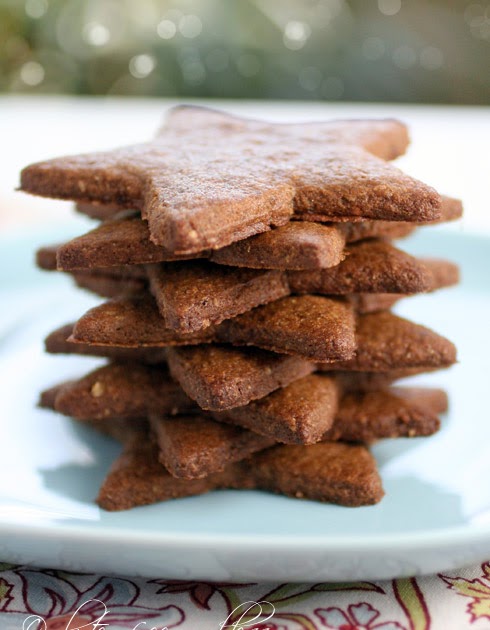
Gingersnaps, or cut-out cookies? How about both?

This time of year simply begs for gingersnaps- the classic and humble cookie that tastes old fashioned and elegant and post new wave all at once. A subtle, spicy, gingery bite that snaps with a crunch to awaken satiated taste buds soaked in a holiday sea of egg nog, cheese logs and peanut butter balls.

Fancy cookies, these are not.

Slathered with green icing and star sprinkles?

Not exactly.

Though, you could, I suppose. Slather these. And sprinkle with abandon.

If you’re of a mindset that more is more, and nurture not the minimalist mantra of Less.

The choice is yours.

Go old fashioned and let the gingersnap goodness tingle on its own.

Or go wild.

And get your frosting on.

It’s your party.

Gluten free ginger cookies cooling on a wire rack

Karina’s Gluten-Free Gingersnaps Recipe

By Karina Allrich December 2010.

The dough for these gluten-free gingersnaps lends itself beautifully to rolling out and cutting into shapes. Usually vegan gluten-free dough is finicky. But I found it surprisingly easy to roll out- with a simple technique we use for making crackers. The cut-outs were tricky to move, though. But don’t fret. I have a method to bypass that horror (cookie shapes breaking into sad little twisted lumps).

Ingredients:

1 cup sorghum flour
1 cup tapioca starch/flour
1/2 cup hazelnut flour or almond flour
1 cup light brown sugar
1 teaspoon ground ginger
1 teaspoon ground cinnamon
1/4 teaspoon ground nutmeg
1/4 teaspoon ground cloves
1/4 teaspoon fine sea salt
1 1/4 teaspoons xanthan gum
1 teaspoon baking soda
1/2 cup Earth Balance Sticks, or Spectrum Organic Shortening
1/4 cup unsulphured molasses
4 tablespoons coconut milk (or non-dairy milk)

Supplies you’ll need:

A large baking sheet. An Exopat or Silpat. Plastic wrap. A rolling pin. Cookie cutters.

Instructions:

Preheat the oven to 350ºF.

Whisk together the dry ingredients in a large mixing bowl.

Use a whisk attachment or pastry cutter to cut in the shortening and molasses. The mixture will be sandy and crumbly.

Add the coconut milk one tablespoon at a time.

Mix after each spoonful to keep a close eye on the consistency. You don’t want the dough too sticky. It should still appear somewhat crumbly- but- when you pinch the dough it should stick together and feel like cookie dough. I used four tablespoons of So Delicious coconut milk to get to this consistency.

Divide the dough in half. Wrap one half in plastic wrap and pop it in the fridge to chill while you work with the other half.

Note: If the dough seems too soft and warm- chill all of it for an hour to improve the rolling out process.

Split the half dough ball in two.

Place the Exopat liner on the counter. Put the dough in the center, and using your palms, lightly press the dough into a flattish round shape.

How does the dough feel? If it’s warm or very soft you may need to chill it before working with it. If it feels sturdy and pliable, proceed.

Cut a swath of plastic wrap the size of the Exopat and lay it on top of the dough. Use a rolling pin to roll out the cookie dough evenly. The plastic wrap makes this super easy. When the dough is evenly 1/4 inch thick, pull off the plastic and save it for the next batch.

Use cookie cutters or juice glasses to cut shapes into the dough- not too close together. Do not move the shapes you cut. You are just cutting the dough.

Carefully pull away the pieces of dough surrounding the cookie shapes, leaving the cookie shape itself on the Exopat (I used a butter knife to help me do this).

When you’re done you’ll have a sheet of shapes ready to bake!

Roll up the excess dough to reuse.

Place the baking sheet next to the Exopat liner and gently move the liner with cookies onto the baking sheet.

Bake in the center of a preheated oven for 8 to 10 minutes.

Note: Use this first sheet as a trial run to see your best baking time. The thinner the cookie the faster it will bake. Mine were ready at 8 minutes.

These gingersnaps crisp as they cool. So if you like a chewy, tender ginger cookie, bake for less time, say 7 to 8 minutes. If you prefer them crunchy gingersnap style, bake them at least 8 minutes, up to 9 minutes- if they aren’t rolled very thin. Remember the thinner they are the faster the bake. For thicker cookies, bake up to 10 minutes- but remember, these really do crisp as they cool to room temperature, so experiment with timing.

When the cookies have firmed up and are cooled enough to handle, remove them to a wire rack to continue to cool and crisp up.

Repeat the process for the remaining cookie dough.

Note: If you bake two sheets at a time, your baking time may vary from mine. I baked one sheet in the center. Rotate the pans to help with even baking.

When the cookies are cool, divide them up and store them in sandwich bags, inside a large freezer bag. Freeze for maximum taste and texture preservation.

Makes 3 to 4 dozen cookies, depending upon the size of the cut-outs.

Vegan gluten free gingersnaps in a stack with a glass of cold coconut milk

I made half the batch as classic gingersnaps- small round snaps of gingery goodness. Perfect for dunking in ice cold coconut milk. I rolled the dough out slightly thicker and used an espresso cup, and have a delightfully tender, chewy center.

I bagged and froze extras for easy take-along treats. I tuck them in my purse. They’re fabulous with a soy chai latte. Just sayin’.

Vegan and wheat free ginger cookies is moon and star shapes for Christmas


Recipe Notes:

Use fresh spices. Not last year’s. These cookies shine with spicy flavor, so don’t use stale spices you’ve had kicking around since Santa Clause was a kid.

For those of you avoiding nut flours, I suggest trying your favorite medium weight gluten-free flour as a substitute for the hazelnut flour. The hazelnut flour is slightly sweet and nutty. So you’ll want to replace it with a good tasting flour- not a bean flour.

For subbing the coconut milk, any non-dairy milk will work- but again, choose a good tasting sub. I think any nut milk or rice milk should work. Choose a vanilla milk for added flavor.

For subbing the organic shortening, I find oil sometimes problematic in cookie recipes, so I’m not sure I’d recommend using oil. Perhaps a solid coconut oil or vegan stick margarine. If you are not vegan, and use butter, that will work.

Why I use an Exopat or Silpat- a silicone liner for the baking sheet- I find that gluten-free cookies will too often spread, and brown too much if baked directly on a baking sheet. Unless you use a sheet with “cushioned air”- those really slow down the baking time.

These are a pleasantly crisp gingersnap-style cookie. If you frost them with icing, it will soften the cookie. So if you prefer a softer cookie- ice these.

Gluten free vegan gingersnap cookies in star cut out shapes on a plate


Gluten-Free Double Chocolate Chip Cookies by Gordon Ramsay

Gluten-Free Double Chocolate Chip Cookies


Gluten free vegan chocolate cookies with chocolate chips


Double Chocolate Yum.

(And some gluten-free baking advice.) 


I have a new cookie recipe to share today. A cocoa infused cookie studded with semi-sweet chocolate chips. A cookie that tastes like a brownie- if a brownie was slightly crispy and crunchy on the outside, and chewy soft on the inside. 


You could say, it’s a brownie with a cookie texture.


Gluten free chocolate cookies recipe


Karina’s Gluten-Free Double Chocolate Chip Cookies – A Vegan and Dairy-Free Recipe

Recipe originally published April 2011 by Karina Allrich.

I used a mild organic cocoa in these chocolate chocolate chip cookies. The cookie’s flavor is subtle, like cocoa, with lovely bittersweet bites of dark chocolate chips. The men in the house like these babies straight from the freezer, ice cold.

Ingredients:

Whisk together:

1/2 cup GF buckwheat flour or certified gluten-free oat flour

1 cup sorghum flour

1/2 cup tapioca starch or potato starch (not potato flour!)

1/3 cup organic cocoa

2 teaspoons xanthan gum

1 teaspoon sea salt

2 teaspoons baking powder

1 cup organic cane sugar

1/3 cup light brown sugar

Add in:

1/2 cup organic coconut oil or Spectrum Organic Shortening

1 tablespoon bourbon vanilla extract

1/2 cup vanilla rice milk, coconut milk, or almond milk- more as needed

As you beat the dough pay close attention to the consistency. Add more rice milk a tablespoon at a time, and beat to combine, until you achieve a smooth but sturdy cookie dough. I added two more tablespoons of rice milk to my dough.

Add in:

1/2 cup vegan chocolate chips

Instructions:

Preheat the oven to 375ºF. Line one or two baking sheets with parchment paper or an Exopat liner.

Stir in the chocolate chips as best you can (the dough is stiff).

Roll a golf ball sized wad of dough between your palms, and place the ball on the lined baking sheet about two inches apart. Repeat this process to make 18-24 balls. Use your palm to press down on the dough and flatten slightly- not too much- unless you like your cookies thin. Press a few extra chocolate chips into the tops of the cookies, if you like.

Bake in the center of a preheated oven for about 15 minutes until the cookies are set. They will still be slightly soft in the center. If you bake two pans at once, rotate the pans half way through baking.

Remove the pans from the oven, and allow the cookies to cool and “set” for a few minutes; then use a thin spatula to move the cookies to a wire rack. The cookies will get crisper as they cool.

Cook time: 15 min

Yield: 18-24 cookies


Recipe Source: glutenfreegoddess.blogspot.com

All images & content are copyright protected, all rights reserved. Please do not use our images or content without prior permission. Thank you. 


 photo Print-Recipe.png


Karina’s Notes on Baking:

In this recipe- use eggs, if you prefer.

Texture is a big deal in gluten-free baking. It’s no secret that giving gluten the boot also means giving texture, stretch, and structure the old heave-ho, right along with it. First timers bite into gluten-free goodies and pause. They chew. Their eyes widen and dart to the side as they search for a word to describe exactly what it is they are chewing. The word most often used to describe something gluten-free? Gummy. Or worse. Hockey pucks. Cardboard. Dirt. Attributes one does not necessarily associate with um, pleasure. With nourishment. With flavor.


Which is why I am here.


It was nearly ten eleven twelve thirteen years ago (December 2001) when I broke up with the abusive protein known as gluten.


Our love affair had been a passionate, tumultuous ride. Thrilling and deliciously seductive. From twirling garlic laden Italian pasta to rustic bread baking, we had nurtured a decades long love affair. Four and a half decades, in fact. And I’m not embarrassed to admit, I was deep into it. Head over heels. And dizzy in denial. Until symptoms could no longer be ignored.


And it turned out I felt better without gluten. Not just better. Transformed. 


So I bought a gluten-free cookbook and started baking (and no offense to the wonderful woman who was- literally- a gluten-free pioneer and wrote several best selling gluten-free cookbooks, but). I determined- quite quickly- that white rice flour and starches do not a gourmet treat make.

Truth is, ten years ago, baking gluten-free meant using rice flour and starches, or just plain cornstarch (this was Julia Child’s advice). We didn’t have the higher protein, whole grain gluten-free choices we have today. Oh, they were there, lurking. Buckwheat flour and almond meal have long, delicious traditions in the old country (I loved the cookbook Fabulous and Flourless). But packaged blends and gluten-free mixes favored cheaper rice flour and starches (and even today, most g-free mixes rely on this old school stand-by, with predictably gummy results). So the cardboard moniker stuck.


And me?

My hopes for baking without gluten deflated like a sad little souffle.


Until Bob’s Red Mill brought us whole grain gluten-free grains. Grains with protein and fiber. Grains with nutrition. Grains with flavor. And yes- texture! Milled with artisan care in a gluten-free facility. And no, this is not a sponsored endorsement. This is personal.


By now you should know I’m not the kind of blogger who can be seduced by a coupon offer. Or a free t-shirt. I’ve been doing this awhile, Darling.


I have an opinion. An informed opinion. Based on thirteen-plus years of gluten-free baking (which ought to be worth more than a coupon or a  five dollar sample).


So I tell it like it is.

Readers sometimes ask me for recipe substitutions. These can be grouped into a handful of popular themes: 

  1. I use too many different flours- they want to use one (or a baking mix).
  2. I use buckwheat flour- they wouldn’t touch buckwheat flour like they wouldn’t wear Crocs.
  3. I use sorghum flour- they can’t find sorghum flour (for that, I am truly, sympathetically sorry!).
  4. I use almond meal or coconut flour (fabulous protein and fiber)- and they are allergic (once again, profoundly sorry!).


So they sub. They use rice flour and starches in my recipes. And return to tell me the texture is gummy. Or as dense as cardboard.


Exactly.


Flour choices matter.


And so does execution.


So I thought I’d address this today, and offer some quick, short advice on gluten-free baking- and substitutions.

Truth? Gluten-free baking is more of an art than a science.

What this means- there is no one perfect, exact, preset formula for a gluten-free recipe. And you don’t need a scale to measure things in grams.


Why?


Without stretchy gluten, flours can be finicky, and far less forgiving.


There is weather, Bubela. You know, humidity. And winter heat dryness. And there is how you store your flours (in the cold fridge- or in the cupboard next to the stove?). Dampish flours need less liquid added. And some g-free flours are super thirsty (coconut flour grabs on to fat and liquid like a parched and greedy camel).


With gluten-free baking, the relationship of dry ingredients to wet is crucial. Even two tablespoons more/or less liquid can make the difference between a gummy center, and a fluffy crumb.  


Here’s what I do– I add my liquid to the whisked dry ingredients slowly, a little at a time, and beat until it comes to the right consistency. Don’t dump all the liquid in at once. Sometimes you need a tablespoon less liquid. Sometimes, a few tablespoons more.


Then there is temperature. The temperature of the ingredients themselves (ice cold eggs?). The ambient temperature of your kitchen (is it drafty and damp, or hot and humid, or do you use air conditioning?). And then, perhaps the most influential of all, there is the temperature of your oven– which, surprisingly, can actually vary. Not only for those of us using cheap stoves in rental apartments, but also in your shiny newly installed appliance– it may not be calibrated correctly. This is a big issue for many a reader, by the way). Which is why I recommend using an oven thermometer, and checking your ‘preheat’ temperature. Temperature influences baking time, big time. 


How to judge the right consistency?

Intuition and experience helps. But in general, cake and cupcake batters are slightly thicker than wheat based cake batters. You’re not looking for velvety thin ribbons of batter like the old days. I find the best gluten-free cake batters tip toward a muffin batter consistency.

Bread dough and pizza dough is more like muffin batter. 

G-free cookie dough is stiff and sturdy and a bit sticky. Roll it into balls with wet or oiled hands.

For baking substitution help (because of course, I know how hard it is to bake gluten-free with allergies- you know I love you, my multi-allergic sisters and brothers, I’m one of you!) please use my post on Baking Substitutions and Help as a guide to subbing problematic ingredients in my recipes.
And for vegans, and non-vegans, I have found my recipes perform well with eggs and without, using an egg substitute. For a powdered egg sub I use Ener-G Egg Replacer– if you use a different one, you may need to adjust starches/liquids. Many readers report good luck using flax seed gel; I have limited expertise with flax, but I do think it adds a nice touch to gluten-free baking. And yes, for dairy and non-dairy, I find it’s an easy one-to-one sub. (I must be dairy-free, so I write up recipes that way, but if you prefer using butter and milk in my vegan recipes- that will work just fine; my husband and sons have tried them both ways, with success). 
For detailed info on gluten-free flour choices and how to make your own g-free flour blends that don’t suck, see my Gluten-Free Baking Tips post.

Finally- to repeat it— experience counts.

Even our failures bring us one step closer to better results. They teach us. Baking gluten-free is a process. It is not a finite, closed experiment. It is more like jazz than strophic form. Learning an intuitive sense of improvisation is worth the effort.

So, go bake some cookies with whole grain flours and share them with someone you love, okay?

Turkey Enchilada Soup (Gluten-Free, Lactose-Free) by Gordon Ramsay

enchilada soup with avocado and green onions


Warm, spicy turkey enchilada soup topped with avocado and lactose-free cheese is the perfect pick-me-up for cold winter days. 

I created this recipe for my client, GO VEGGIE. As always, thank you for supporting the brands that keep me inspired in the kitchen. 
enchilada soup with avocado and green onions

I made this turkey enchilada soup a few weeks ago, thinking it would be perfect to share at the beginning of cold and flu season. Then, before I had a chance to write it up, I got a nasty cold and spent a solid 72 hours asleep on the couch. Funny how that happens. 

While I don’t wish the cold I had on anyone, I have you covered if you do happen to get it. This enchilada soup has everything you need: It’s brothy and warm, to help if you have the chills. It’s a little spicy, to help open your sinuses. It’s super cozy and comforting, and you can adjust the toppings to suit your mood. (I don’t know about you, but I’m super picky about what I feel like eating when I’m sick.)

two bowls of enchilada soup with homemade enchilada sauce and go veggie mozzarella

How to make enchilada soup?

To make this turkey enchilada soup, start by sauteeing garlic and onion in a little olive oil. Then, add ground turkey breast and cook it until it’s browned and crumbly. Browning the meat will help give your soup tons of flavor! If turkey isn’t your thing, you can also use ground chicken or even meatless crumbles. 

Next, start building the base of your broth. It’s based on my homemade enchilada sauce recipe, so you know it’s going to be good! Add chicken or vegetable stock, cumin, chili powder, and a can of crushed fire-roasted tomatoes. At this point, you’ll also add red bell pepper, black beans, and corn. Bring everything to a simmer to help the flavors come together, then stir in some apple cider vinegar to perk up the flavor. Give it a taste and season it with salt and pepper to your liking. 

What to serve with enchilada soup?

Now is where things really start to get fun – everyone can add toppings to their own bowl of soup! I always start by adding a big hand full of GO VEGGIE lactose-free mozzarella shreds to my bowl. What good is an enchilada without any cheese? I love the way these shreds melt into my soup, and they have just as much protein as dairy cheese (plus more calcium, vitamin A and vitamin D!) In addition to the cheese, I like to add sliced avocado, cilantro, and green onions. You can also serve diced green chiles, crushed tortilla chips, lactose-free sour cream, or lime wedges. 

Turkey enchilada soup with various toppings

Yield: 6

Prep Time: 10 minutes

Cook Time: 30 minutes

Total Time: 40 minutes

Warm, spicy turkey enchilada soup topped with avocado and lactose-free cheese is the perfect pick-me-up for cold winter days.

Ingredients

  • 1 Tablespoon olive oil
  • 1 onion, diced
  • 4 garlic cloves, minced
  • 1 pound ground turkey breast
  • 1 red bell pepper, diced
  • 1 can fire-roasted crushed tomatoes
  • 4 cups chicken broth or vegetable stock
  • 1 Tablespoon ancho chile powder
  • 1/2 teaspoon cumin
  • 1 can black beans, rinsed and drained
  • 2 cups frozen corn
  • Sea salt
  • 1 1/2 cups GO VEGGIE lactose-free mozzarella shreds
  • 1 avocado, sliced
  • Scallions, cilantro, and other toppings, as desired

Instructions

  1. Heat the oil in a large Dutch oven set over medium heat. Add the onion and saute 3-4 minutes, to soften. Stir in the garlic and cook another 1-2 minutes.
  2. Add the turkey. Cook, breaking up with a spoon, 7-10 minutes, or until browned. Stir in the peppers and tomatoes and cook 3-4 minutes.
  3. Stir in the broth, chile powder, cumin, beans, and corn. Simmer 15 minutes. Season to taste with salt.
  4. Divide the soup among six bowls. Top with cheese, avocado, and any additional toppings that you like.

Nutrition Information:

Yield: 6 Serving Size: 1
Amount Per Serving: Calories: 352 Total Fat: 10g Saturated Fat: 2g Trans Fat: 0g Unsaturated Fat: 7g Cholesterol: 61mg Carbohydrates: 36g Fiber: 10g Sugar: 7g Protein: 34g


Proudly powered by WordPress

By continuing to use the site, you agree to the use of cookies. Click here to read more information about data collection for ads personalisation

The cookie settings on this website are set to "allow cookies" to give you the best browsing experience possible. If you continue to use this website without changing your cookie settings or you click "Accept" below then you are consenting to this.

Read more about data collection for ads personalisation our in our Cookies Policy page

Close