Tag: Leek

Garlic properties and benefits – Creative in the kitchen – Gordon Ramsay’s version

Garlic properties and benefits Creative in the kitchen


Garlic properties and benefits Creative in the kitchen

L'garlic is a very well known vegetable also as Allium sativum and belongs to the Liliaceae family. Some, given its onion-like shape, place it in the family of Amarillidaceae although obviously the flavor is very different and unmistakable.

Thanks to its properties, garlic is useful for immune system, respiratory, circulatory, versus cold is influence.

The garlic plant has been known since ancient times in fact the cloves or cloves of garlic were used by the Egyptians in the third millennium BC. later by the Greeks, Romans, Chinese and Indians as a condiment for food, used raw, in salads or added to sauces, stews, fish or vegetable dishes. In practice, how we still use them.

Today the garlic plant is grown all over the world and is well known in the kitchen for everyday use!

A clove of garlic is a load of very effective healing active ingredients for our body such as allicin, sulfur, vitamins of the group B., adjust the LDL cholesterol is HDL. It can be useful in chronic infections caused by candid and in those ofrespiratory system. Garlic also has remarkable "spicy" and aphrodisiac properties, in fact it would help maintain an active and healthy sexuality, mainly thanks to the positive action it exerts on circulation in general.

100 g of garlic contain 41 kcal / 171 kj calories and also contains:

80 g of water, 8.4 g of carbohydrates, 8.4 of sugars0.9 g of proteins0.6 g of fat, 0 g of cholesterol, 3.1 mg of total fiber, 3 mg of sodium, 600 mg of potassium, 14 mg of football, 1.5 mg of iron, 63 mg of phosphorus, 5 µg of vitamin A, 0.14 mg of vitamin B10.02 mg of vitamin B2, 1.30 mg of vitamin B3 and 5 mg of C vitamin.

Garlic properties and benefits Creative in the kitchen

Garlic is excellent ally of the intestine, of the immune system, ofcardiovascular system andrespiratory system and the use of garlic is also used as natural antibiotic. In addition, garlic has a respectable medicinal reputation, in fact it is excellent for the prevention of influence, skin diseases, colds and it is infallible intestine disinfectant.

It is true that eating raw garlic leaves that taste in the mouth, which in the morning would spread any interlocutor (maybe avoid eating the clove of garlic before a meeting or a gallant meeting) it is also true that if eaten raw, every day for long periods, it could cause irritation to the intestinal walls and damage blood cells, but in reality, if you do not exceed and use common sense, moderate consumption can only improve the state of health in general.

Garlic properties and benefits Creative in the kitchen
In the kitchen, garlic is a basic ingredient and is essential to flavor many recipes and make them tasty.

Discover the recipes with the use ofgarlic:

garlic properties and creative benefits in cooking

And if you want to fully enjoy its properties, you can prepare a decoction of garlic, combine it with the tomato on a simple bruschetta, prepare the garlic soup, a typical first course of Catalonia and of Spain, made with bread, cold-ground red pepper, eggs. But also a classic spaghetti with garlic, oil and chilli it is great for feasting on a good mood, benefits and nutrients:

boil the water over high heat, in the meantime cut the garlic into slices. In a large pan, fry the garlic slices over low heat with a drizzle of olive oil and add the chopped chilli. When the garlic is golden, season with salt and turn off the heat. Boil the spaghetti al dente, drain and season hot by adding a sprig of chopped parsley, whisk everything and serve hot.

Cloves of garlic are also used in the preparation of sausages such as salami with garlic and in the canning industry it is used to flavor appetizers in oil or vinegar.

.

Homemade Hamburger Sandwiches Quick and easy recipe – Gordon Ramsay’s version

Print Friendly, PDF & Email


Print Friendly, PDF & Email

Homemade Hamburger Sandwiches, a very simple recipe for making the classic soft burger buns, slightly sweet just like those in the pub. If you divide the dough, the sandwich will be in the maxi format, otherwise if you want a medium sandwich you can divide the dough into 8. Perfect for filling with beef burgers or with vegetable burgers, slices, onion, salad, a slice of tomato and homemade mayonnaise (without eggs)

Ingredients for 8 sandwiches

  • 450 grams of flour (300 flour 0+ 150 Manitoba flour)
  • 1 egg
  • 7 gr of dried brewer's yeast (I Mastrofornaio)
  • 180 grams of warm water
  • 40 grams of granulated sugar
  • 1 teaspoon of salt
  • 30 gr of extra virgin olive oil

*****

Let's proceed by making the dough that can be prepared by hand or with the planetary mixer, I used the planetary / mixer. We prepare all the ingredients on the work surface.

We put in the bowl of the mixer the flour, lo sugar, the dried brewer's yeast, L'egg and theoil, start mixing with a wooden spoon or, if we use the planetary mixer, with the leaf hook (K); let's add thewarm water and finally the salt.

We mix the ingredients, then change the hook and put the hooked one, let the dough knead, in all it will take 5-6 minutes. Proceeding by hand instead we knead first in the bowl, then on the work surface with a thin layer of flour.

We form a ball and place in a bowl with a drop of oil on the bottom. We cover the container with foil. 
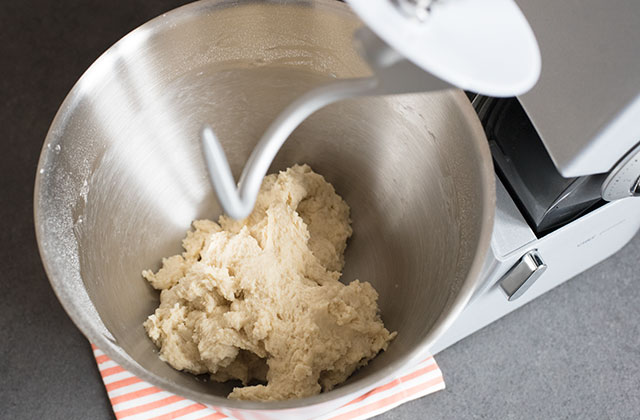
We let it rise for 1 to 2 hours (based on the outside temperature) must double its volume, if the environment is cold we keep the container in the oven off with only the light on. After rising, roll out the dough on a pastry board with very little flour and let's create a loaf from which we will detach 6 or 8 loaves. We create balls and let them rise for at least 1 hour (better 2).

If they have not risen much despite the time passed, you will see that they will rise further in the oven. Now put the loaves on a baking sheet with parchment paper, brush with water and oil in equal quantities. Add the sesame seeds (if you want you can also brush with an egg and milk beaten together, or just with milk).

We bake at 180-190 ° for 15-20 minutes or in any case until golden brown. After taking out the burger buns, remove them from the pan and place them on a wire rack. To prevent moisture from forming on the bottom. Your homemade burger buns are ready. We cut the sandwiches and make to taste!

The leftover sandwiches can be stored in a food bag once cooled; they will be soft for 2 days.

Homemade Hamburger Sandwiches

Homemade Hamburger Sandwiches "style =" width: 640px;

Enjoy your meal!

3.1

Margherita pizza with chestnut flour – Gordon Ramsay’s version

Margherita pizza with chestnut flour


It may look like a wholemeal pizza, but it is a delicious Margherita pizza with chestnut flour.

An alternative to classic pizza margherita recipe, this chestnut flour pizza is also made with a part of Manitoba flour, perfect for reducing its caloric intake and increasing its leavening power.

It is the first time that I try a leavened product based on this flour, with which I usually make mine castagnaccio. A beautiful discovery that I wanted to inaugurate with my favorite pizza: the Margherita. This is the pizza I always use to test a new pizzeria and, as in this case, also to experiment with a new blend of flours.

So here is the recipe for my pizza Margherita, simple simple, to be cooked in a pizza oven, or, by lengthening the time a little, in a normal domestic static oven.

Margherita pizza with chestnut flour

ingredients for two pizzas with chestnut flour

THING

for the pizza dough
  • 150 g of chestnut flour
  • 150 g of Manitoba flour
  • 175/200 ml of warm water
  • 10 g of salt
  • 6 g of dry yeast
  • 10 g of sugar
  • 2 tablespoons of extra virgin olive oil
  • Salt and Pepper To Taste
for the filling
  • 2 fresh mozzarella of 125 g each
  • 400 ml of selected tomato sauce
  • 4 tablespoons of extra virgin olive oil
  • a bunch of fresh basil
  • 1 teaspoon of dried oregano
  • Salt and Pepper To Taste

HOW TO PREPARE MARGHERITA PIZZA WITH CHESTNUT FLOUR

As for a normal one Pizza margherita, I started from the dough, dissolving the yeast and sugar in a little warm water and pouring them into the center of the flour. I also added the remaining water, always warm, the oil and salt, then, with the help of a fork, I mixed the water from the center, incorporating the flour little by little with my hands. With energy, I began to knead to mix all the ingredients, until the mixture was elastic but not sticky.

I created a spherical shape by folding the outer edges of the dough inwards. It must be smooth and compact. I turned it upside down and turned it between my hands resting on the work surface with my palms facing slightly upwards, as if to form a V (this operation is called "pirlatura").

I placed the dough in a bowl greased with oil and covered with cling film, letting it rest for about 3 hours in a warm place (I use the "rising" function of my oven which guarantees a constant temperature of 30/35 ° ). Finally, I cut the dough into 2 parts, formed 2 pallets, manipulating them as little as possible, and let them rest on a baking sheet, always warm and always covered.

In a bowl I combined the tomato puree (but the peeled tomatoes will also be perfect), with the oil, salt, pepper and dried oregano (if you wish you can flavor the tomato with a clove of crushed garlic, to be removed at the time of service). I drained the mozzarella, I dried and chopped with my hands.

COOKING THE DAISY WITH THE PIZZA OVEN

Once fully matured, I spread a mixture on the shovel of the oven (here I leave you the link of mine G3 Ferrari Pizza Express Delizia oven*) Sprinkling it with a little durum wheat semolina flour. I rolled out the dough, pushing it with my fingertips from the center outwards, without touching the edges to leave the classic cornice.

Once stuffed with the fragrant tomato and mozzarella, I placed the pizza on the refractory stone of my oven, preheated to 400 °. After about 4 minutes it is ready to be enjoyed!

PIZZA WITH CHESTNUT FLOUR IN THE HOME OVEN

To cook it in a normal domestic oven, bring it to 220 ° and place your two pizzas laid out on the pan resting on the base, always sprinkled with semolina. Cook the first 8 minutes with the tomato only, then add the mozzarella and finish cooking for another 10 minutes.

When I prepare the pizza in the pan, I move it to the top of the oven for the last 2 minutes of the grill to obtain a golden effect on the cornice, which I brush with the bottom of the tomato sauce.

I served with another sprinkling of oregano, a few drops of raw oil and basil leaves.

Click.

Margherita pizza with chestnut flour

Proudly powered by WordPress

By continuing to use the site, you agree to the use of cookies. Click here to read more information about data collection for ads personalisation

The cookie settings on this website are set to "allow cookies" to give you the best browsing experience possible. If you continue to use this website without changing your cookie settings or you click "Accept" below then you are consenting to this.

Read more about data collection for ads personalisation our in our Cookies Policy page

Close