Tag: mushroom

Tamagoyaki (Japanese omelette) Original recipe – Gordon Ramsay’s version

tamagoyaki - rolled Japanese omelette


there Tamagoyaki it’s a rolled omelette typical of Japanese food whose peculiarity is the rectangular shapedue to typical cooking square pan or rectangular. It has texture soft and a taste reminiscent of an Omelette but more bittersweetand according to Japanese tradition it is served sliced ​​for breakfast ; accompany sushi or carry as bento! When I tasted it I fell in love with him and I thought I’d reply immediately! Thanks to Original recipe of my sushi friend Japanese chef that you suggested a series of tricks to do it in homeAlso without the pan which naturally we Westerners don’t have in our pans!

tamagoyaki - rolled Japanese omelette

It is worth saying that there are several enriched variants. Such as Tamagoyaki with addition of dashi broth. In this case I give you the basic version, the most classic, with a few ingredients easily available at home: eggs, soy sauce, sugar and salt. Although it is a super preparation easybeware of follow the steps. There right technique to realize the truth Tamgoyaki recipe it’s exactly that of roll the omelette in several stages. You start by first adding a small part of the beaten egg mixture, wait until it cooks, roll it up and only at that point add more raw mixture. We wait for it to cook and roll it up again and continue until the ingredients are used up! To then find this again ‘package‘ ready from slice into rectangles! In this very basic classic version, there are very few ingredients. then there is the more elaborate version with the addition of Tamgoyaki for me is perfect to serve as second dish to accompany any side dish, for example a delicious plate of crunchy Tempura! but also how delicious appetizer. And as the Japanese sushi chef suggests, yes too to carry for lunch in the office and out of town it’s delicious! try it and you won’t regret it!

Tamagoyaki recipe

PREPARATION TIMES


Preparation Cooking Total
5 minutes 10 minutes 15 minutes

Cost Kitchen Calories
Bass Oriental 255 Kcal

Ingredients


Quantity for 2 – 4 people

  • 4 eggs
  • 30 ml of water
  • 25 g of soy sauce
  • 2 g of sugar
  • 1 g of salt

Method

How to make Japanese omelette

First of all, break the eggs into a bowl, mix them well to mix the reds and whites perfectly, then add the rest of the ingredients and mix well:

egg mixture for tamagoyaki

Tamagoyaki cooking

At this point you can use a typical rectangular pan, it will be very simple because the shape will be created automatically.

However, don’t worry, you can also use one classic 22 cm non-stick pan

First of all, grease the pan with a piece of kitchen paper soaked in a little seed oil which you will reuse at other times during cooking.

Then heat the pan over medium heat and once it reaches temperature add 1/4 of the mixture.

At this point, use chopsticks or even a fork to break the bubbles by moving the mixture a little and as soon as the base part solidifies, use a spatula to roll the mixture onto itself:

how to make tamagoyaki - part1

At this point, grease the pan again with the greased handkerchief and pour in another quarter of the egg mixture:

how to make tamagoyaki - part 2

Immediately lift the already rolled piece of omelette, to let part of the liquid mixture go underneath.

When the layer starts to become solid, roll the omelette on itself, starting from the already compact part, forming a rectangle.

Continue like this: grease the pan again, add another quarter of the omelette, lift the already rolled piece, roll again from the already solid part

for a total of 4 times

how to make tamagoyaki - part 3

As you can see, the fourth time, your rolled Japanese omelette has already taken the rectangular shape.

Finally, transfer immediately to a cutting board and slice into 3 cm thick rectangles

Here’s yours ready Tamagoyaki ready to serve.

tamagoyaki - original recipe

storage

It keeps very well for the following day.

Also discover my entire collection of Second courses with eggs

Recipe and Secrets of Tavolartegusto – Gordon Ramsay’s version

sponge cake for siant honore cake


There St. Honoré cake (Saint Honore) It is one of sweets most loved of French pastry shop: the elegant cake of great opportunities! made of delicious layers: choux pastry or sponge cake and puff pastry, filled with chiboust cream (typical saint honore cream) vanilla And chocolate . Decorated with caramelized cream puffs and tufts of chantilly . A unique delight that takes the named after the patron saint of the French pastry chefs Honorè of Amiens. Invented In the 1849 from the pastry chef M. Chiboust together with the apprentice Auguste Julien, in his pastry shop on Saint Honorè street in Paris. If you want too prepare it at homedon’t be afraid, read all my advice carefully, I will guide you with step by step photos and there will be applause!

Of this sumptuous Parisian masterpiece, which has undergone many transformations over timethey really exist many variations . As, after careful study it’s a professional pastry making course I’ll explain to you that clarifying that the Original recipe French is made with a layer of choux pastry and puff pastry, and is shallower and thinner. While the saint honorè cake Italian style involves the addition of sponge cake. This is the more classic and known here in Italy, particularly popular in the 80s; That we are going to create with all the pastry chefs’ secrets! Being a complex preparation, requires time available . But believe me, with a little organization, preparation all the basics in advance of pastry, it will be easier assemble the dessert! Just like the diplomatic cake or the delicious Profitterol pyramid it is perfect as birthday cake And special occasions when you want to amaze with special effects. Its beauty and deliciousness made up of different consistencies and textures will make you forget the time it took. Furthermore you will save a lot of money! The price of a saint honore cake is almost 30 euros per kg!

Yes. To simplify the creation you can purchase empty cream puffs ready to be filled. Just as if you don’t have the desire or time to make puff pastry, you can buy rolled up puff pastry from the supermarket, I recommend it round to avoid cuts and waste. Finally you can also buy packaged sponge cake, at this point I recommend it already cut in disks.

The original cream to make this cake is Chiboust, not surprisingly also known as la Saint honoré cream . It is nothing more than a custard lightened by Italian meringue. Its foamy and soft texture is heavenly. During preparation it is divided in half to obtain the double vanilla and chocolate flavor for the typical effect two-tone . I advise you to prepare it because it really makes a difference! If you are in a hurry, you can replace it with the classic custard which you can divide in half and make the double color with the same quantity of chocolate that you find in the ingredients. Or even the Diplomatic Cream or custard with the addition of cream.

Chantilly cream is nothing more than fresh liquid cream whipped with icing sugar and that’s what you need for this cake. it remains super delicate and smells of milk. Alternatively, you can use ready-made and already sweetened whipping cream or vegetable whipping cream, but be aware that the taste is more artificial and less authentic.

Without caramel on top, the cream puffs remain soft and when in contact with the cream and the internal filling they lose their crunchy contrast. Which is one of the distinctive features of the saint honorè. So don’t be afraid, it will take 5 minutes more, but it will be worth it.

How to make the Saint Honorè Cake

One of the secrets for a perfect result is to divide the preparation into 2 days. So that the bases have time to settle and then you have time to assemble the dessert and let it rest in the fridge.

Day 1 of preparation

First of all, dedicate yourself to preparing the base, make my sponge cake

sponge cake for siant honore cake

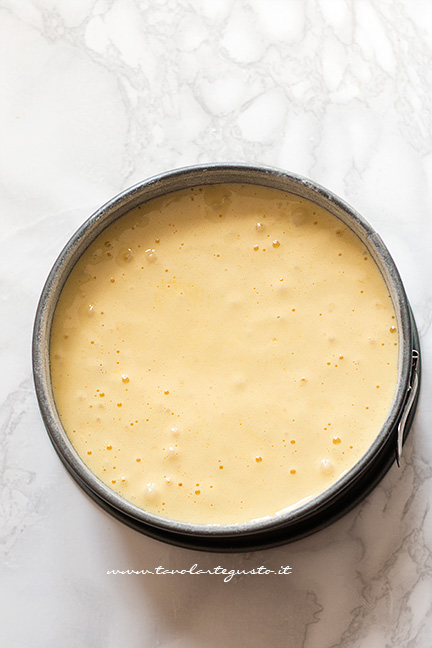
Bake in the oven at 180° in a 22 cm pan for about 30 minutes without opening the oven. Once cooked, remove from the mold and leave aside to cool perfectly sealed in cling film.

Then do it first part of the filling

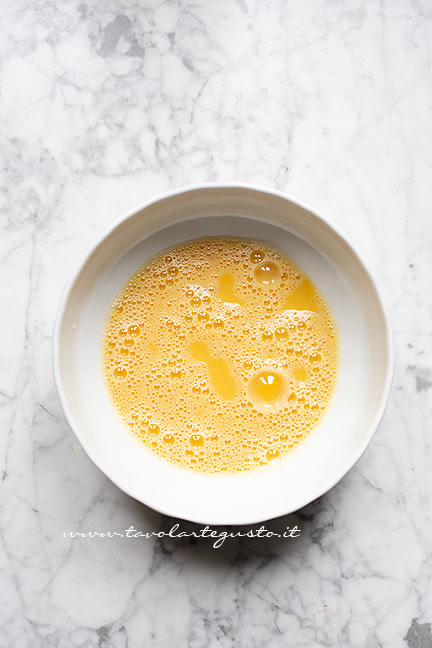
First of all, start by whipping the egg yolks with sugar and vanilla with an electric whisk for 3 minutes until you obtain a very swollen and frothy mixture. Then add starch and flour, whisking constantly, until you obtain a compact mixture. Separately, heat the milk and when it comes to the boil, pour over the whipped eggs and lower the heat. When the milk pierces the eggs forming craters, stir with a hand whisk, turn off and remove from the heat. If you want to see the various preparation steps, look at the Chiboust Cream article

As soon as it comes off the heat, divide the mixture into 2 halves.

Pour the vanilla cream immediately into a bowl, cover with cling film and leave to cool.

In the other half, add the 70 g of chopped chocolate flakes, mix well with the whisk to mix everything and finally transfer this too into a bowl and cover with cling film.

Let cool completely, first at room temperature then in the fridge.

In the end cut the puff pastry to a size equal to the sponge cake circle, i.e. 22 cm.

Then place on a baking tray with baking paper and brush the surface with very little ice water (it must not drip) and a sprinkling of icing sugar:

cook the puff pastry disc for saint honore

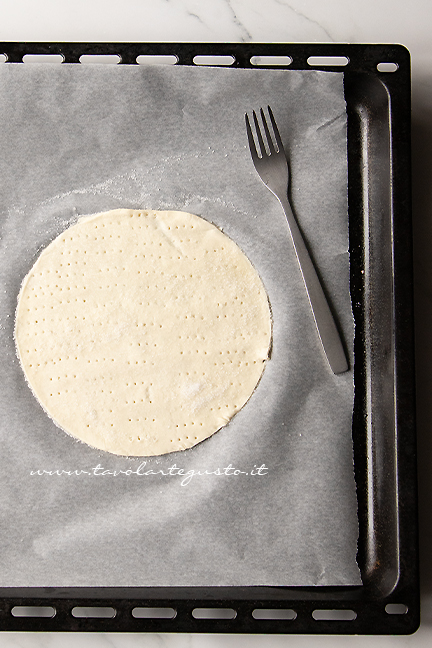
Finally, cook in a very hot static oven at 200° for 12 – 15 minutes until golden and set aside.

In the end caramelize the cream puffs

First of all, prepare the caramel by pouring the water into a saucepan with the sugar and bring to the boil over medium-low heat without ever stirring.

As soon as it has reached an amber colour, turn off the heat and immerse the bottom of the saucepan in cold water for a few seconds to stop cooking. The caramel to be used for the glazing must be browned but not burnt, soft and not completely fluid. Then stir continuously to obtain this consistency and if it hardens, heat it in a bain-marie.

Then use a pointed wooden skewer to dip the cream puffs on the surface, leaving only the base part without caramel:

caramelizing cream puffs for Saint Honorè

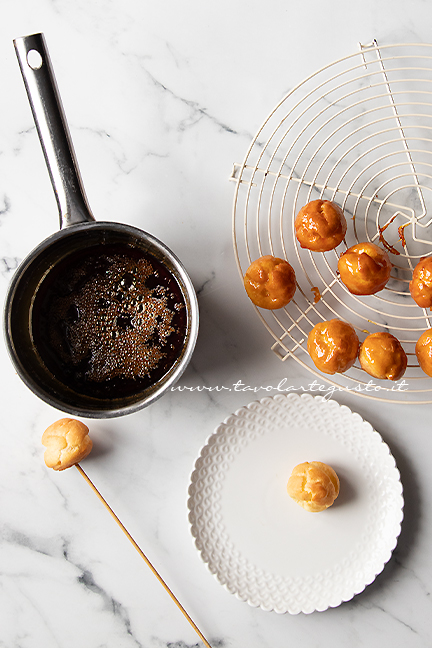
as you make them, place them on a wire rack or on baking paper.

The day before for convenience, also prepare the wetplacing all the ingredients together in a saucepan on the heat, when the sugar melts, remove from the heat and leave at room temperature or in the fridge.

Day 2 of preparation

First of all, take the creams out of the fridge and leave them at room temperature.

Then prepare it Italian meringue to complete the chiboust cream

I advise you to make it directly in the planetary mixer, whipping the egg whites at very low speed with 1 teaspoon of sugar and the pinch of salt which will add flavour.

In a separate saucepan, pour the water with all the sugar and heat over a moderate heat until boiling. The syrup must not caramelize: it will be ready when the sugar has completely dissolved and takes on a transparent color and many bubbles have formed. At that point, immediately pour the boiling syrup over the egg whites without stopping the mixer which in the meantime will still be frothing the egg whites.

Finally, increase the speed and whip the egg whites with the boiling sugar syrup at maximum speed for about 5 minutes, or until the mixture has completely cooled and thickened.

Leave aside to cool completely, meanwhile take the creams and stir them with a hand whisk:

vanilla and chocolate chiboust cream for saint honore cake

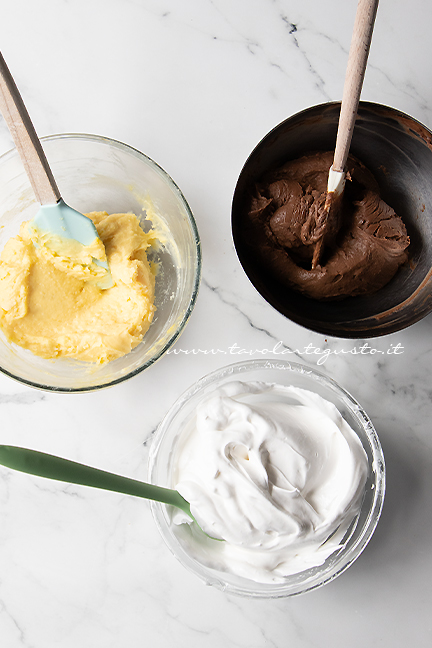
At this point divide the meringue and add it to one cream and half to the other, little by little, always mixing from bottom to top to avoid dismantling the mixture.

Place the two creams directly into 2 disposable piping bags and cut to size an opening of approximately 1 cm.

Assemble the saint honore cake

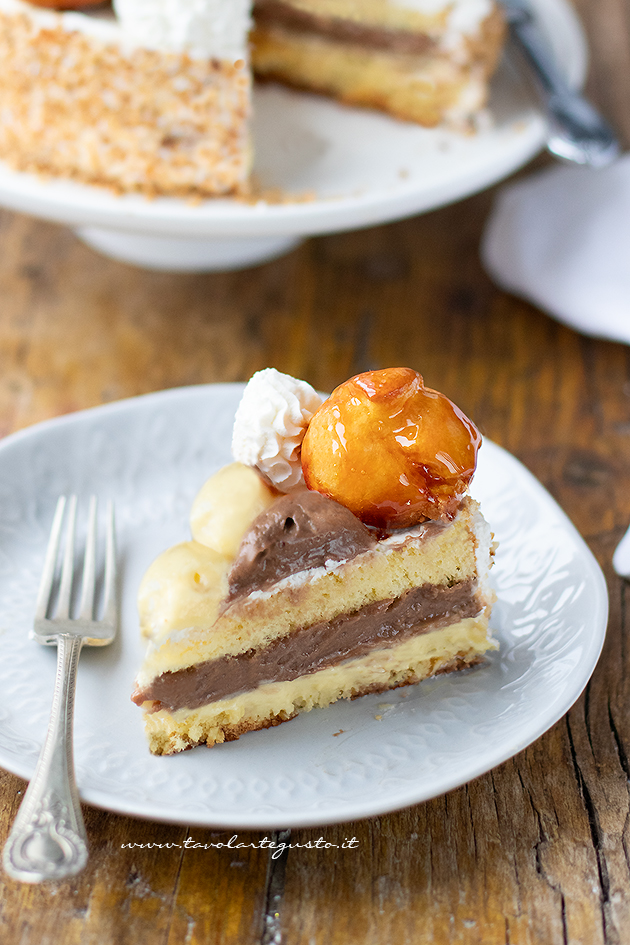
Cut the sponge cake in half to make 2 discs. Leave it in the freezer for 5 minutes to get a perfect cut and use a sharp knife.

Then, place the first disc of sponge cake directly on a serving plate where you will present the dessert.

Finally, wet the surface with the very cold syrup with a brush and add the first layer of vanilla chiboust cream:

assemble the saint honorè cake 1

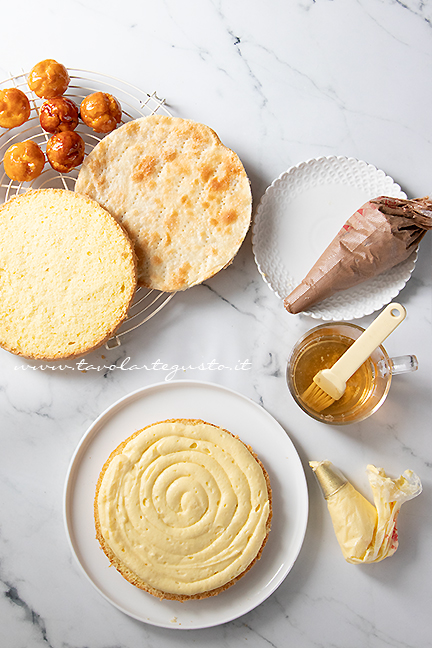
Then, on the cream layer, add the puff pastry disc:

assemble the saint honorè cake 2

Then add the chocolate chiboust cream:

assemble the saint honorè cake 3

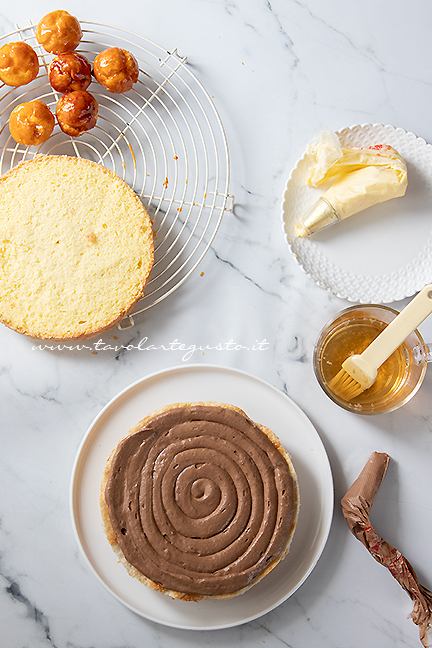
Finally, lay down the last layer of sponge cake and proceed to brush with the syrup.

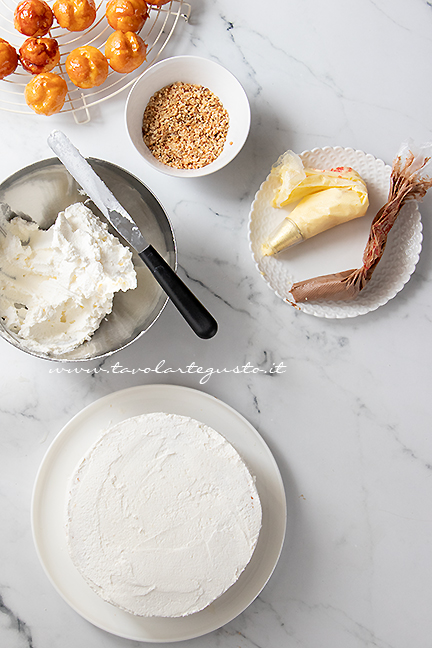
At this point, whip the liquid cream with the icing sugar to make the firm Chantilly. If you want to see step by step photos with useful tips, look at the Chantilly Cream article

Finally, with the help of a spatula, cover the Saint honorè entirely with Chantilly cream, starting first from the sides and then expanding above:

cover the saint honore with chantilly

Decorate the Saint Honore

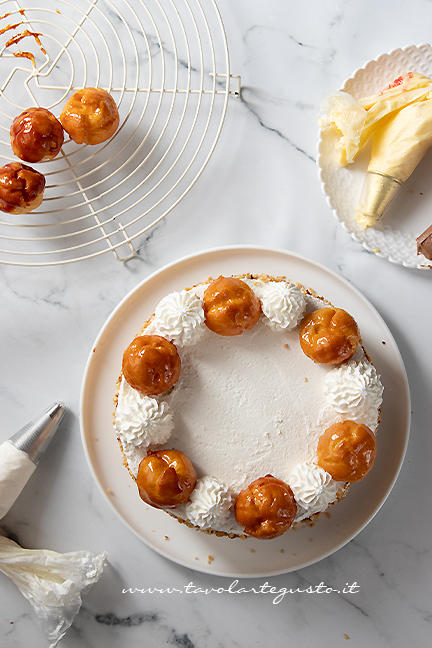
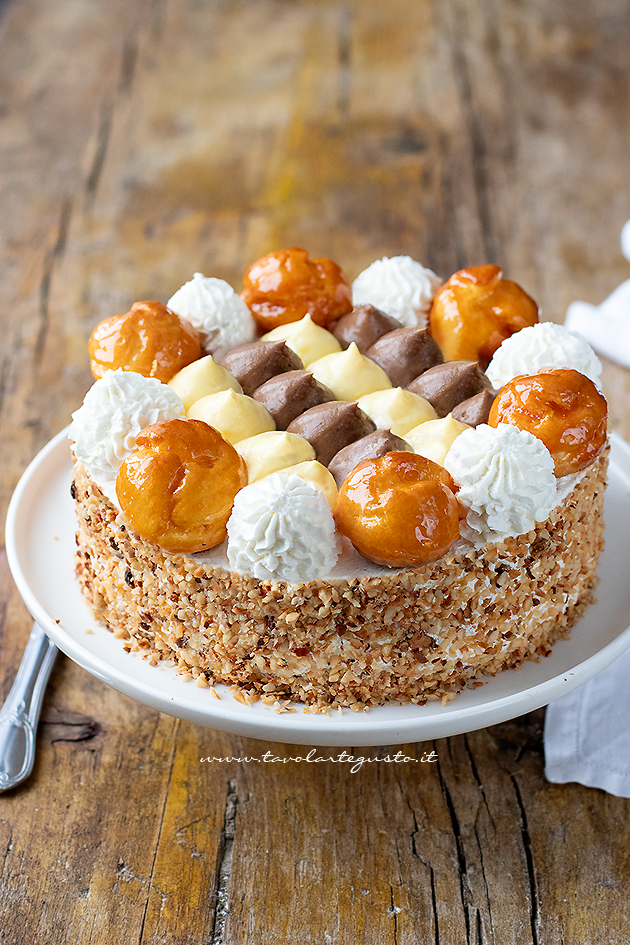
First of all, add the chopped hazelnuts to the edges with the help of a spatula.

Then fill your cream puffs with Chantilly from the base, you can use a piping bag with a very small nozzle.

So first place a crown of cream puffs on the surface of the cake, leaving a space equal to the size of a cream puff between one and the other.

Then add tufts of Chantilly between the cream puffs:

decorate the saint honorè cake

At this point you have to make the final decoration. Always use the same piping bags used previously with a 1cm cut and make a row of vanilla polka dots and the other next to the chocolate.

At this point, place it in the fridge and leave for at least 2 – 3 hours.

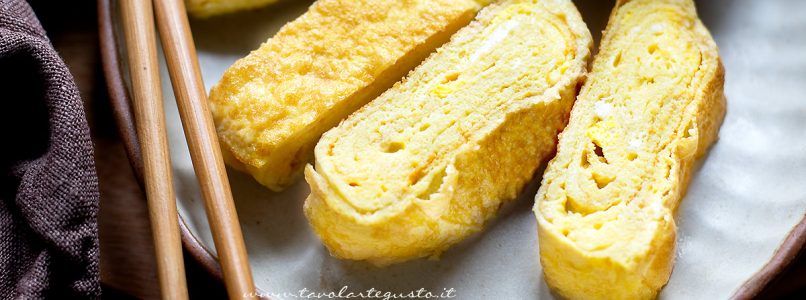
Here’s yours ready St. Honoré cake

St. Honoré cake

This is the slice of Saint Honoré

slice of saint honorè cake

Variations and Tips

If you want a simpler alternative to Saint Honore, which is equally elegant enough to leave everyone speechless, you can opt to make a Paris Brest with choux pastry by filling it with this chiboust cream.

Or a spectacular pyramid of caramelized Croquembouche, which you can fill with very easy Chantilly.

Ultimately I recommend you look at my complete collection of Birthday Cakes. The wonderful is guaranteed!

storage

The Saint Honorè Cake keeps perfectly for 2 days in the fridge. If you want to keep it for several days, you can proceed by freezing the dessert and defrosting it slowly in the fridge.

Spaghetti with mussels, the Neapolitan recipe from Cannavacciuolo. Better than soup, creamy and fabulous – Gordon Ramsay’s version

mussels


mussels

Have you ever thought about preparing pasta with peppered mussels? We did it and the result was truly exquisite. The idea came to us on the occasion of Holy thursday, when mussels become the absolute protagonists. In fact, during the week before Easter it is tradition to prepare mussel soup. So good that we are thinking of using it for season the pasta. It therefore seems like the right time to propose to you a different first course than usual. With this at the table you will surely surprise your guests and taste an excellent first course.

Pasta with peppered mussels

Ingredients

  • spaghetti 400 g
  • mussels 1 kg
  • peppercorns 1 and a half tablespoons
  • garlic 2 cloves
  • parsley 1 bunch
  • salt
  • oil

Preparation

Let’s start cooking pasta with mussel pepper preparing seafood. The first thing to do is remove the byssus. Pull it firmly by holding it between your thumb and forefinger. Now scrape the shells using a steel net and rinse them with running water. Let it brown the garlic cloves together with a drizzle of extra virgin olive oil. Add the mussels and cover with a lid. Turn off the heat when all the mussels are cooked completely open. Leave to cool a little, then remove the mussels and shell them. Filter their sauce and keep it aside.

Put the water for the pasta on the heat. Don’t salt it too much, because the mussel sauce is already there very salty. Chop the pepper using a mortar. Drop the spaghetti. In a pan let it toast the pepper. Add a ladle of pasta cooking water and a ladle of filtered mussel sauce. Cook for a few minutes. Drain the pasta halfway through cooking, to continue it in the pan with the pepper. Also add the mussels. Continue until the spaghetti is ready. There pasta with peppered mussels ready. Serve and complete with another sprinkling of pepper.

mussels

navigate_before

navigate_next

Proudly powered by WordPress

By continuing to use the site, you agree to the use of cookies. Click here to read more information about data collection for ads personalisation

The cookie settings on this website are set to "allow cookies" to give you the best browsing experience possible. If you continue to use this website without changing your cookie settings or you click "Accept" below then you are consenting to this.

Read more about data collection for ads personalisation our in our Cookies Policy page

Close