Tag: Couscous

Recipe and Secrets to make it soft and juicy! – Gordon Ramsay’s version

Roast veal


L'Roast veal it's a second course of meat exquisite, a great classic from the Italian cuisine. It is accomplished with a single piece of veal, first bound to perfection, then done brown in a saucepan where the crust and finally baked in the oven; where yes they release all the flavors and when cooked on average; turns out soft And tender inside, caramelized out! A real one goodness to prepare the Sunday and i holidays, accompanied by the irreplaceable baked potatoes! You want prepare it at home to perfection?

Here is for you Roast Recipe with all Tricks And Secrets illustrated step by step for a result mouth-watering: a Roast veal very soft to the bite and to the cut, gently juicy And not dry! Even cold and the next day!

Roast veal

Like any traditional recipe they exist different versions and many regional variations. Today I give you the Original recipe of Roast veal in the oven. There classic base that my family has always prepared together with the delicious Braised meat and baked Lamb!

It's about a quick preparation which will take you a few minutes before going into the oven. THE secrets for a perfect result I am 3: the first is choice of piece of meat. Trust your trusted butcher, but be prepared on the subject! The codon it is what I prefer because it remains very soft; but there are also walnuts, underside, rump, joist which are very good. If you are not practical, do it to tie. Very important step: the snare retains the juices of the meat! Secondly pay attention to cooking! First of all never cook cold roast veal from fridge; and always practice the browning in the pot so that the crust is created and the piece turn out more juicy. Always remember that i cooking times vary according to weight ; so keep the rule in mind: 1 h and 10 for each kg to get it well done.

In procedure I will show you many other little tricks for an impeccable result! Trust and you will get the Best Roast Veal never made!

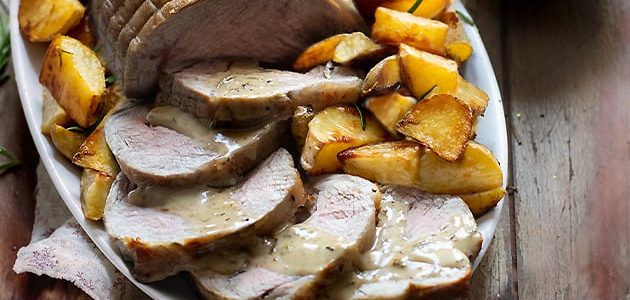
Perfect with any type of side dish, mine, Roast veal with potatoes which I love! But cooked and seasonal vegetables of all kinds are fine! Ideal not only as a main Sunday dish, but also for Special occasions, to add to the Christmas Menu, Easter and other anniversaries!

Discover also:

The stew (veal with potatoes! All the secrets to having it soft and tasty)

Roast Veal Recipe

PREPARATION TIMES

Preparation Cooking Total
10 minutes 50 minutes 1 h

Ingrediants

Quantity for 6 people

For the Roast:

  • 1 single piece of Veal Codon or Walnut, Sottofesa, Rump, Magatello (mine 700 gr)
  • half a glass of dry white wine
  • abundant fresh rosemary
  • 2 tablespoons of extra virgin olive oil
  • 1 tablespoon of butter
  • salt
  • a few ladles of vegetable broth

For the accompanying sauce:

  • roast cooking juices (ie what remains in the pan)
  • 1 tablespoon of cornstarch or potato starch (which you can replace with flour)
  • 1/2 cup of white wine
  • 1 ladle of vegetable broth
  • Rosemary
  • salt

Method

How to make roast veal in the oven

First of all, keep the meat at room temperature 30 minutes before browning.

Then massage it well with the salt, put the rosemary between the food string and the meat.

Then preheat to 200 ° C.

Finally, add the oil and butter to a large saucepan. Heat and melt 1 minute then add the meat and brown it over medium heat, 1 minute on each side, turning it all over with 2 wooden spoons or two stirrers.

how to roast veal

Never prick the meat with a fork otherwise the softness will be compromised!

Finally add half a glass of white wine and let it evaporate over a high flame.

Then transfer the roast to an oven pan that you have previously heated in the oven, transferring all the cooking sauce into it and adding more fresh rosemary:

cook the roast veal in the oven

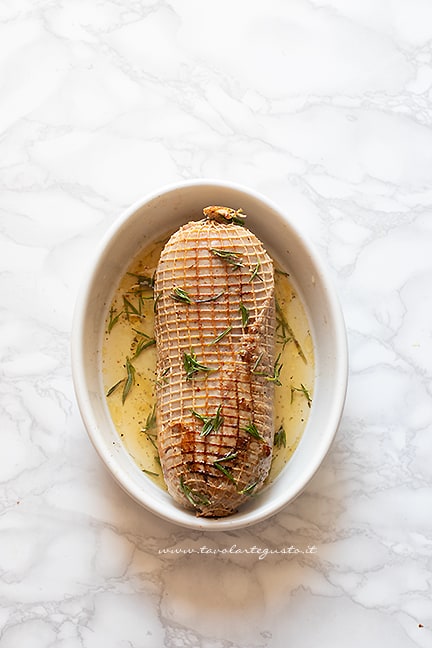
Cooking Roast veal in the oven

Finally, bake in a hot oven at 200 ° for about 50 minutes – 1 hour, taking care to turn the meat about every 20 minutes and sprinkle it with its cooking juices and 2 – 3 tablespoons of boiling vegetable broth.

Pay attention to cooking times. The rule is 1 h 10 for each kg of meat, so always adjust according to the weight of your piece of veal!

If you have a cooking thermometer there core temperature: must be around 68-70 ° C.

Self you don't have a thermometer, use a long toothpick like a skewer, make it reach the heart. I recommend, if the juice that comes out is transparent, without red or pink traces, the roast veal is ready.

But be careful that if you want it less cooked, you can remove it when the liquid comes out pink.

While the roast is cooking, you can proceed to prepare the BAKED POTATOES

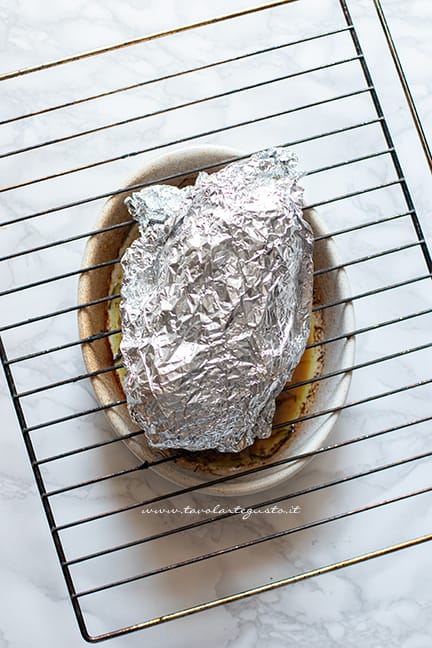
Finally, take the roast out of the oven and cover it entirely with aluminum foil and let it rest for 15 minutes, letting all the remaining cooking juice drain:

leave the roast veal to rest

Take all that is left in the pan with the sauce and rosemary and add it to a saucepan along with 1 tablespoon of cornstarch and the wine. Let it evaporate over low heat for 5 minutes, then add the vegetable broth, pinch of salt, heat over low heat for 2 minutes and finally blend everything with a blender until you get a creamy sauce. If too thick, add a little more broth. Heat it before serving!

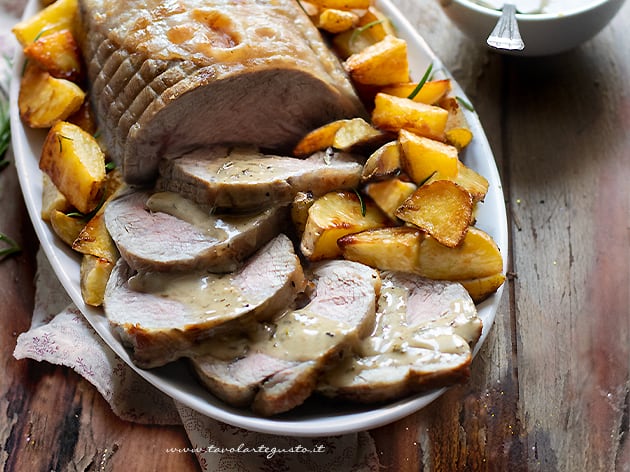
After the indicated time has elapsed, slice the roast veal to a thickness of at least 5 millimeters with a knife with a very sharp and toothless long blade! (I recommend otherwise the meat is shredded)

Serve in a serving dish surrounded by baked potatoes and hot sauce!

Yours is ready Roast veal

Roast veal in the oven

Store the Roast veal

Once cooked, you can keep it sealed in an airtight container for 2 days in the refrigerator.

Finally you can heat it in the microwave and it will return as it was just done

You can also freeze it in single portions already sliced.

.

Recipe and Tips for a perfect result! – Gordon Ramsay’s version

Cookies with cookie shooters


THE Cookies with cookie shooters they are gods treats delicious! Made with a soft whipped shortcrust pastry and malleable ideal to enter the machine cookie shooters; that is to say a gun with many interchangeable dies, which allows you to "shoot" the biscuit directly on the pan and give life; depending on the inserted die, many types of biscuits with different shapes using 1 single dough! Here it is for you Recipe And Advice illustrated with step by step photos to prepare gods Cookies with the perfect cookie cutter! both for the taste exquisite, both in the well defined shape which they keep even after cooking ; both like crumbly consistency that ease of execution!

Cookies with cookie shooters

It is in fact one very quick and easy preparation! is realized in few minutes . The secret for a perfect result not only is in the dough! which should not turn out nor too soft, but not too hard! but in making the pastries directly into the pan! so without baking paper that will stick to the cookie! From this basis you can realize white vanilla dough and the one at cocoa. You can choose whether to leave them simple or decorate them with candied cherries, melted chocolate, marmalade, colored sprinkles, dried fruit ! To you the choice! they are amazing in every way!

Perfect for every moment of the day, from the Breakfast at the snack, perhaps accompanied by a delicious hot chocolate or tea! Given their beauty, i cookies with cookie shooters they are also perfect from packaging and gifting to Christmas , Valentine's Day and more special occasions!

Recipe Cookies with cookie shooters

PREPARATION TIMES

Preparation Cooking Total
30 minutes 12 minutes 32 minutes

Ingrediants

Quantity for about 50 Biscuits

  • 270 g of 00 flour (or to have half white and half chocolate: 135 g of 00 flour white dough – 115 g 100% flour + 20 g unsweetened cocoa powder cocoa dough )
  • 170 gr of soft butter
  • 85 grams of powdered sugar
  • 1 whole egg
  • grated peel of 1 orange
  • grated zest of 1 lemon
  • 1 sachet of vanillin or 1 berry seeds or 1 tablespoon of extract
  • 1 pinch of salt
  • candied cherries
  • sugared almonds of your choice
  • 100 gr of chocolate of your choice for glazing

Method

How to make cookies with a cookie cutter

First of all, whisk the soft butter with sugar, salt, finely grated citrus peel and vanilla with an electric mixer for 2 minutes, until the mixture is soft and fluffy.

Then add the egg and whisk until you get a velvety dough.

Finally add the flour if you want only 1 color.

Otherwise divide the dough in half and into two separate bowls. In one add the flour, in another add the flour + the previously sifted cocoa.

Knead first with the spatula then with your hands. The doughs must be soft and malleable without sticking, if necessary, sprinkle a pinch of flour:

cookie dough with cookie shooters

Then assemble your cookie shooter!

In this case I have chosen the BISCOLT Cookie Shooting Machine

simple to use, in non-toxic aluminum, with 14 dies with original shapes!

Biscolt cookie machine

Depending on the occasion, you can use all the dies you have available or make only 1 – 2 types of biscuits

Then mount the die with the mold of your choice, simply inserting it into the circle that is screwed and unscrewed with a click; keep in mind that you can change the die whenever you want! even if you have the dough in the tool of a different color!

Then separately fill your machine with a sausage of dough:

how to use the cookie cutter

close it again and "shoot" the biscuit directly into the non-stick pan, without using baking paper !!

how to make cookies with a cookie cutter

Once made, you can choose whether to add decorations before baking such as cherries, sugar pralines or dried fruit.

Finally, let it cool in the fridge 15 minutes before cooking to keep it in perfect shape!

Then bake in a hot oven at 180 ° for about 12 minutes in the middle of the oven! they must be clear and not burnished!

Remove from the oven and let them cool. Only when they are very cold, if you like, can you glaze a part of the biscuits with melted chocolate. In the article Shortcrust biscuits and chocolate you will find all the tips for glazing your biscuits.

Yours are ready Cookies with cookie shooters

Cookies with cookie shooters

They keep for about 1 month in biscuits or tin boxes!

In anticipation of the Christmas Gifts you can make the package yourself, following the tutorial with the downloadable PDF in the article DIY Cookie Box

instagram-logo

Prepare the Recipe!
Follow me on Instagram @tavolartegusto and share your creation with the hashtag #tavolartegusto. You will enter my gallery!

WAIT! READ ALSO THESE:


.

Christmas tree with Nutella and puff pastry: the amazing sweet version! – Gordon Ramsay’s version

Christmas tree with Nutella and puff pastry


L'Christmas tree with Nutella it's a Christmas cake greedy and rapid; variant of the salty puff pastry tree! It is realized in 10 minutes with suns 2 ingredients, that is to say: puff pastry And Nutella, which assembled together, give life to one Tree-shaped pastry filled with nutella ; where is it each diner can detach his branch greedy and is immediately party!

Christmas tree with Nutella and puff pastry

For the realization use the rectangular puff pastry, it will be easier to make the shape! for the filling you can use Nutella or any another spread with hazelnuts! The secret for the perfect success is the passage in the freezer for 15 minutes , before carving the branches! I recommend this you will need to have a solid filling that does not come out and of turn the twigs without dirtying everything! In this I have chosen to decorate with many smarties on the surface that simulate just the balls on the Christmas tree! but you can also add nothing, the result will still be amazing!

Together with the classic Panettone, the soft Pandoro, the sweet gingerbreads and the spectacular Christmas cake, theTree with puff pastry and nutella it is perfect to bring to the table like dessert at the end of the meal, parties, parties and Christmas snacks for adults and children! you can realize it well in advance, in the end keep it in the fridge And bake it at the moment!

Discover also:

Christmas sweets (a roundup of traditional and innovative sweets to make for your Christmas holidays!) / P>

Recipe Christmas tree with Nutella

PREPARATION TIMES

Preparation Cooking Total
10 minutes 20 minutes 30 minutes

Ingrediants

Quantity for 8 – 10 people

  • 2 rolls of rectangular puff pastry
  • a few tablespoons of Nutella
  • smarties and sugared almonds (optional)

Method

How to make the Nutella Christmas tree

First of all, make the shape following the step-by-step steps you find in PASTA PASTA TREE

the filling changes but the realization is identical! The only attention is spreading an even and not too double layer of Nutella and please,

before cutting the branches, place the triangle in the freezer for 15 minutes! Then follow again all the indications of the preparation that you find in the link.

Finally, bake in a static oven at 200 ° in the center of the oven, taking care to add a dripping pan on the surface of the oven that acts as a screen and will prevent the tree from burning or swelling excessively! Cook at 200 ° for the first 10 minutes then lower to 180 ° and continue cooking for another 10 minutes!

Then remove from the oven and let cool, if you like, glue the smarties on the branches with melted chocolate or simply with a hint of Nutella.

Yours is ready Christmas tree with Nutella!

Christmas tree with Nutella

It keeps perfectly 2 days at room temperature, even if it is good to consume it during the day to enjoy all its fragrance!

Instead, you can keep it in the fridge ready to cook for 2 – 3 days!

.

Proudly powered by WordPress

By continuing to use the site, you agree to the use of cookies. Click here to read more information about data collection for ads personalisation

The cookie settings on this website are set to "allow cookies" to give you the best browsing experience possible. If you continue to use this website without changing your cookie settings or you click "Accept" below then you are consenting to this.

Read more about data collection for ads personalisation our in our Cookies Policy page

Close